Grid Execution with Selenium
The following browsers have moved their default mode to be W3C standard:
- Chrome - Starting from version 75
- Safari - Starting from version 12
- Edge (Chromium) - Starting from version 77 Tests written in JAVA require Selenium jar version 3.14 and above.
There are two main aspects of running Selenium-based tests in the grid. The first aspect is initiating a test session and the other is running tests in parallel on multiple devices.
Initiating a Test Session
To initiate a test session and run a Selenium-based test on the grid, certain capabilities must be specified in the Desired Capabilities object. The capabilities are:
-
Cloud URL - the URL of the cloud.
In addition, the Selenium test desired capabilities may include more capabilities.
Parallel Execution
If you run a test using the capabilities as they appear above, it will run on one browser only. However, if you run this test on multiple threads, every thread creates a different instance of the test class which in turn initiates another test request. Running tests in parallel require that you understand the concept of multi-threaded execution (either by built-in specific language implementations or using unit testing frameworks). It also requires that your license includes the ability to run tests on multiple nodes. For more information about these two aspects, visit our documentation on the subject.
Setting test report status
There may be cases where the test developer may want to set the test report status manually.
For example,
- If the test fails on the client-side (and not on Selenium Grid side) the test report generated will be with Success status.
- If the test can fail but the test code catches the exception and the test developer would not like this failure to set the report status to Fail.
To set the test report status from the client code, one can use the commands:
driver.executeScript("seetest:client.setReportStatus", <test-status>, <error-message>);
driver.executeScript("seetest:client.setReportStatus", <test-status>, <error-message>, <stacktrace>);
Where test-status is:
- "true" or "passed" for success
- "skipped" for skipped
- everything else for fail
For example,
driver.executeScript("seetest:client.setReportStatus", "Skipped", "This test should skip");
driver.executeScript("seetest:client.setReportStatus", "Failed", "Element text is wrong", "java.lang.Throwable at ClientSideFailureTest.clientSideFailure(ClientSideFailureTest.java:82) at ClientSideFailureTest.test(ClientSideFailureTest.java:76)");
Add a step to test reports with the status
Users can add a step in the report from the client code.
driver.executeScript("seetest:client.report", <message>, <step-status>);
Where test-status is:
- "true" for success
- "false" for fail
For example,
driver.executeScript("seetest:client.report", "This step should passed", "true");
or
driver.executeScript("seetest:client.report", "This step should failed", "false");
Add steps group to the report
Users can add a group of steps in the report.
To begin a steps group, call the following command:
driver.executeScript("seetest:client.startStepsGroup", <group-name>);
To end a steps group, call the following command:
driver.executeScript("seetest:client.stopStepsGroup");
All the steps that appear between 'startStepsGroup' and 'stopStepsGroup' will be part of the group of the steps.
For example,
driver.executeScript("seetest:client.startStepsGroup", <group-name>);
step_1
step_2
...
step_n
driver.executeScript("seetest:client.stopStepsGroup");
Add a step to test reports before every 'it'
When users run more than one 'it' with one Driver, you can set testName for each 'it' in the report:
exports.config = {
...
        onPrepare: function() {
            jasmine.getEnv().addReporter({
                specStarted: async function(result) {
                    await browser.executeScript('seetest:client.startGroup', '+result.description+');
                }
            });
        },

 onComplete: () => {
      browser.executeScript('seetest:client.stopGroup);');
        console.log('onComplete');
    },
...
        specs: ['test.js']
}
Add test property (tag) to report
Users can add a test property (tag) to the report from the client code.
driver.executeScript("seetest:client.addTestProperty", <key>, <value>);
For example,
driver.executeScript("seetest:client.addTestProperty", "key", "value");
Download a file to your client computer in a grid session
Users can download a file from the Selenium Agent machine to the local machine in the grid session.
File size up to 50MB.
For example,
byte[] content = null;
Object res = driver.executeScript("seetest:client.getFile", "<SELENIUM_AGENT_FILE_NAME>");
content = Base64.getDecoder().decode((String) res);
FileUtils.writeByteArrayToFile(new File("<CLIENTS_FILE_PATH>"), content);
List all your session's files in a grid session (Chrome only)
Users can list all the files that their session downloaded in the grid session.
The returned type is List<String>.
For example,
List<String> files = (List<String>) driver.executeScript("seetest:client.getFileList");
System.out.println("list: " + files);
Running with custom Firefox profile
Mostly used for client certificates.
Firefox saves client certificates in the profile but Selenium uses a temporary profile. To pass this issue we need to add a capability that will make Selenium run with our custom profile.
First, we need to make a profile and load our certificate on it:
- Launch Firefox and click the menu icon found in the upper-right corner of the browser. After that, click the Preferences icon.
- Go to the Certificates tab and then click the View Certificates button.
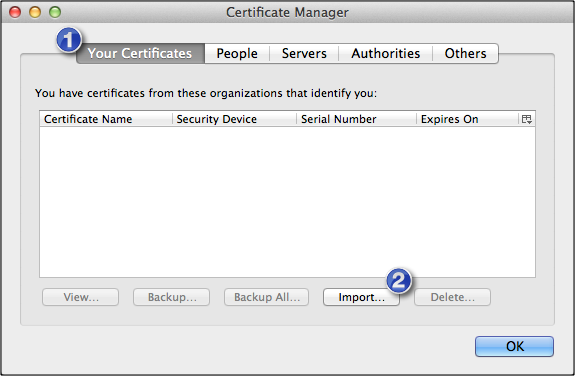
- The previous step should have launched the Firefox Certificate Manager. Click the Your Certificates tab and then click the Import button.

- The previous step should launch a browser that you can use to navigate to the directory where your client certificate file (usually a PKCS12 file with the .p12 or .pfx extension) is stored. Select the file and enter the required password. If you succeed, you should see a notification that says "Successfully restored your security certificate(s) and private key(s)." (or something to that effect). Click OK to proceed.

- You should then see your newly imported certificate under the Your Certificates collection of your Firefox Certificate Manager.
Now our custom profile is done.
To use it with selenium we need to take only the files named cert9.db and key4.db and pack them in a zip file (You can zip the entire profile and not just the certificate part, but it is not recommended):

Now all that is left is to add the profile to the desired capabilities.
File file = new File("<PATH_TO_PROFILE_ZIP_FILE>");
String firefoxProfile = "";
try {
	firefoxProfile = Base64.getEncoder().encodeToString(FileUtils.readFileToByteArray(file));
} catch (IOException e) {
	e.printStackTrace();
}
dc.setCapability(FirefoxDriver.PROFILE, firefoxProfile);
We will get a driver with the custom profile we supplied.