Work with Your Documents
Here's a list of noteworthy features to the Documents List page.
What Is a Document in TeamForge?
For TeamForge purposes, a document is any file that you track with a document artifact.
Any project involves some number of documents that must be written, edited, reviewed, and published. You can use a document artifact to standardize and track the work you do with documents. TeamForge automatically maintains the version history of each document, including the person who posted each version, its status, and any version comments.
If you are the author, use the Review feature to track the process of getting feedback on your document. You can also associate documents with tasks, code commits, or other artifacts to ensure visibility.
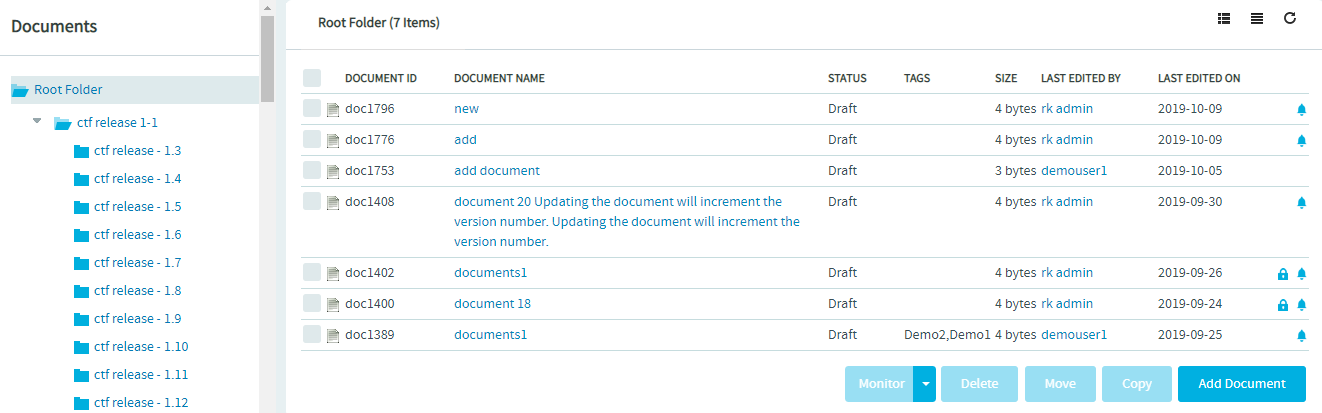
The Left Navigation Pane
A new left navigation pane lets you quickly access your documents. The left navigation pane consists of the following menus.
- All Folders—A drop-down menu that shows the document folder tree. Clicking the ALL Folders menu, by default, lists the documents in the Root Folder. However, you can select any other folder from the drop-down menu to view the documents of that specific folder. The folder you last selected is persisted throughout the session to let you start from the same folder when you later visit the Documents List page.
- Recent—Lists the recently viewed/added documents.
- Favorites—Lists the favorite documents and document folders.

- Tags—A Tag Cloud, which is a group of tags added to the left navigation pane of the Documents List page. You can filter documents by tags.
Concatenation of the Document Name and ID
Document name and ID are concatenated to better identify documents in the new Documents List page. The Name column shows the concatenated document name and ID. While document IDs are linkified, document names are plain text.
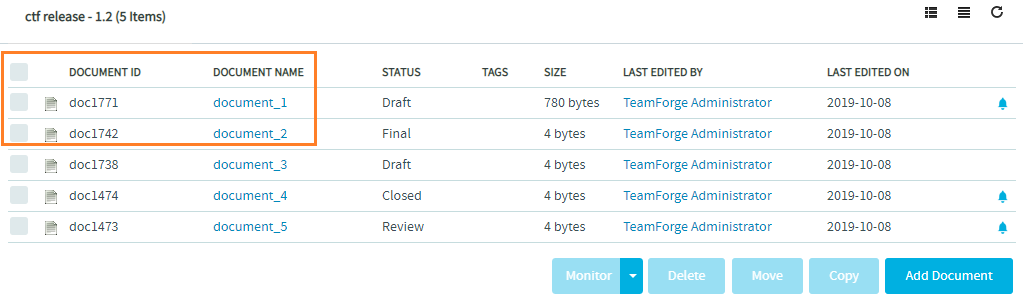

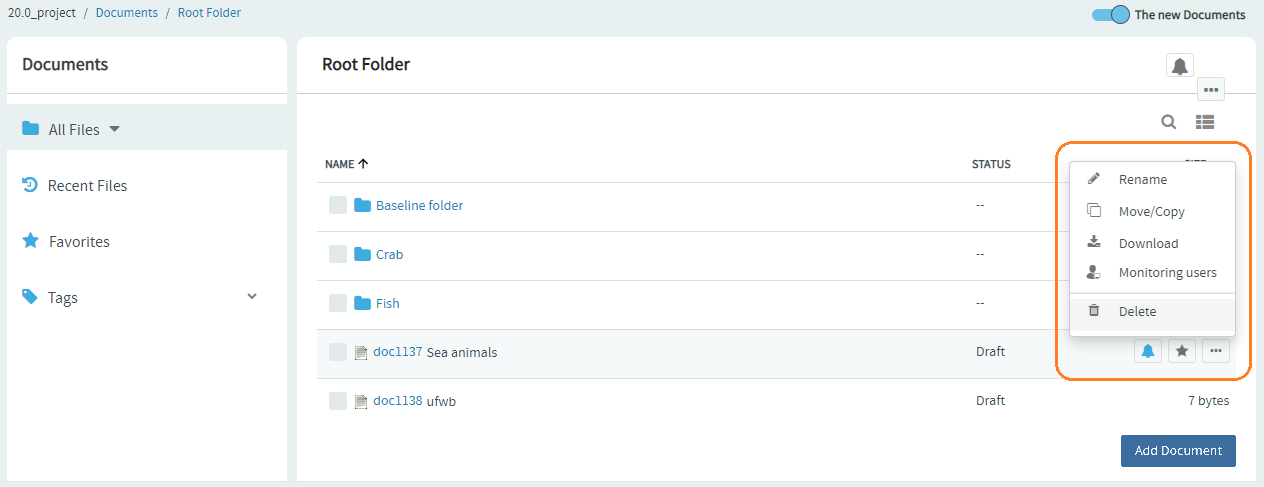
Action Buttons Replaced by Action Icons
The action buttons for performing operations such as monitoring, moving, and copying documents are replaced by action icons in the enhanced Documents List page.
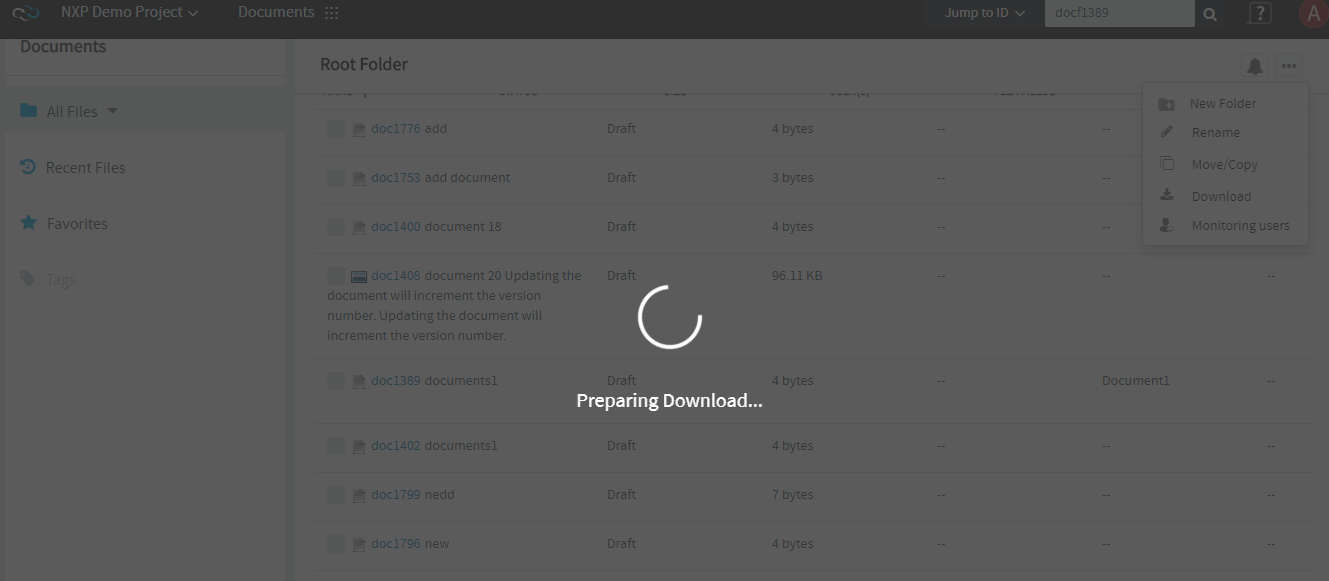
The bell icon represents the monitoring feature and the more (...) icon lists additional actions such as New Folder, Rename, Move/Copy, Download, and Monitoring Users.

Documents List Page Shows Both Folders and Files
Unlike the old Documents List page that shows only documents when you select a folder, the new Documents List page lists both folders and files (documents) when you select a folder from the left navigation pane.

Create a Document
You can create a document by uploading a file or entering the text directly into TeamForge. TeamForge automatically detects the file extension for many common file types.
To create a document, you must have the Document Admin permission, or Create/View permission for document folders or documents.
Starting with release 17.11, TeamForge is configured to send HTML emails to users assigned to and users monitoring the document you create. For more information, see HTML Emails for Documents.
You can now unmonitor documents by clicking Unmonitor the Document in the emails you receive when you create documents. For more information, see Unmonitor Documents via HTML Emails.
-
From the Project Home menu, select Documents.
-
Using the document tree, find the folder where you want to create the document, and select Add Document.
You can create a document in the root document folder or any other folder.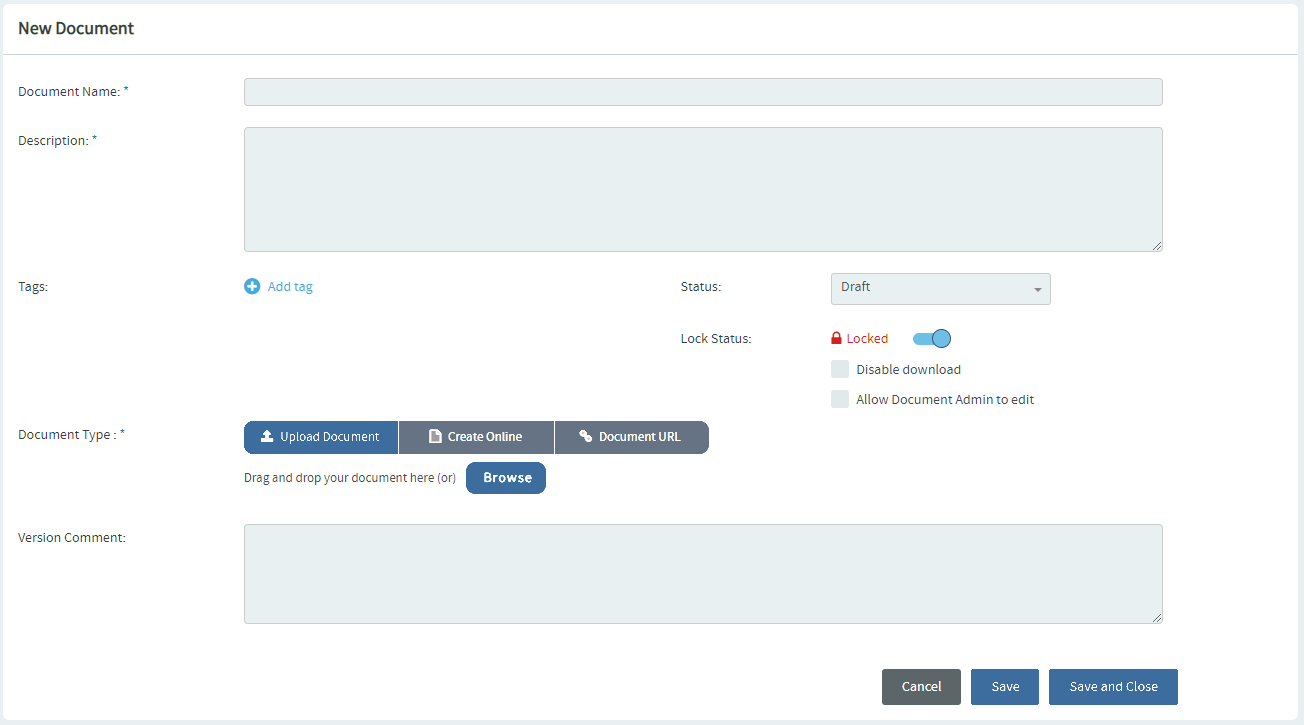
-
On the Create Document page, enter a name and description for the document.
-
Tag the document (Optional) .
Select one or more tags from the Tags drop-down list. Your Project Administrator must have set up tags before you can add them. For more information, see Set Up Tags.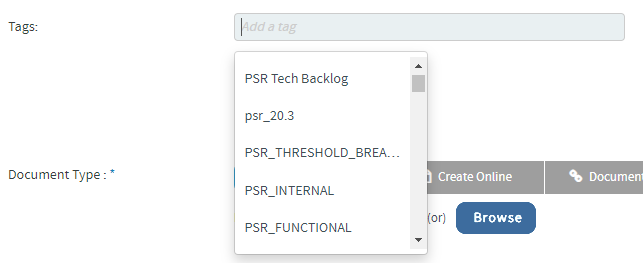
If you have Create/Edit permissions, you can also create new tags:
- Select Add Tag.
- Enter a new tag title.
- Select Create a New Tag.

-
Identify the status of the document:
- Draft – The document is not yet complete.
- Final – The document is finished.
-
(Optional) Configure lock status to control editing and downloading:
- To lock or unlock a document for editing, toggle Lock Status.
- To lock a document for downloads, select Disable Download. The download lock prevents users from downloading the document. You must lock a document before disabling downloads.
- To allow the Document Admin to edit the document, select Allow Document Admin to Edit.
noteDocument Admins can edit documents created by deleted users, even if Allow Document Admin to Edit is not selected.
tip Documents you create are not locked by default. You must enable Lock Status to disable downloads.
You must have Document Edit permission to lock or unlock documents. -
Select the document creation method:
- Upload Document – Upload a file by browsing or dragging and dropping.
- Create Online – Enter the content directly in the editor.
- Document URL – Provide a URL for the document.
noteYou cannot prevent others from editing or downloading a document if you choose the URL option.
-
(Optional) Enter a Version Comment.
-
Save the document:
- Select Save to save and return to the document list.
- Select Save and Close to save and view the document details.
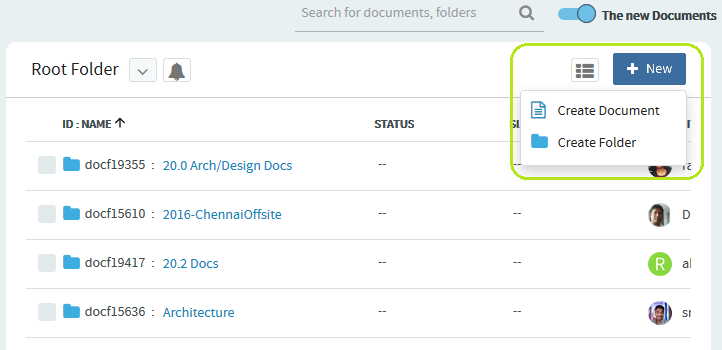
Create New Documents and Document Folders
-
Browse and select a folder from the left pane where you want to have a new document or document folder created.
-
Click New and select Create Document or Create Folder for creating a new document or a new folder respectively.
-
If you are creating a new folder, type a name for the folder and click Save. To create a new document, see Create a Document.
Monitor and Unmonitor Document Folders and Documents
To monitor a document folder that you want, select the document folder from the left navigation pane and click the monitor icon (the grey bell icon ![]() ) from the list view.
) from the list view.
The bell icon's color toggles between blue and grey when a folder is monitored and unmonitored respectively.
To unmonitor this document folder, click the monitor icon (the blue bell icon ![]() ).
).

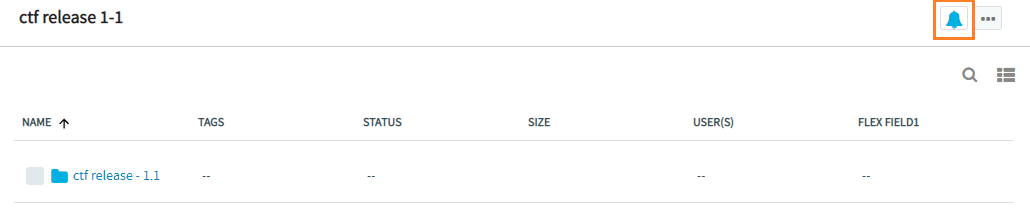
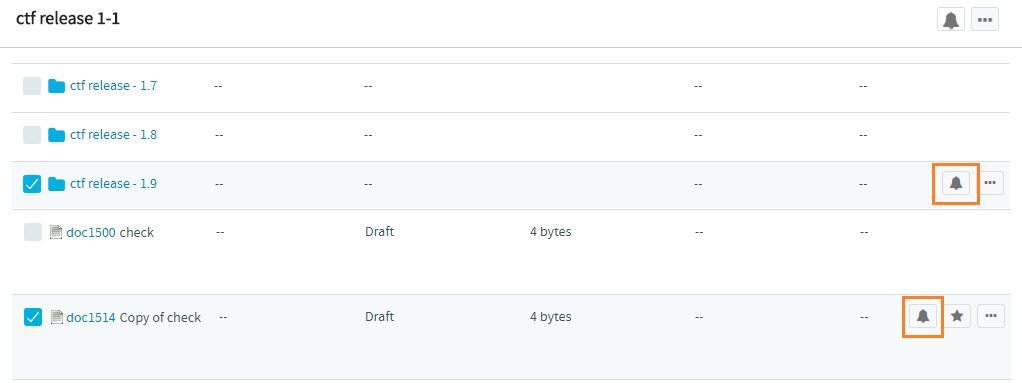
In general, to monitor or unmonitor a document folder or document, select the required folder or the document from the list and click the monitor bell icon.
The monitor bell icon can be found with individual document folders and files so that you can choose to monitor or unmonitor document folders and files contextually.
Add a New Subfolder to a Document Folder
To add a new subfolder to a document folder:
- Select a document folder from the All Files left navigation menu or from the list view.
- Click the more icon (
 ).
). - Select the New Folder option.

- Type a folder name and click Save.
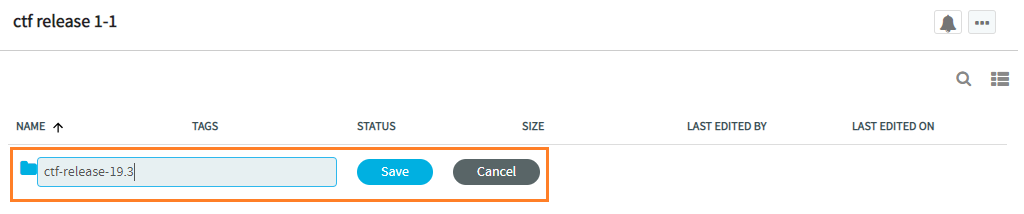 The new subfolder gets created and added to the list successfully.

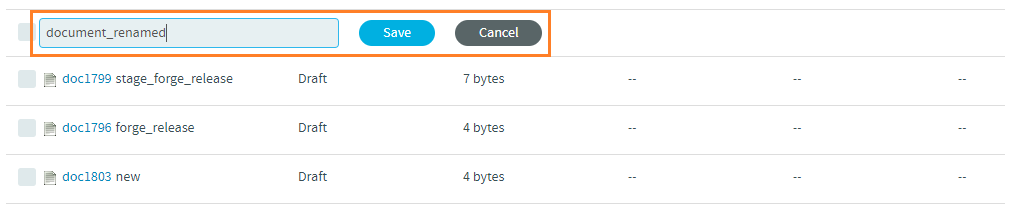
Rename Document Folders and Documents
To rename a document folder or a document:
- Select the folder or document.
- Click the more icon ().
- Select Rename.

- Type a new name and click Save or press Enter.
 note
noteYou can rename a document either using the "Rename" option or by editing the document.
Move or Copy Documents and Document Folders
While you can move or copy documents to folders both within and across projects, you cannot move document folders from one project to another.
Copy a Document
If a given document belongs logically to two or more document folders, keeping a copy in each folder can help users locate it.
Copying a document can also be useful if you want to use an existing document as a template for creating a new document. When making a copy of a document, reference to the source document is maintained in the document title and the Associations tab.
Each copy must be maintained separately. Changes made to one copy are not propagated to other copies.
- Click the more icon () of the document that you want to copy.
- Select Copy from the menu.

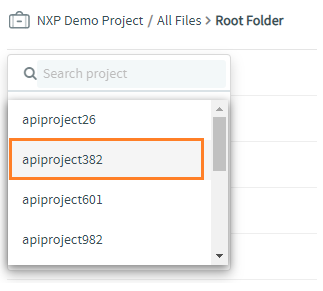
The Copy Files dialog box appears. - Select the project from the Select Project drop-down list and select the document folder where you want to copy the selected document.
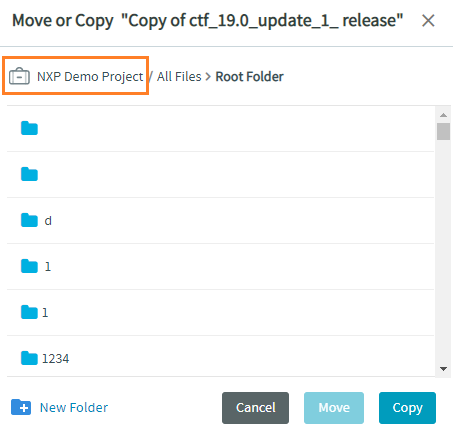
- Click Copy.
The document copy is now placed in the selected folder, with the name format Copy of Source Document Name. The reference to the source document is also maintained in the Associations section of the Document Details page.
Move a Document
You can move a document to another folder within the project or to a folder in another project at any time. This allows you to reorganize documents as needed.
You can move one or more documents in the same operation. You cannot move a document while it has an open review.
To move a document between projects, you must have document administration permission in both the source and destination projects.
- Click the more icon () of the document that you want to move.
- Select Move from the menu.
The Move Files dialog box appears. - Select the project from the Select Project drop-down list and select the document folder where you want to move the selected document.
- Click Move.
The document is now moved to the selected folder.
Move or Copy Multiple Documents
To move or copy multiple documents at once:
- Select the list of documents you want to move or copy from the list view.
- Select Move/Copy from the top-level menu.
The Move/Copy dialog box appears. - Repeat steps 3 and 4 from the single-document procedure to move or copy the selected documents.
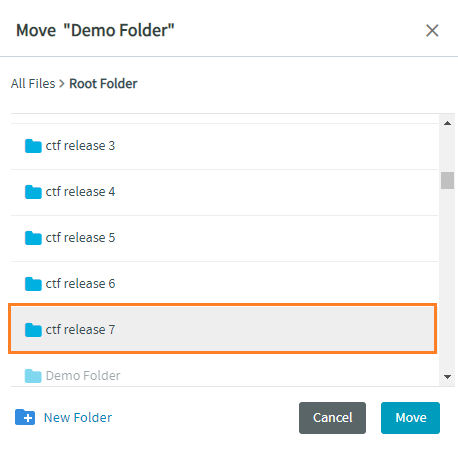
Move a Single Document Folder
To move a single document folder to another document folder in the same project:
-
Select the document folder from the Documents List page.
-
Select Move/Copy from the more icon (
) of the document folder.
The Move dialog box appears. By default, the Root Folder is selected. -
Select a folder from the tree view where you want to move the selected document.
noteTo create a new folder, click the New Folder link.
-
Click Move.
Move Multiple Document Folders
To move multiple document folders to another document folder in the same project:
- Select the document folders from the list view and select Move/Copy from the more icon () at the top of the Documents List page.
- Repeat steps 3 and 4 from the single-folder procedure to move the selected folders.
Delete a Document
If you no longer need a document, you can delete it. Deleting a document removes all its versions, details, and review history.
To delete documents, you must have the delete permission (Delete/View) for document folders or documents. This is required even if you have the Document Admin permission.
- Select the document you want to delete from the Documents List page.
- Click Delete.
- Confirm the deletion.
The document is deleted.
Also see: Hard-links Between Baselines and Configuration Items
Delete Document Versions
Document versions can accumulate over time. You may choose to delete one or more versions of a document if you no longer need them. This helps save disk space and reduces maintenance overhead.
You can delete a document version only if:
- You have the delete permission (Delete/View) for documents.
- The document has more than one version available.
- The selected version is not marked as active.
- The selected version is not part of a baselined document. (Versions added after the document is baselined can be deleted, provided they are not active.)
Deleting a document version permanently removes the version and cannot be undone. Exercise caution when deleting document versions.
- Select the document from the Documents List page.
- Click the document name to see its versions.
- From the Versions tab, select one or more versions you want to delete.
- Click Delete. A confirmation message is displayed.
- Click OK to confirm deletion.
The selected document versions are deleted.
Download Documents and Document Folders
To download the top-level document folder, any subfolders, and documents on the Documents List page, click the more icon (![]() ) of the document folder or document and select Download from the menu.
) of the document folder or document and select Download from the menu.

The document folders are downloaded as TAR files. Spaces, if any, in the document folder name, are encoded with an underscore. For example, a document folder named teamforge release 19.3, when downloaded, becomes "teamforge_release_19.3".
When a document is downloaded, only the active version of the document is downloaded. The downloaded file name is in the format "<document_id>-<active document version>". For instance, for a document with the id "doc1796" and with two versions "Version 1" and "Version 2", of which "Version 1" is the active version, then the name of the downloaded document reads "doc1796-Version1".
You can download multiple documents and folders or both. In this case, the downloaded TAR file name reads as TeamForge["<UUID>"] where UUID is the unique id.
To download multiple documents, multiple document folders, or a combination of both document folders and documents:
-
Select the required documents and/or document folders.
-
Click the more icon
at the top of the Documents List page. -
Click Download.
You can restrict downloads by both the file size and number. For more information, see the documentation for these site-options.conf tokens:
You can also track your downloads with the download progress indicator.
Users Monitoring Document Folders and Documents
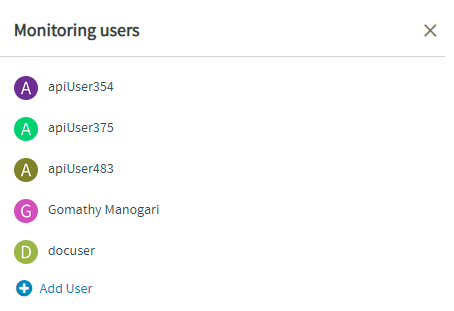
You can view the list of users monitoring a document folder or a document from the redesigned documents list page. While viewing the monitoring users, you can more users to the monitoring users list as well.
To view the list of users monitoring a document:
-
Go to Project Home > Documents page.
-
Click the The New Documents toggle button to go to the redesigned Documents List page.
-
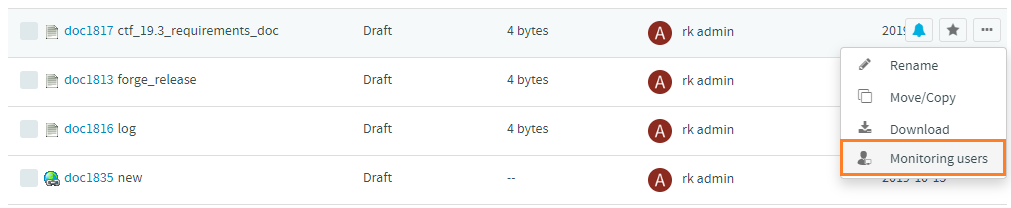
Click the more icon (
) against the required document folder or document. -
Select the Monitoring users option.
noteIf you want to monitor the top-level or the root folder, use the more (...) icon next to the bell icon on top of the documents list page.
-
Click Add User to add more users to the list.
-
Click the close button on the Monitoring users dialog.
The users now monitor the document or document folder.
If you're a site administrator or a document administrator, you can delete a user from the monitoring users list.
Click the delete icon against the user name that you want to delete from the list of monitoring users.
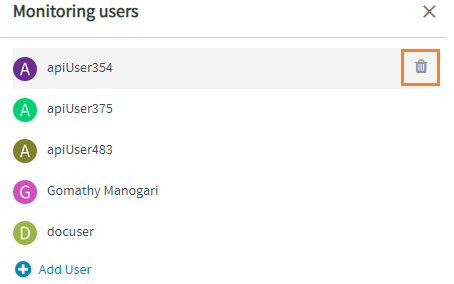
Now the user no longer monitors the document or document folder.
Mark Documents and Document Folders as Favorites
You can star documents and document folders as favorites on the Documents List page. The documents and folders marked as favorites are added to the list of favorite documents and document folders.
To mark documents or document folders as favorites:
-
Select Project Home > Documents.
-
Hover your mouse over a document or a document folder on the Documents List page and click the star icon
 to mark it a favorite.
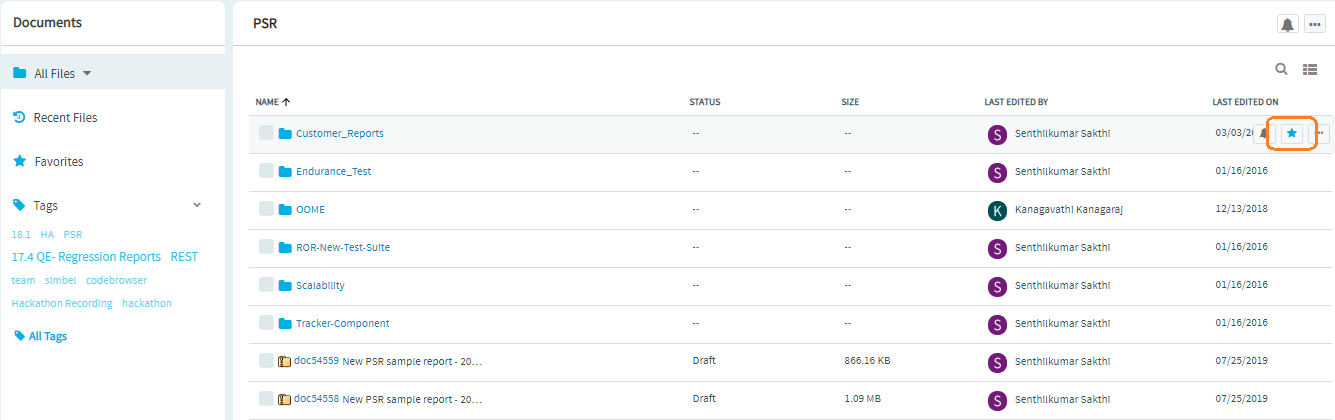
-
To mark multiple documents and document folders as favorites, select the documents and document folders and click the star icon at the top of the Document List page.
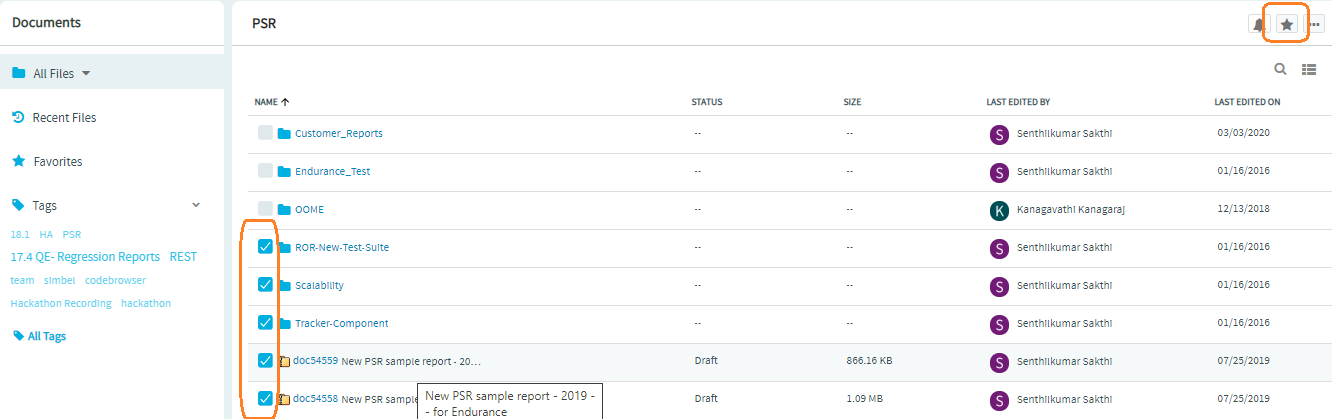
Favorite documents and folders have a star showing up next to their names. Also, the grey star icon changes to blue star icon.

-
Select the Favorites left navigation menu to view the list of favorite documents and folders.

Lazy-loading of Document Folders and Documents
Unlike the old Documents List page, the new page supports lazy-loading of documents and document folder as you scroll down the page.
This optimizes the performance by not loading a large number of documents and document folders right away while keeping you waiting to do things.
Known Issue: As long as the contents of a document folder with a large number of documents/sub folders are being loaded, you cannot perform any other action on the new Documents List page.
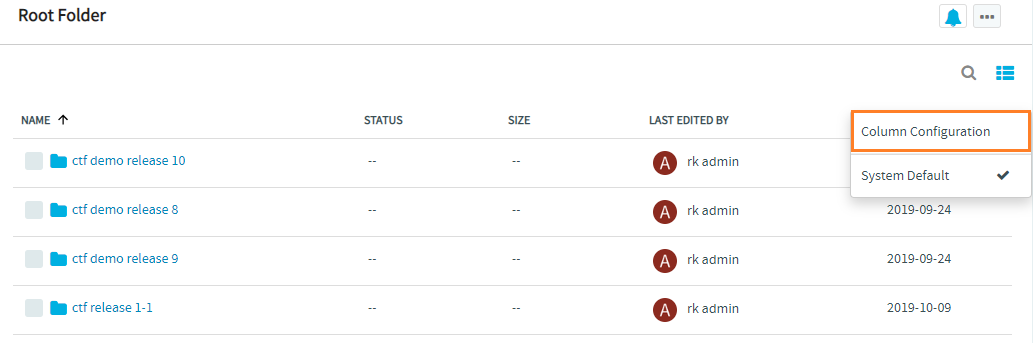
Configure Default Document Columns
The Column Configuration feature for Documents has been enhanced in the redesigned documents list page.
To configure the document columns:
-
Go to Project Home > Documents page.
-
Click the The New Documents toggle button to go to the redesigned Documents List page.
-
Click the Column Configuration icon (
 ) on this page.
 -
Select the Column Configuration option.
-
Select the required user-defined (flex) field from the All fields list.
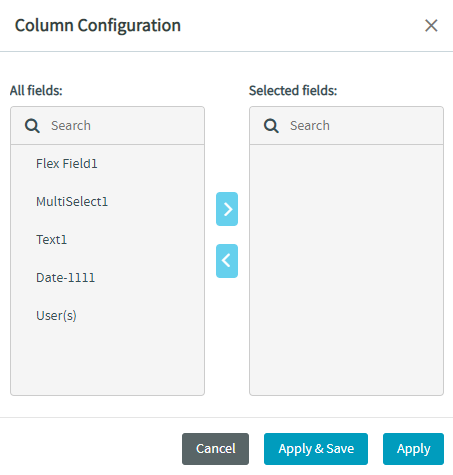
-
Click the
>button to move the selected field to Selected fields list. -
Repeat the steps 5 and 6 to add more fields to the list of selected fields.
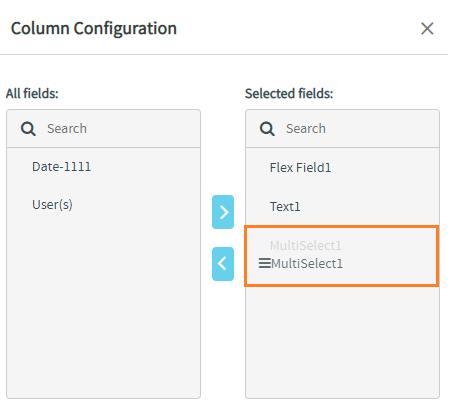
You can change the order of the fields added to the Selected fields list. To reorder the fields, click and drag the required field and drop it up or down any other field in the list.
For instance, if you want to place the second item "MultiSelect1" field as the third item in the list, just click, drag, and drop it after the "Text1" field, which is the third item currently.
-
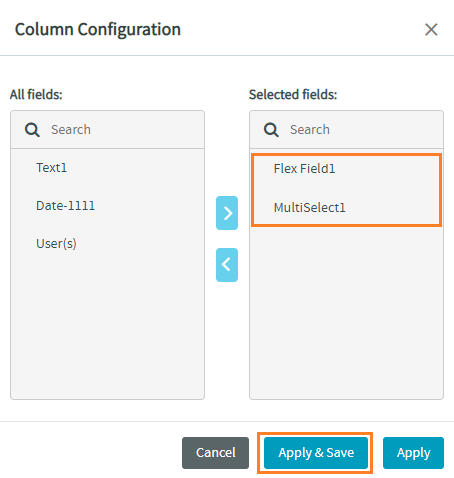
Click Apply & Save to save the settings before it is applied on the documents list page.
noteClick Apply to just apply the defined column configuration without saving it. However, if you do any other action on the page.
-
Enter a name for the configuration.

-
Select the Make it Default checkbox to set this as the default configuration.
-
Click Save.
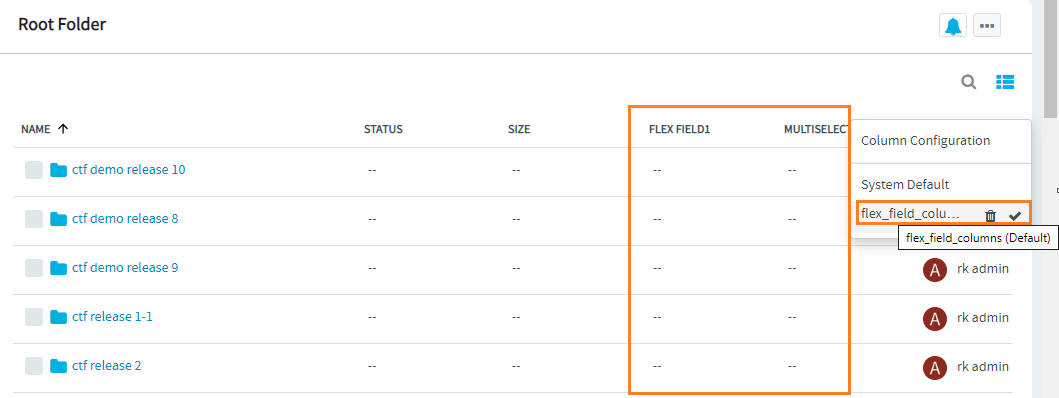
The saved configuration is listed under the Column Configuration and is applied successfully on the documents list page.
Save an Applied Column Configuration
You can saved a defined configuration of document columns after applying it.
To apply and then save a column configuration:
-
Click the Column Configuration icon (
) on the documents list page. -
Select the Column Configuration option.
-
Select the required user-defined (flex) field from the All fields list.
-
Click the
>button to move the selected field to Selected fields list. -
Repeat the steps 5 and 6 to add more fields to the list of selected fields.
You can change the order of the fields added to the Selected fields list. To reorder the fields, click and drag the required field and drop it up or down any other field in the list.
For instance, if you want to place the second item "MultiSelect1" field as the third item in the list, just click, drag, and drop it after the "Text1" field, which is the third item currently.
-
Click Apply.
-
After the configuration is applied, repeat steps 1 and 2 to open the Column Configuration dialog.
-
Click Apply & Save.
-
Enter a name for the configuration.
-
Select the Make it Default checkbox to set this as the default configuration.
-
Click Save.
The saved configuration is shown on the documents list page.
Delete a Column Configuration
You can delete a saved column configuration, if required.
To delete a column configuration:
-
Click the Column Configuration icon (
) on the documents list page. -
Hover your mouse on the user-defined column configuration name for the delete icon to show up.
-
Click the delete icon.

-
Click Confirm to delete the configuration.

The selected column configuration is deleted successfully.
Document Details Page
Each document has a details page with these sections:
- Document Details: View details about the document such as the name, description, file type, and size.
- Status: View the document status, including whether it is locked for editing.
- Created By: Identify and contact the author of each document version.
- Version Comment: Explanation of changes from one version of the document to another.
- Monitor: Begin or stop monitoring the document.
- Versions: View the version history of the document.View the version history of the document.
- Change Log: View the change log of a selected document.
- Associations: View any items associated with the document.
- Review: Initiate the review of the document.
- Baselines: Lists the baselines associated with the document.
View Baselines from the Document Details page
Use the Baselines tab to see baselines that include this document. The tab is visible to users with a baseline license and document view permission.
Associate a Document with Other Items
You can associate a document with other Digital.ai TeamForge items such as tasks, tracker artifacts, file releases, or news items. Associations define relationships, track dependencies, and help enforce workflow rules.
Some common use cases for document associations include:
- Associating a requirements document with supporting feature requests or bugs in the tracker.
- Associating a document or a document review with the task that requires it as a deliverable.
- Associating a master document such as a product plan with supporting documents such as a test plan or beta plan.
- Associating a product announcement document with a file release.
Create an Association
-
From the Project Home menu, click Documents.
-
In the document tree, locate the folder that contains the document you want to associate. Select the document by checking the box, and then click Details.
-
On the Document Details page, select the Associations tab.
-
Click Add.
-
In the Add Association Wizard, select the items to associate with the document:
-
Enter Item ID — If you know the item's ID, you can enter it directly.
noteTo associate an object in an integration application from within TeamForge, use the
[<prefix_objectid>]format. Successful associations appear as hyperlinks.Each integrated application displays its prefix when you hover the mouse over the application name in the toolbar.
-
Add from Recently Viewed — Select from the last ten items you viewed in this session.
-
Add from Recently Edited — Select from the last ten items you changed.
-
-
Click Next.
-
(Optional) Enter a comment in the Association Comment box.
-
Save your work:
- Click Finish and Add Another to create more associations.
- Click Finish to return to the Details page.
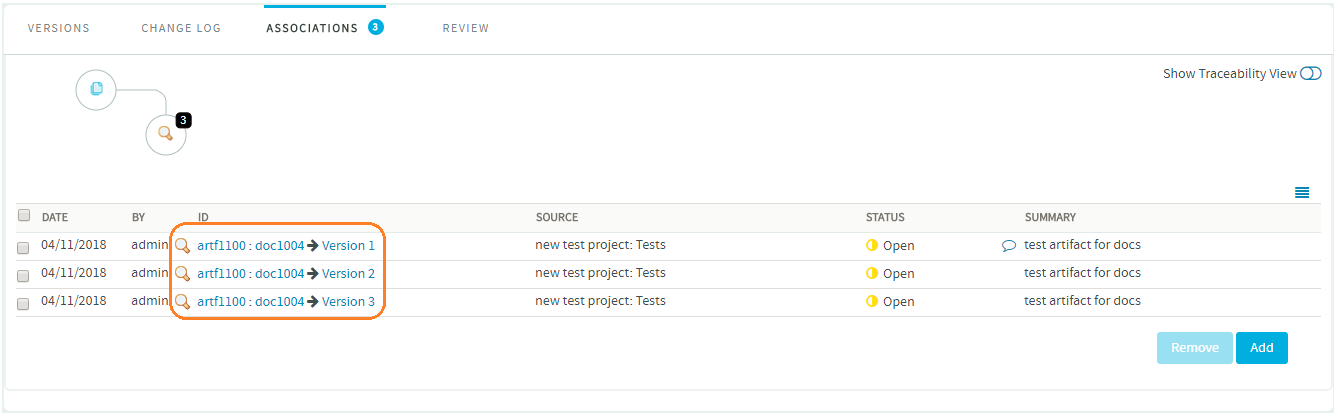
View Associations
-
On the Associations tab, you can view a graphical representation of all associated items.
-
Use the Association Viewer to switch between:
- List view — Shows associations in a table.
- Trace view — Displays layers of associations (including parent/child dependencies) in a timeline format.
You can scroll across the Trace view by dragging the mouse, or use the Previous and Next arrows to move through events on the timeline.
While the Associations tab shows the total number of associations, only the most recent 500 associations are listed. To see older associations, browse through the Association Viewer.
You can also click nodes in the graphical viewer to filter the associations shown in the table. For example, if the selected node has two associations, only those two items are displayed in the table.
Permissions
- Project members with the Document Admin permission can copy and move documents, and create and administer them.
- To delete documents, users must also have the Delete permission.
Edit a Document
When you are asked to help develop a document, you can edit it online or by posting a new version.
To edit a document that is locked for editing, you must have the Document Edit permission. To download a document that is locked for downloading, you must have the Document View permission. A Document Administrator with Allow Document Admin to Edit enabled in the Lock Document section, or a Site Administrator, can also remove edit and download locks.
If the Enable Document Admin to Edit option is disabled in documents created by deleted users, Document Administrators can still unlock and edit those documents.
Update a Document
You can update a document by uploading a new version or by changing its name, description, or lock status.
You can also update a document in TeamForge directly from Microsoft Word, Excel, Project, or PowerPoint.
Starting with release 17.11, TeamForge is configured to send HTML emails to users assigned to and monitoring the document you update. For more information, see HTML Emails for Documents.
You can now unmonitor documents by clicking Unmonitor the Document in the emails you receive when you update documents. For more information, see Unmonitor Documents via HTML Emails.
-
From the Project Home menu, select Documents.
-
In the document tree, find the folder that contains the document you want to edit.
-
Select the document by clicking its name.
-
On the Document Details page, select Edit/Update.
You can see this button at the top-right corner only if you have Document Edit permission. -
On the Edit Document page, make your changes:
- Update the name or description.
- Change the status value, if needed.
- To set locks, select the appropriate check boxes in the Lock Document section.
- Update a binary document by selecting Upload From File, then browsing for the updated file.
- Update a text document by selecting Create Online, then editing the document text.
-
(Optional) Enter a version comment to describe your changes.
-
Select Save.
The document is now updated.
Change the Active Document Version
You can specify which version of a document is the active version at any time.
TeamForge stores every document version that you or other users post.
- When you open a document from the document list, you open the active version.
- When you open the Document Details page, the information you see is about the active version.
The Versions section of the Document Details page lists all document versions and indicates which one is active. By default, the most recently posted version is active.
-
From the Project Home menu, select Documents.
-
In the document tree, find the folder that contains the document.
-
Select the document by clicking its name.
tipOn the Document Details page, in the Versions section, the active document is indicated with a checkmark in the Active column.
-
Select the version you want to make active, and then select Mark as Active.
The selected version is now the active version.
Starting with release 18.1, you can also associate TeamForge objects—such as artifacts and documents—with a specific document version.
On the Versions tab in the Document Details page:
- Select the desired version.
- Select Associate to link it with a TeamForge object.
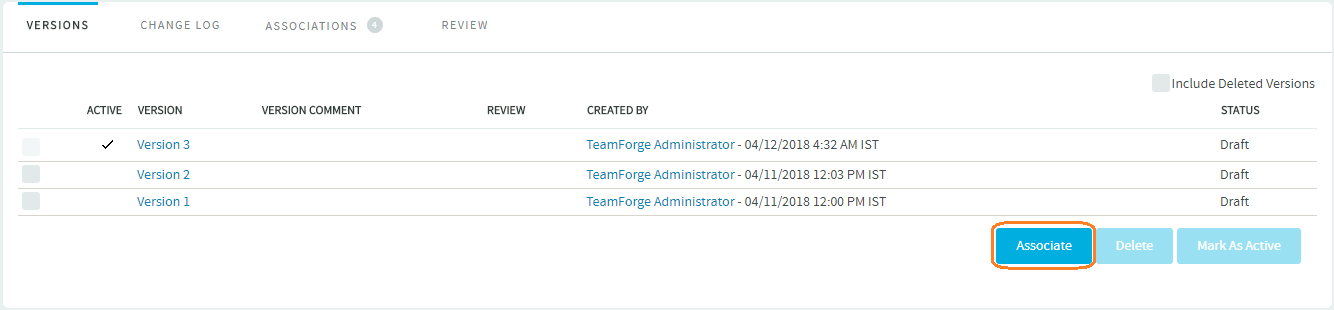
If you do not select a document version, the current active version of the document is associated with the object.
Lock a Document
While you are working on a document, you can lock it to prevent others from editing or downloading it and posting new versions to TeamForge.
You can lock a document when you create it or at any time afterward. When a document is locked:
- Any user with Document View permission can view or download it.
- You can edit or download a locked document if you are a Site Administrator or a Document Administrator with Allow Document Admin to Edit enabled in the Lock Document section.
-
On the Document Details page, confirm that the lock status is currently Unlocked.
-
Select Edit/Update.
This button appears in the top-right corner only if you have Document Edit permission. -
On the Edit Document page, select the appropriate check boxes in the Lock Document section.
-
Select Save.
The document is now locked and indicated with a padlock icon in the document list.
Unlock a Document
To work with a document that someone else has locked, you must unlock it.
You can unlock a document that you locked previously. To unlock a document locked by another user, you must be a Site Administrator or a Document Administrator with Allow Document Admin to Edit enabled in the Lock Document section.
-
On the Document Details page, confirm that the document is currently locked.
-
Select Edit/Update.
This button appears in the top-right corner only if you have Document Edit permission. -
On the Edit Document page, clear the check boxes in the Lock Document section.
-
Select Save.
The document is now unlocked. All project members with Document Edit permission can update the document.
Find and View a Document
You can find and view a document by navigating to it, searching for it, or opening it from a URL or unique identifier. You can also open a document from TeamForge directly in Microsoft Office applications.
Navigate to a Document
If you know where a document is posted, or if you want to browse available documents, you can locate a document by navigation.
You can access documents from your project home page or from the project’s Documents page.
-
Choose one of the following ways to find documents:
- Look for a Documents window on your project home page.
If your project manager has added a document component, all project documents appear there.
For details on how to add a Documents component, see Create a Project Page Component. - If there is no Documents component, select Documents in the project navigation bar. The List Documents page appears.
- Look for a Documents window on your project home page.
-
Select a documents folder.
If the folder contains subfolders, expand the document tree by selecting the arrow next to the folder name. -
To view or save a document, select the file type icon next to the document name.
Use filter options to locate the document you want.- Documents with file types that can be viewed in a browser (such as HTML and text) are displayed in a TeamForge window.
- Other file types open in the appropriate viewing software.
-
To view additional information about the document, select the document name.
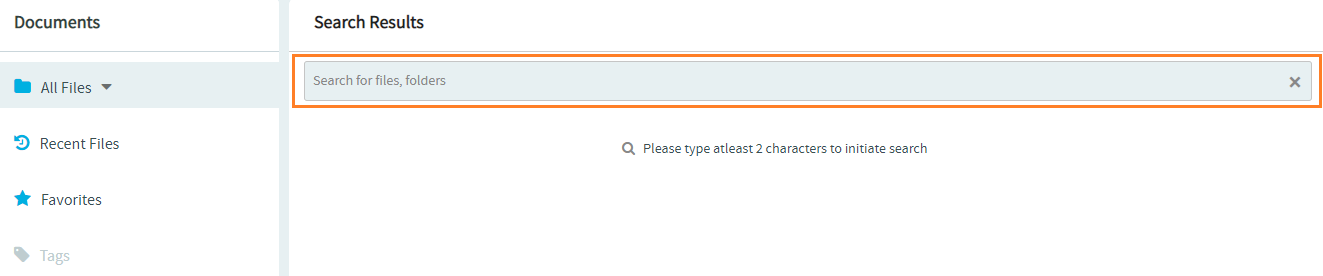
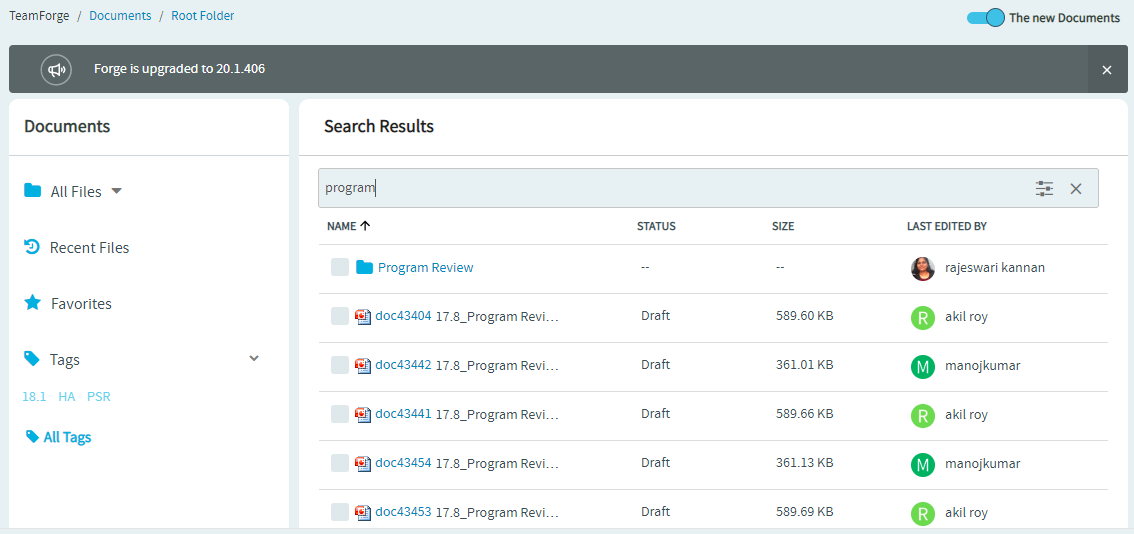
Search Document Folders and Documents
You can search for document folders and documents from the Documents List page.
- You can search for a document or a document folder by its Name.
- You can do a whole word search for documents and document folders with the keyword within double quotes.
- You can also do an advanced search for documents with a wide-range of parameters.
To search for a document or a document folder:
-
Select the column configuration on which you want to search.
-
Click the search icon.
-
Type at least two characters of the search keyword in the search text box to view the search results as you type.
Documents matching the search keyword are displayed.
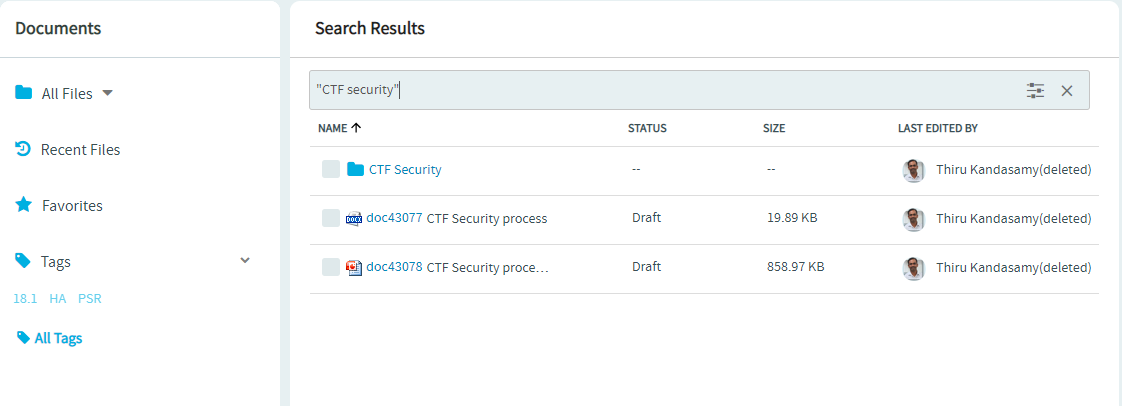
Whole Word Simple Search
The Documents List page's search function supports whole word search for documents and document folders.
Just include the search keyword within double quotes to do a whole word search. Document and document folder title is searched for a match when you do a whole word search.
Advanced Search
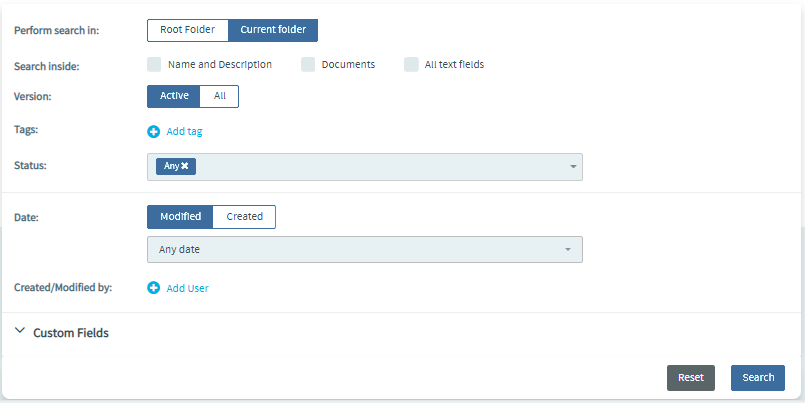
When you want to narrow down your search results with one or more documents you want, you would typically search with more than one of the following advanced search parameters.
Perform search in
- Root Folder or Current Folder.
- Select the folder where you want to search for documents.
- Current Folder is selected by default.
- Click Root Folder to search the root folder (and subfolders).
Search Inside
- Name and Description, Documents and All text fields
- Select one or more of these check boxes to search. You must select at least one of these check boxes.
- You can search the name and description of documents, the document content, and all the text fields.
Version
- Active or All
- Select Active or All to search the active and all document versions respectively.
- Active document versions are searched by default.
- Select All to search all document versions.
Tags
- Select one or more tags to search for documents that are tagged with the selected tags.
- Click Add tag and select one or more tags.
Status
- Select one or more statuses to restrict your search to documents that are in one of the the selected statuses.
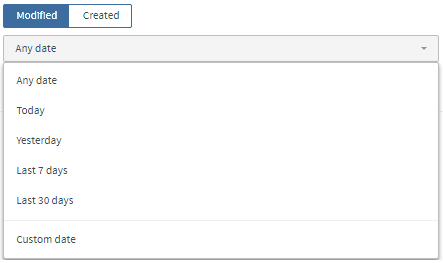
Date
- Modified or Created
- Select Modified or Created to search for documents that are modified or created on a particular date respectively.
- Select one of the following options from the drop-down list to search for documents that are modified or created: Today, Yesterday, Last 7 Days and Last 30 Days.
- Any Date is selected by default.
- You can also select Custom Date from the drop-down list and select a custom date range from the From and To date fields.
Created/Modified by
- Select one or more users to search for documents created or modified by the selected users.
- Click Add user and select one or more users from the drop-down list.
Custom Fields
- You can also include custom fields (single/multi select, user, and date fields) in your advanced documents search.
To perform an advanced documents search:
- Click the search icon
- Click the advanced search icon (the guitar icon).
- Select the advanced search criteria.
- Click Search. The search results are displayed.
note
Search results are restricted to a maximum of 500 documents. You must refine your search criteria in case your search results are not fetching you the documents you are looking for.
- Repeat steps 2 through 4 to further refine your search criteria.
Document Reviews
To start a document review, you must first create the document in TeamForge.
A document review helps you gather input by selecting reviewers, setting a due date, and describing the type of feedback you need.
-
From the Project Home menu, select Documents.
-
In the document tree, select the document you want to review.
-
On the Document Details page, select the Review tab, and then select Start a Review.
noteIf a review is already in progress, Start a Review is disabled. You can have only one active review at a time.
-
In the Start a Review modal, enter a descriptive name for the review.
-
Enter a due date for reviewers. Use the calendar icon to select dates.
tipComments are due at midnight on the selected date. For example, if you want reviews to be completed by the end of Tuesday, select Wednesday as the due date.
-
Select required and optional reviewers. Use the + Add icon to open the Add User modal and select users.
-
Write a message to your reviewers describing the document and the type of input you need.
Reviewers receive this message in an automatic email showing you as the sender.tipIf you add yourself to the reviewers list, you will receive a copy of this email for reference.
-
(Optional) Select Attach document to email to include the document in the review notification email.
-
Select Start Review.
The document is now submitted for review:
- All reviewers receive an email with the review details, your message, and a link to the Review Details page.
- The document status changes to Review and remains so until the review is closed.
tipTo help track the development of your document, associate a tracker artifact with your document review.
Read Review Responses
After you start a document review, you receive email notifications whenever reviewers post responses.
You can read responses from the email or from the Review Details modal. The Review Details modal is the starting point for managing all document review activities.
-
From the Project Home menu, select Documents.
-
In the document tree, find the folder containing the document.
-
Select the document.
-
On the Document Details page, select the Review tab.
A summary of all open and closed reviews appears. -
Select the review title. Review responses are listed in the Review Details modal.
You can also reach the Review Details page by:
- Selecting the link in the related email notification.
- Selecting the review title in the My Document Reviews section of your My Page.
Starting with release 19.2, the Review tab of the Document Details page includes a new Message column. This shows the notification email message sent to document reviewers.
Edit Review Details
After a review starts, you can change its name, reviewers, or due date.
When you make changes, affected reviewers receive an email notification.
-
From the Project Home menu, select Documents.
-
In the document tree, find the folder containing the document.
-
Select the document.
-
On the Document Details page, select the Review tab.
A summary of all open and closed reviews appears. -
Select the review title. The Document Review modal appears.
-
Select the Edit icon.
-
In the Edit Review modal, make your changes:
- Use the calendar widget to change the due date.
- Use the Add User widget to add or remove reviewers.
-
Select Save.
- New reviewers receive an email with the review details.
- Removed reviewers receive an email that their reviews are no longer required.
- Outstanding reviewers receive an email if the due date changes.
Send a Reminder Email
You can send reminder emails to reviewers who have not submitted their responses.
-
In the Document Review modal, find the outstanding required and optional reviewers.
-
Select the Send Reminder Email icon.
-
In the Send Reminder modal, write a message to include in the email.
noteThe email always includes the document URL, even if you do not attach the document.
-
Select Send.
The email is sent to all reviewers who have not yet responded.
Close a Document Review
After a document review is complete, you must close it. Reviews are never closed automatically. You cannot start a new review on the same document until the current review is closed.
You can close a review even if the due date has not passed.
-
From the Project Home menu, select Documents.
-
In the document tree, find the folder containing the document.
-
Select the document.
-
On the Document Details page, select the Review tab.
A summary of all open and closed reviews appears. -
Select the review title.
-
In the Document Review modal, select the Close Review icon.
-
In the Close Review modal, change the document status to Final or Draft.
-
Select OK.
The review is now closed:
- Reviewers with outstanding responses receive an email notification.
- No additional review responses can be submitted.
Review a Document
When you are a reviewer, you read the document, consider other reviewers’ comments, and post your response.
When identified as a reviewer:
- You receive an email with the review details, including the due date, your reviewer type (required or optional), and any message from the submitter. The email includes a link to submit your response.
- A new entry in the Documents Awaiting Review section of your My Page shows a summary of the review. This includes the due date, the project, and the requester.
Steps to Respond
-
Go to the Document Review page:
- Select the link in the email notification.
- Or select the document title in the Documents Awaiting Review section of your My Page.
-
In the Document Review modal, under Submit a Response, enter your response.
-
(Optional) Use Browse to attach a marked-up copy of the document or another file.
-
Select Submit.
Your response is now submitted:
- The review submitter receives an email notification with your response.
- Your comments appear in the Responses section of the Document Review modal.
Find and View a Document
Navigate, search, or open by URL/ID.
- From the project home page, click Documents (or use a Documents component if present).
- Select a folder in the tree. Expand subfolders as needed.
- Click a file type icon to view/download, or click the document name to open details.
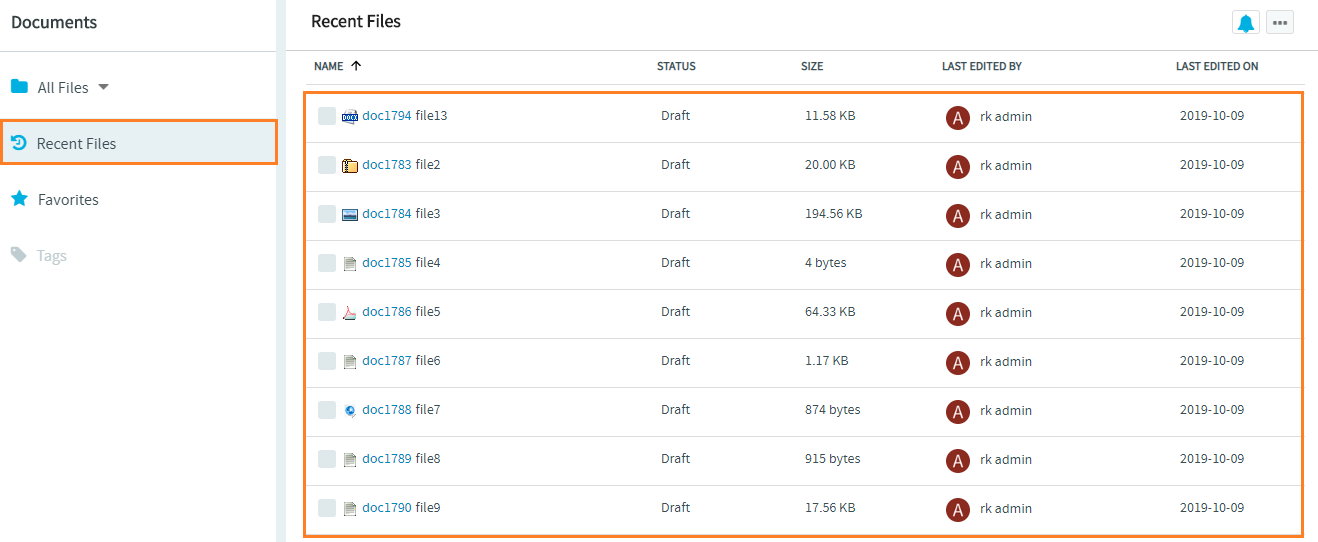
Recent Documents
You can see the list of recently added, modified, and viewed documents from the Recent Files page.
Select the Recent Files left navigation menu on the documents home page to view the list of documents that are recently added, modified, and viewed.
Tag Cloud
Tags are another means of navigating/classifying your documents. While nothing has changed with the way you create or manage tags, Tag Cloud unlocks the potential of tags as a means of navigation/classification and brings tags to the forefront in the form of tag clouds.
A Tag Cloud is a group of tags added to the left navigation pane of the Documents List page. You can filter documents by tags.
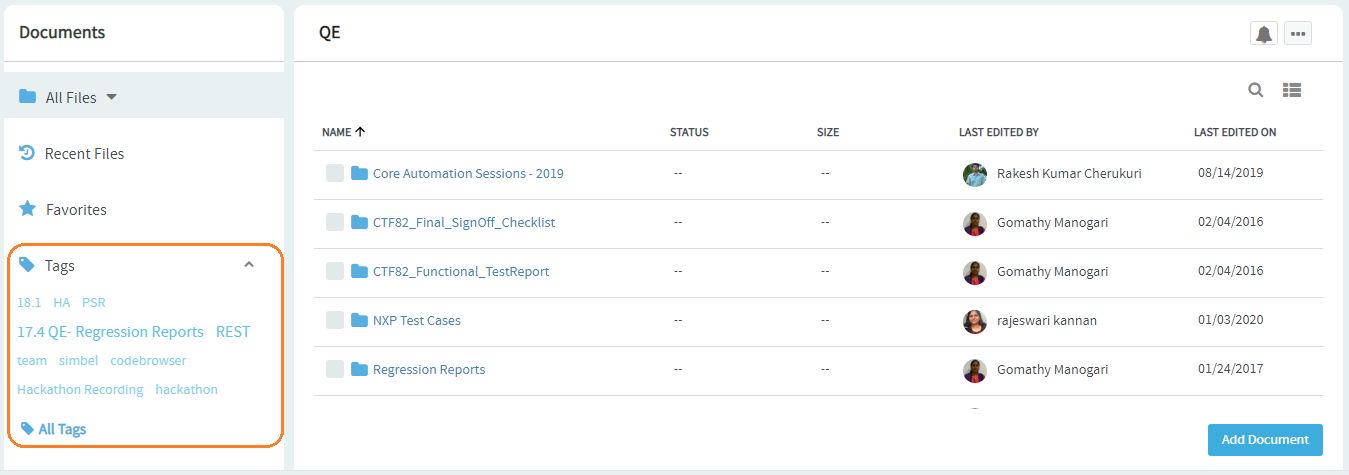
- The Tag Cloud shows the most recently used tags.
- Click a tag to list all the documents that are associated with that tag.
- Click All Tags to view all the tags in the Documents List page.
- A tag in the tag cloud is visually distinguishable by its size and shade.
- The font size and shade of a tag indicates the number of documents associated with a tag.
- A bigger font size and a darker shade means that more number of documents are associated with the tag.
- Tags in the Tag Cloud are sorted and listed—the tags list starts with the most recently used tags followed by the least recently used ones.
Delete Documents and Document Folders
You can either delete documents and folders one-by-one or select multiple documents and folders and delete them. When documents and folders are deleted, an email notification is sent to notify users monitoring the documents and folders.
- Select a folder from the All Files drop-down menu from the left navigation pane.
- To delete:
- an individual document or folder, hover over any document or document folder, click the more icon and select Delete from the contextual menu.
- multiple documents and folders, select the documents and folders you want to delete, click the more icon at the top of the Documents List page and select Delete.
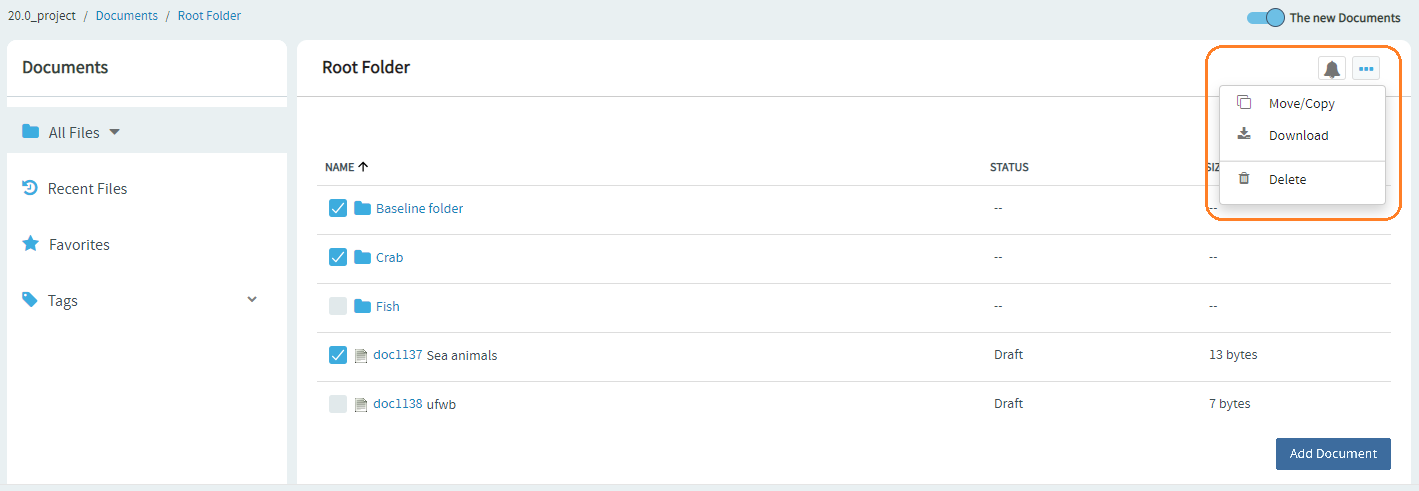 A confirmation message appears.
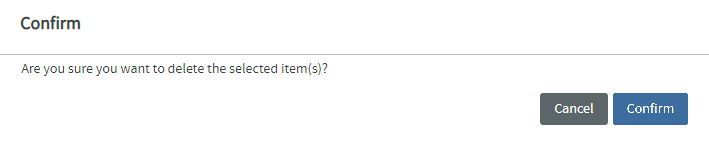
- an individual document or folder, hover over any document or document folder, click the more icon and select Delete from the contextual menu.
- Clik Confirm to delete the selected documents and folders.
Also see: Hard-links Between Baselines and Configuration Items
Delete Document Versions
Delete specific document versions to reduce storage.
You can delete a version only if:
- You have Delete/View permission on documents (Document Admin permission alone is not enough).
- The document has more than one version.
- The version is not active.
- The version is not part of a baseline (versions added after baselining can be deleted if not active).
Deleting a version is permanent.
- Open the document and go to Versions.
- Select one or more versions (not active/baselined).
- Click Delete and confirm.
Work with Documents from Microsoft Office Applications
You can use the File menu in Microsoft Word, Microsoft Excel, Microsoft Project, and Microsoft PowerPoint to work with documents stored in your TeamForge site.
Open a Document in Microsoft Office
You can access your Word, Excel, Project, and PowerPoint documents in Digital.ai TeamForge without opening the TeamForge web interface.
- Open your Microsoft Office application.
- From the File menu, choose Open from Digital.ai TeamForge.
- In the Login window, provide the following information:
- Your TeamForge user name and password.
- The URL of your organization's TeamForge installation.
note
Do not enter the
http://orhttps://prefix before the server name.
- Click Log In. The Selection Dialog window shows all projects, folders, and documents that you have permission to view.
- Select the document you want to open.
The document opens in your Microsoft Office application.
Save a Document to TeamForge
You can save Microsoft Word, Excel, Project, and PowerPoint documents to Digital.ai TeamForge without using the TeamForge web interface.
- Open your Microsoft Office application.
- Open the document you want to save.
- From the File menu, choose Save to Digital.ai TeamForge.
- In the Login window, enter the following information:
- Your TeamForge user name and password.
- The URL of your organization's TeamForge installation.
note
Do not enter the
http://orhttps://prefix before the server name.
- Click Log In. The Selection Dialog window displays all projects and folders where you have permission to create documents.
- Select the folder where you want to save the document.
note
Do not click on an existing document. Doing so prompts you to update that document instead of creating a new one.
- In the Document Properties window, clear Use Filename, then enter a name in the Digital.ai TeamForge Document Name field. By default, the file name is used.
- Enter a description for the document.
- Choose whether the document is in draft or final status.
- To prevent others from editing the document, select Lock Document.
- Optionally, add a version comment.
- Click OK.
The document is now saved in Digital.ai TeamForge. You can view it in the document folder that you selected.
After you save a document to Digital.ai TeamForge, future saves will also be stored in TeamForge. To save the document locally, choose Save As from the File menu.
HTML Emails for Documents
Starting with TeamForge 17.11, when you create or update a document, TeamForge sends HTML email notifications to users monitoring that document or its folder.
HTML emails are formatted messages similar to newsletters that you receive from web services. They include colors, graphics, table columns, and links, providing a richer look and feel compared to plain text emails.
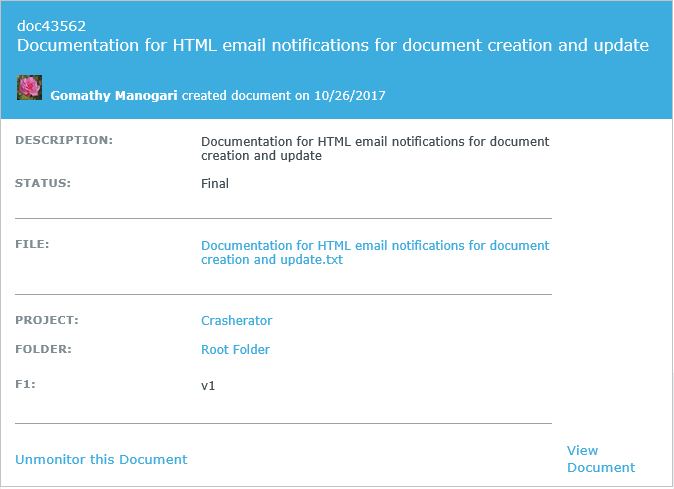
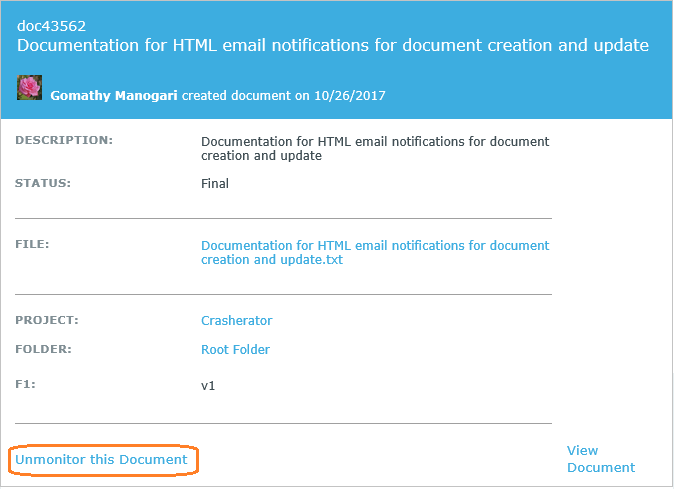
By default, the HTML email notification for documents contains details such as document ID, title, description, status, file name (with link), project, and folder. Fields with null values are not displayed.
Sample HTML email when a document is created:
When a document is updated, the email shows both new and old values for fields such as file name, description, tags, and status.
Sample HTML email when a document is updated:
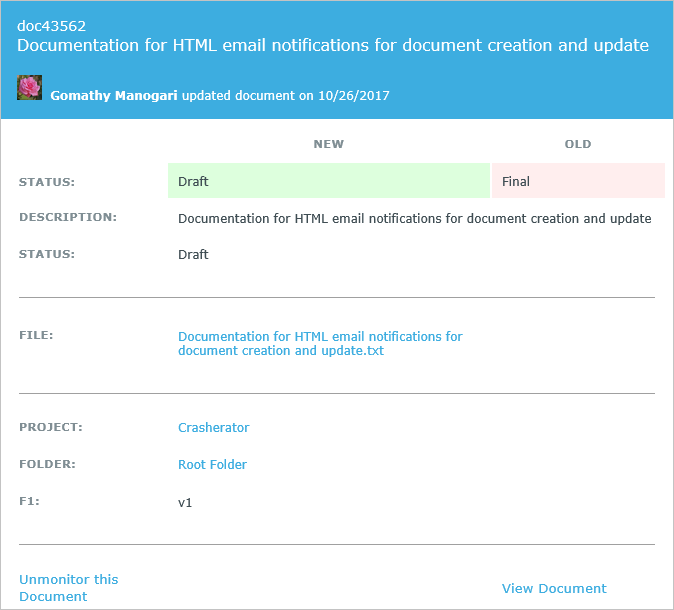
TeamForge HTML emails are supported by Outlook for Windows, Outlook for Mac, and Office 365 web clients.
Unmonitor Documents via HTML Emails
You can stop monitoring a document directly from the email notification by clicking the Unmonitor this Document link.
Example: Email notification when a document is created
Example: Email notification when a document is updated
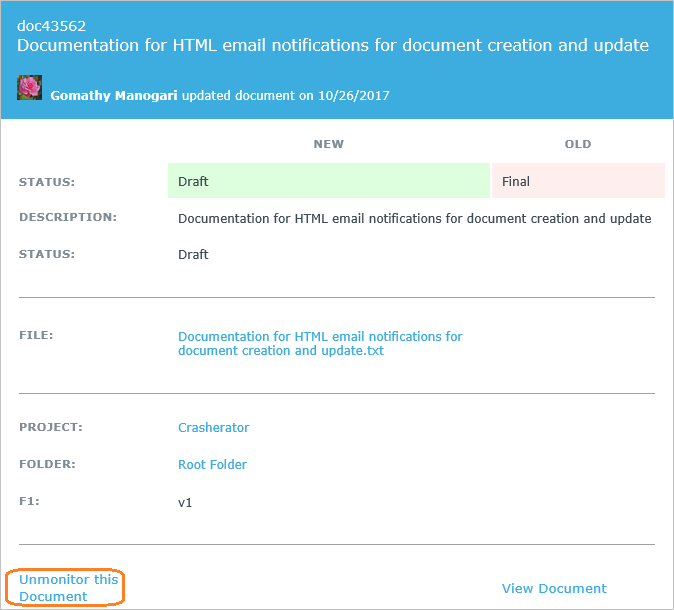
Clicking Unmonitor this Document opens a confirmation dialog box:
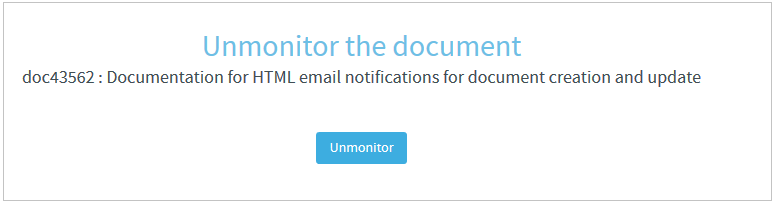
Select Unmonitor to stop monitoring. A success message is displayed.
In addition, each HTML email includes a View Document link at the bottom right. Click this link to go directly to the document details page.