Deploy Plugin
The Deploy plugin for Release allows you to start a control task or to start a deployment of an application on Deploy. It also provides the functionality to trigger undeployment of an application already deployed on Deploy.
If you are using the community supported xlr-xldeploy-plugin and want to migrate to the offically supported xlr-xld-plugin, refer to Migrating from the community Deploy plugin for Release to the officially supported plugin.
Requirements
The Deploy plugin for Release requires Release version 6.2.x or later to be installed and is compatible with Deploy version 5.5.x or later.
Installation
- Download the Release Deploy plugin.
- Install the plugin in Release.
Configure Deploy Server (Connections)
- In Release navigation pane, go to Configuration > Connections > Deploy Server and click
 .
. - Specify the required information:
Title- [Required] Select a suitable title for the server configuration.Url- [Required] URL to connect to Deploy Server (Example:http://localhost:4516). If the port number is not specified in the URL, the plugin uses the default port number: 4517 forhttpsprotocol and 4516 forhttpprotocol. If Deploy is running over ports 80 or 443, you must mention this explicitly in the URL.Username- Username for Deploy server. Can be provided/overridden at task level.Password- Password for Deploy server. Can be provided/overridden at task level.Proxy Host- HTTP proxy host if needed.Proxy Port- HTTP proxy Port if needed.Proxy User Name- HTTP proxy User name to connect to Deploy.Proxy Password- HTTP proxy Password to connect to Deploy.
Add a control task
Control tasks are actions that you can perform on middleware or middleware resources. For example: checking the connection to a host is a control task. When you trigger a control task, Deploy starts a task that executes the steps associated with the control task.
You can create a control task in Release by adding a task of type Deploy -> Control Task with the following properties:
Server: [Required] Deploy Server to connect to.Configuration Item Id: [Required] Full CI name (Example:Infrastructure/ProductionBox). Autocomplete is not supported.Control task name: Name of the control task (Example:checkConnection). Autocomplete is not supported.Username: Required if not provided in Connections.Password: Required if not provided in Connections.Continue If Step Fails: If it is set toTrueand a step fails, the task is retried. Default value isFalse.Number Of Continue Retrials: Number of times to retry the task when the step fails and 'Continue If Step Fails' is set toTrue. Default value is 0.Polling Interval: Polling interval in seconds to check the task status. Default value is 10.Polling Retry Count: Number of times to retry checking for the task status. Default value is 0.Display Step Logs: If it is set toTrue, the step logs will be printed. Defaults value isTrue.Parameters: A dictionary with control task parameters.
Add a deploy task
The deploy task is an automated task that tells Deploy to deploy a certain application to an environment. Both the application (Package below) and environment (Environment below) must be configured in Deploy. The task gives live updates of the deployment process and completes automatically when the deployment succeeds.
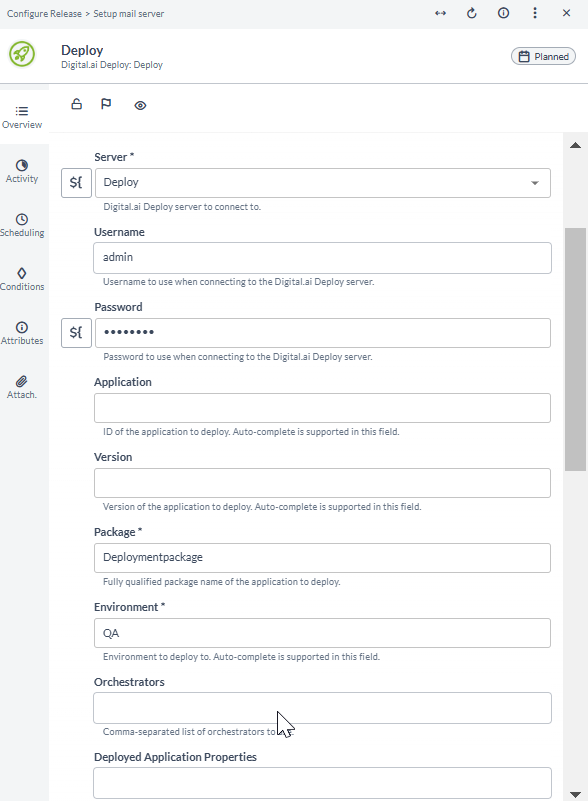
You can create a deploy task in Release by adding a task of type Deploy -> Deploy with the following properties:
Server: [Required] Deploy Server to connect to.Application: ID of the application to be deployed. Autocomplete is supported.Version: Version of the application to be deployed. Autocomplete is supported.Package: [Required] Fully qualified ID of the package to deploy (Example:Applications/PetClinic/1.0orPetClinic/1.0). This field is auto-populated on completingApplicationandVersionfields. Applications prefix is optional.Environment: [Required] ID of the environment to deploy (Example:SITEnvorEnvironments/SITEnv). Autocomplete is supported. Environments prefix is optional.Username: Required if not provided in Connections.Password: Required if not provided in Connections.Continue If Step Fails: If it is set toTrueand a step fails, the task is retried. Default value isFalse.Number Of Continue Retrials: Number of times to retry the task when the step fails and 'Continue If Step Fails' is set toTrue. Default value is 0.Polling Interval: Polling interval in seconds to check the task status. Default value is 10.Polling Retry Count: Number of times to retry checking for the task status. Default value is 0.
Note: A default value of 0 means the task will constantly retry polling the Deploy task until completion. A retry count of > 0 means that it will poll that number of times and afterwards will continue on regardless of whether the Deploy task has completed.
Display Step Logs: If it is set toTrue, the step logs will be printed. Defaults value isTrue.Orchestrators: Comma separated list of orchestrators.Deployed Application Properties: A dictionary with key value pairs to set deployed application properties.Deployed Properties: A dictionary with key value pairs. The key is the ID of the deployable and the value in JSON format with the property name and values to be overridden.Rollback On Failure: Enable this to perform rollback if the deployment fails.Cancel If Not Rollbacking: Enable this to cancel the task if the deployment fails andRollback on Failureis not selected.Fail On Pause: Enable this to fail the task if it is paused.
Add an undeploy task
The undeploy task is an automated task that tells Deploy to undeploy an application from an environment. The name of the deployed application holds the complete information about the environment and the package to be undeployed. For example: Undeploy Environments/SITEnv/PetClinic tells that package PetClinic must be undeployed from Environment SITEnv.
You can create an undeploy task in Release by adding a task of type Deploy -> Undeploy with the following properties:
Server: [Required] Deploy Server to connect to.Deployed Application: [Required] Name of the deployed application you want to undeploy (Example:Environments/SITEnv/PetClinic). Autocomplete supported.Username: Required if not provided in Connections.Password: Required if not provided in Connections.Continue If Step Fails: If it is set toTrueand a step fails, the task is retried. Default value isFalse.Number Of Continue Retrials: Number of times to retry the task when the step fails and 'Continue If Step Fails' is set toTrue. Default value is 0.Polling Interval: Polling interval in seconds to check the task status. Default value is 10.Polling Retry Count: Number of times to retry checking for the task status. Default value is 0.Display Step Logs: If it is set toTrue, the step logs will be printed. Defaults value isTrue.Orchestrators: Comma separated list of orchestrators.Deployed Application Properties: A dictionary with key value pairs to set deployed application properties.Rollback On Failure: Enable this to perform rollback if the undeployment fails.Cancel If Not Rollbacking: Enable this to cancel the task if the undeployment fails andRollback on Failureis not selected.Fail On Pause: Enable this to fail the task if it is paused.Fail If Application Does Not Exist: Enable this to fail the task if the application does not exist.
For more information about using the deployment rollback option, refer to Perform deployment rollback.
Add an Add CI tag task
The Add CI tag task is an automated task that adds a new tag to an existing CI in Deploy.
You can create an Add CI tag task in Release by adding a task of type Deploy -> Add CI Tag with the following properties:
Server: [Required] Deploy Server to connect to.Username: Required if not provided in Connections.Password: Required if not provided in Connections.Deploy CI: [Required] Full Configuration Item ID where tags have to be added (Example:Infrastructure/ProductionBox).Deploy New Tag: [Required] A new tag to add to the CI.
Add a Get CI tags task
The Get CI tags task is an automated task that retrieves all the tags of a CI from Deploy. The tags are displayed in an output property.
You can create a Get CI tags task in Release by adding a task of type Deploy -> Get CI Tags with the following properties:
Server: [Required] Deploy Server to connect to.Username: Required if not provided in Connections.Password: Required if not provided in Connections.Deploy CI: [Required] Full Configuration Item ID for which tags are required (Example:Infrastructure/ProductionBox).Deploy Tags: The output property with the list of tags of the above mentioned Deploy CI.
Add a Set CI tags task
The Set CI tags task is an automated task that adds new tags to a CI in Deploy and replaces the old tags. The tags are displayed in an output property.
You can create an Set CI tags task in Release by adding a task of type Deploy -> Set CI Tags with the following properties:
Server: [Required] Deploy Server to connect to.Username: Required if not provided in Connections.Password: Required if not provided in Connections.Deploy CI: [Required] Full Configuration Item ID for which tags are required (Example:Infrastructure/ProductionBox).Deploy New Tags: [Required] The list of new tags to be added to the above mentioned Deploy CI.Deploy Tags: The output property with the list of tags of the above mentioned Deploy CI.
Add a Create CI task
The Create CI task is an automated task that creates a CI and optionally adds it to an environment.
You can create a Create CI task in Release by adding a task of type Deploy -> Create CI with the following properties:
Server: [Required] Deploy Server to connect to.Username: Required if not provided in Connections.Password: Required if not provided in Connections.CI ID: [Required] Full Configuration Item ID (Example:Applications/PetClinic/1.0/CIName).CI Type: [Required] The type of the Configuration Item (Example:udm.Application).Xml Descriptor: XML with the fields to set on the CI.Add To Environment: Switch this to add the CI to an environment.Environment ID: Environment where to add the CI.
Add a Delete CI task
The Delete CI task is an automated task that deletes a CI after optionally removing it from an environment.
You can create a Delete CI task in Release by adding a task of type Deploy -> Delete CI with the following properties:
Server: [Required] Deploy Server to connect to.Username: Required if not provided in Connections.Password: Required if not provided in Connections.CI ID: [Required] Full Configuration Item ID (Example:Applications/PetClinic/1.0/CIName).Environment ID: Environment where you remove the CI.Throw on Fail: Switch this to fail the task if the CI does not get deleted or if one of the provided CIs does not exist.
Add a Get CI task
The Get CI task is an automated task that retrieves a CI from Deploy in either XML or JSON format.
You can create a Get CI task in Release by adding a task of type Deploy -> Get CI with the following properties:
Server: [Required] Deploy Server to connect to.Username: Required if not provided in Connections.Password: Required if not provided in Connections.CI ID: [Required] Fully qualified Configuration Item ID to get (Example:Applications/PetClinic/1.0/CIName).Format: [Required] The format in which the CI will be returned: XML or JSON.Throw on Fail: Switch this to fail the if the CI does not exist.
Add an Update CI property task
The Update CI property task is an automated task used to update a property from a CI on Deploy.
You can create an Update CI property task in Release by adding a task of type Deploy -> Update CI property with the following properties:
Server: [Required] Deploy Server to connect to.Username: Required if not provided in Connections.Password: Required if not provided in Connections.CI ID: [Required] Fully qualified Configuration Item ID to update (Example:Applications/PetClinic/1.0/CIName).Property name: [Required] Name of the property to update on the CI.Property value: [Required] Value of the property to update.
Add a Does CI exist task
The Does CI exist task is an automated task to check if a CI exists.
You can create an Does CI exist task in Release by adding a task of type Deploy -> Does CI exist with the following properties:
Server: [Required] Deploy Server to connect to.Username: Required if not provided in Connections.Password: Required if not provided in Connections.CI ID: [Required] Fully qualified Configuration Item ID to check (Example:Infrastructure/localhost).Throw on Fail: Switch this to fail the task if the provided CI does not exist.
Add a Create folder (tree) task
The Create folder (tree) task is an automated task that creates a folder or the folder tree (if required).
You can create a Create folder (tree) task in Release by adding a task of type Deploy -> Create Folder (Tree) with the following properties:
Server: [Required] Deploy Server to connect to.Username: Required if not provided in Connections.Password: Required if not provided in Connections.Folders: [Required] Comma separated list of the folder names to create (Example: directory, directory/subdirectory).Folder Type: [Required] The type of folder to create: Applications, Environment, Infrastructure, Configuration.
Add a Get latest version task
The Get latest version task is an automated task to find the latest deployment package version for an application in Deploy.
You can create a Get latest version task in Release by adding a task of type Deploy -> Get latest version with the following properties:
Server: [Required] Deploy Server to connect to.Username: Required if not provided in Connections.Password: Required if not provided in Connections.Application ID: [Required] Application ID for which the version needs to be fetched (Example:Applications/PetClinic).Strip Applications: Switch this to strip the prefixApplicationsfrom the application ID.Throw on Fail: Switch this to fail the task if the provided CI does not exist.
Add a Get all versions task
The Get all versions task is an automated task to find all deployment package versions for an application in Deploy.
You can create a Get all versions task in Release by adding a task of type Deploy -> Get all versions with the following properties:
Server: [Required] Deploy Server to connect to.Username: Required if not provided in Connections.Password: Required if not provided in Connections.Application ID: [Required] Application ID for which the versions need to be fetched (Example:Applications/PetClinic).Throw on Fail: Switch this to fail the task if the provided CI does not exist.
Add a Get last deployed version task
The Get last deployed version task is an automated task to find the latest version of the package deployed in Deploy.
You can create a Get last deployed version task in Release by adding a task of type Deploy -> Get last deployed version with the following properties:
Server: [Required] Deploy Server to connect to.Username: Required if not provided in Connections.Password: Required if not provided in Connections.Environment ID: [Required] Environment ID where the application is deployed.Application Name: [Required] Application ID for which the version needs to be fetched.
Add an Import package task
The Import package task is an automated task that imports a package from a remote URL.
You can create an Import package task in Release by adding a task of type Deploy -> Import package with the following properties:
Server: [Required] Deploy Server to connect to.Username: Required if not provided in Connections.Password: Required if not provided in Connections.Repository URL: [Required] URL of the artifact repository from where the package needs to be imported.Repository username: Username of the artifact repository.Repository password: Password of the artifact repository.
Add a Migrate package task
The Migrate package task is an automated task that migrates a package from one Deploy server to another Deploy server.
You can create a Migrate package task in Release by adding a task of type Deploy -> Migrate package with the following properties:
Server: [Required] Deploy Server to connect to.Username: Required if not provided in Connections.Password: Required if not provided in Connections.Destination server: [Required] Deploy Server where to migrate the package.Destination username: Required if not provided in Connections.Destination password: Required if not provided in Connections.Deployment Package: [Required] Fully qualified ID of the package to deploy (Example:Applications/PetClinic/1.0).Auto Create Path: Switch this to auto create the path.Overwrite on Destination: Switch this to overwrite a package with the same ID that already exists on the destination server. If this is set toFalse, it will throw an error.
Add a Delete infrastructure task
The Delete infrastructure task is an automated task that deletes specified infrastructure and all deployed dependencies.
You can create a Delete infrastructure task in Release by adding a task of type Deploy -> Delete Infrastructure with the following properties:
Server: [Required] Deploy Server to connect to.Username: Required if not provided in Connections.Password: Required if not provided in Connections.Infrastructure ID: [Required] Name of the infrastructure you want to delete (Example:Infrastructure/ProductionBox). Autocomplete is supported.
Configure Deploy CLI (Connections)
- In Release navigation pane, go to Configuration > Connections > Deploy CLI config and click .
- Specify the required information:
Title- [Required] Select a suitable title for the server configuration.Cli Home- [Required] The home directory where Deploy CLI is installed.XLD Host- The Deploy server host where the CLI should connect. DEFAULT will work if it is on the same server as Deploy.XLD Port- The Deploy server port where the CLI should connect. DEFAULT will work if it is using the default Deploy port.XLD Secure- Switch to specify if the connection to Deploy will be secure. If set toTrue, the port will default to 4517.XLD Context- The context for Deploy CLI. DEFAULT will work if no context is needed.XLD Proxy Host- HTTP proxy host if needed.XLD Proxy Port- HTTP proxy port if needed.XLD Socket Timeout- Connection timeout to Deploy.XLD Username- Username to connect to Deploy. Defaults to admin.XLD Password- Password to connect to Deploy. Defaults to admin.
Add a Run script task
The Run script task is an automated task that runs a specified script on Deploy CLI.
You can create a Run script task in Release by adding a task of type Deploy CLI -> Run script with the following properties:
Deploy CLI: [Required] Deploy CLI to connect to.Script: [Required] The script that runs on Deploy CLI.Options: The command line options used with the script.Console output: The output property which displays the console output of the process.Error: The output property which displays the error stream of the process.
Add a Run script from file task
The Run script from file task is an automated task that runs a specified script from a file on Deploy CLI.
You can create a Run script from file task in Release by adding a task of type Deploy CLI -> Run script from file with the following properties:
Deploy CLI: [Required] Deploy CLI to connect to.Script: [Required] The location of the script file that runs on the Deploy CLI.Options: The command line options used with the script.Console output: The output property which displays the console output of the process.Error: The output property which displays the error stream of the process.
Add a Run script from url task
The Run script from url task is an automated task that runs a specified script from a URL on Deploy CLI.
You can create a Run script from url task in Release by adding a task of type Deploy CLI -> Run script from url with the following properties:
Deploy CLI: [Required] Deploy CLI to connect to.Script Url: [Required] The URL of the script file that runs on the Deploy CLI.URL Username: Username used when accessing the URL.URL Password: Password used when accessing the URL.Options: The command line options used with the script.Console output: The output property which displays the console output of the process.Error: The output property which displays the error stream of the process.
Get CI boolean property
This task gets a boolean property from the CI.
Get CI date property
This task gets a date property from the CI.
Get CI integer property
This task gets an integer property from the CI.
Get CI list property
This task gets a list property from the CI.
Get CI map property
This task gets a map property from the CI.
Get CI map property key value
This task gets the value of the key from a map property from the CI.
Get CI set property
This task gets a set property from the CI.
Get CI string property
This task gets a string property from the CI.