ServiceNow App Integration for Release
This topic covers the integration of ServiceNow with Release, including how to connect the two platforms to automate and synchronize workflows.
ServiceNow App for Integration With Digital.ai Release
Digital.ai Release Integration is a ServiceNow certified application for integration. You can obtain the app from the ServiceNow Store.
To use the app, install it in your ServiceNow console. This creates a new menu item containing all the necessary configuration options. For more information on the installation process see Install an application.
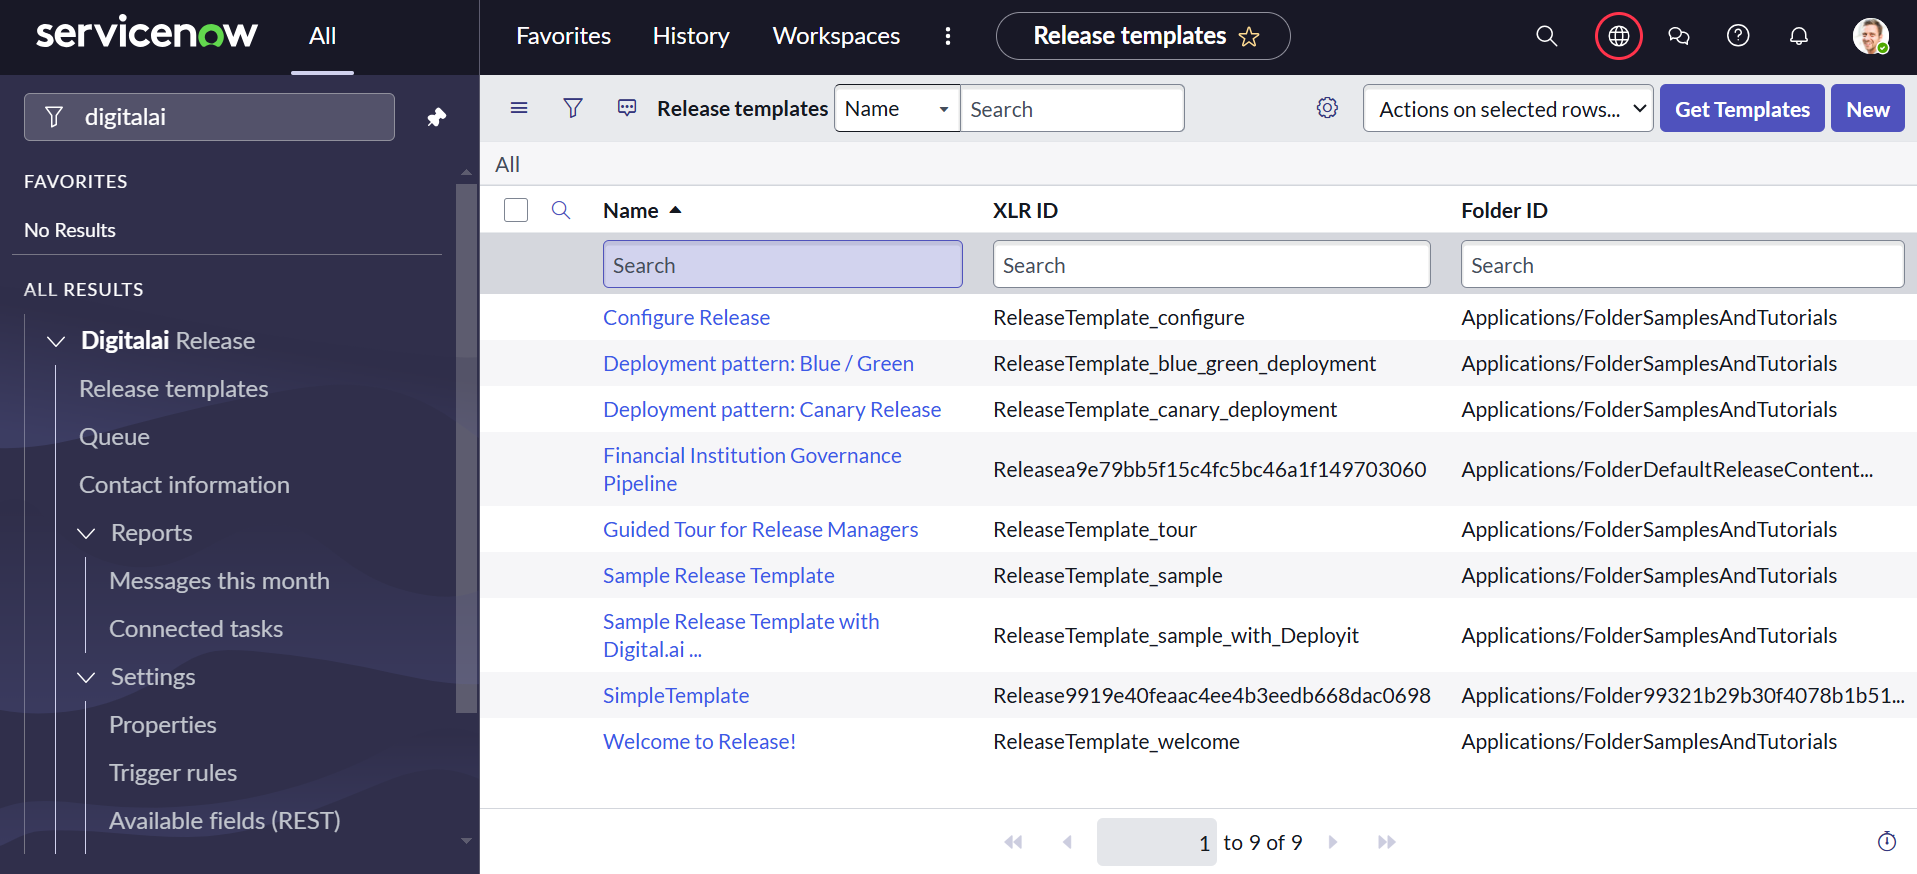
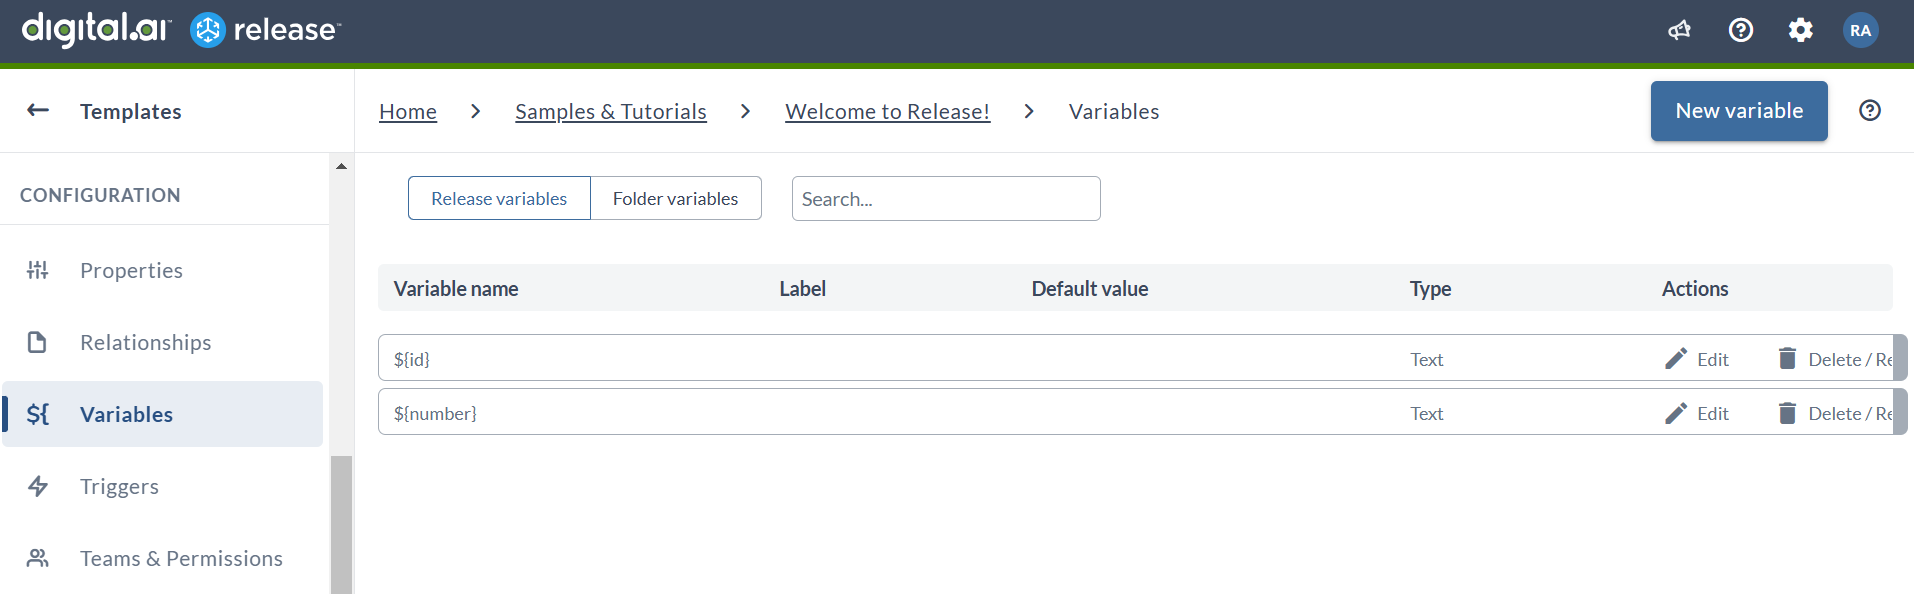
Using Design Templates From Digital.ai Release
All design templates can be retrieved by ServiceNow and can be used to initiate a release from ServiceNow. If you want to use information from the ServiceNow record that initiated the release, you must create two template variables:
${id}: the sys_id of the record the release was initiated from${number}: the number of the record the release was initiated from
The variables listed above will be entered by ServiceNow upon creation.
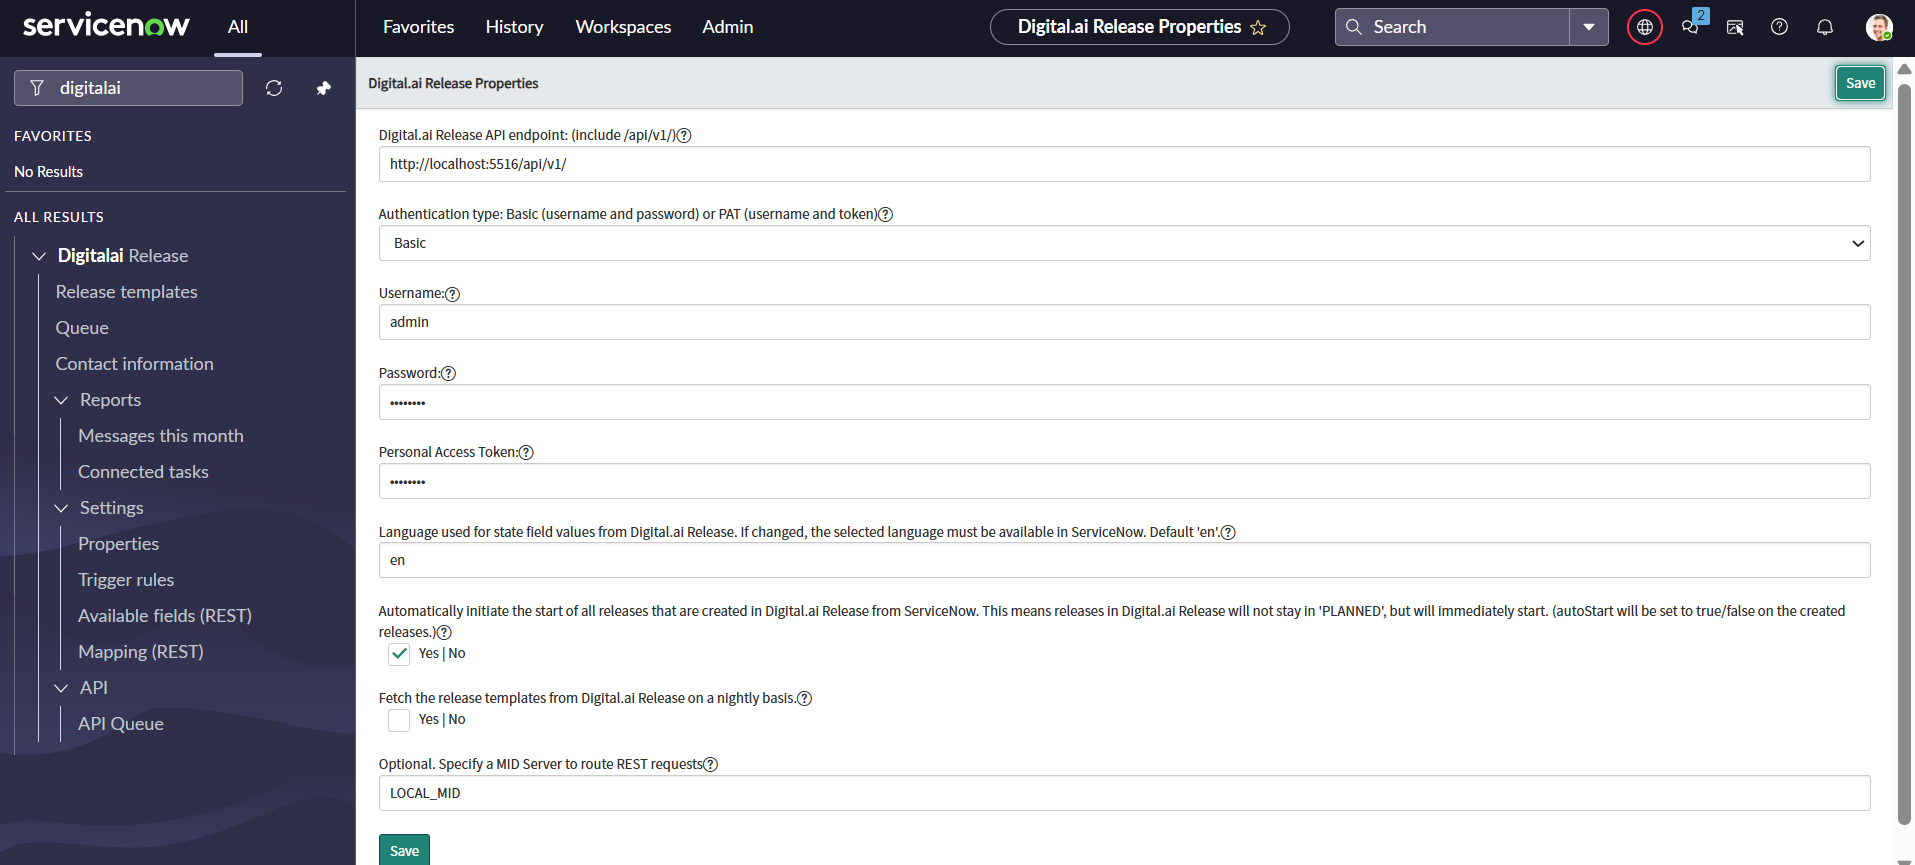
Connect the Digital.ai Release Server From ServiceNow
To set up a connection to a Release server from within the ServiceNow app:
- Navigate to Digitalai Release > properties
- In the endpoint field, enter the URL of the Release server (with
api/v1/appended to the URL). - In the Authentication type field, select either Basic (username and password) or PAT (username and token).
- In the Username field, enter the username to connect with the Release server.
- In the Password field, enter the password for the specified user (required when using Basic authentication).
- In the Personal Access Token field, enter the access token (required when using PAT authentication).
- Optionally, set the Language ISO code if your instance of Release uses a different language than the one used in ServiceNow.
- Optionally, set the "Autostart on true/false" value to specify if the release should immediately start in Release.
- Optionally, set the "Fetch the release templates from XLR on a nightly basis" value to true/false depending on your requirements.
- Optionally, in the MID Server to route REST requests field, enter the name of the MID Server if ServiceNow must route API calls through a MID Server.
- Click Save to save the configuration.
The next step is to retrieve the possible templates from Release. Follow these steps:
- In the ServiceNow console, navigate to Digitalai Release > Release templates
- Click Get Templates.
This retrieves all design templates from Release and display them in a list.
This is also a quick way to test your connection to the Release server.
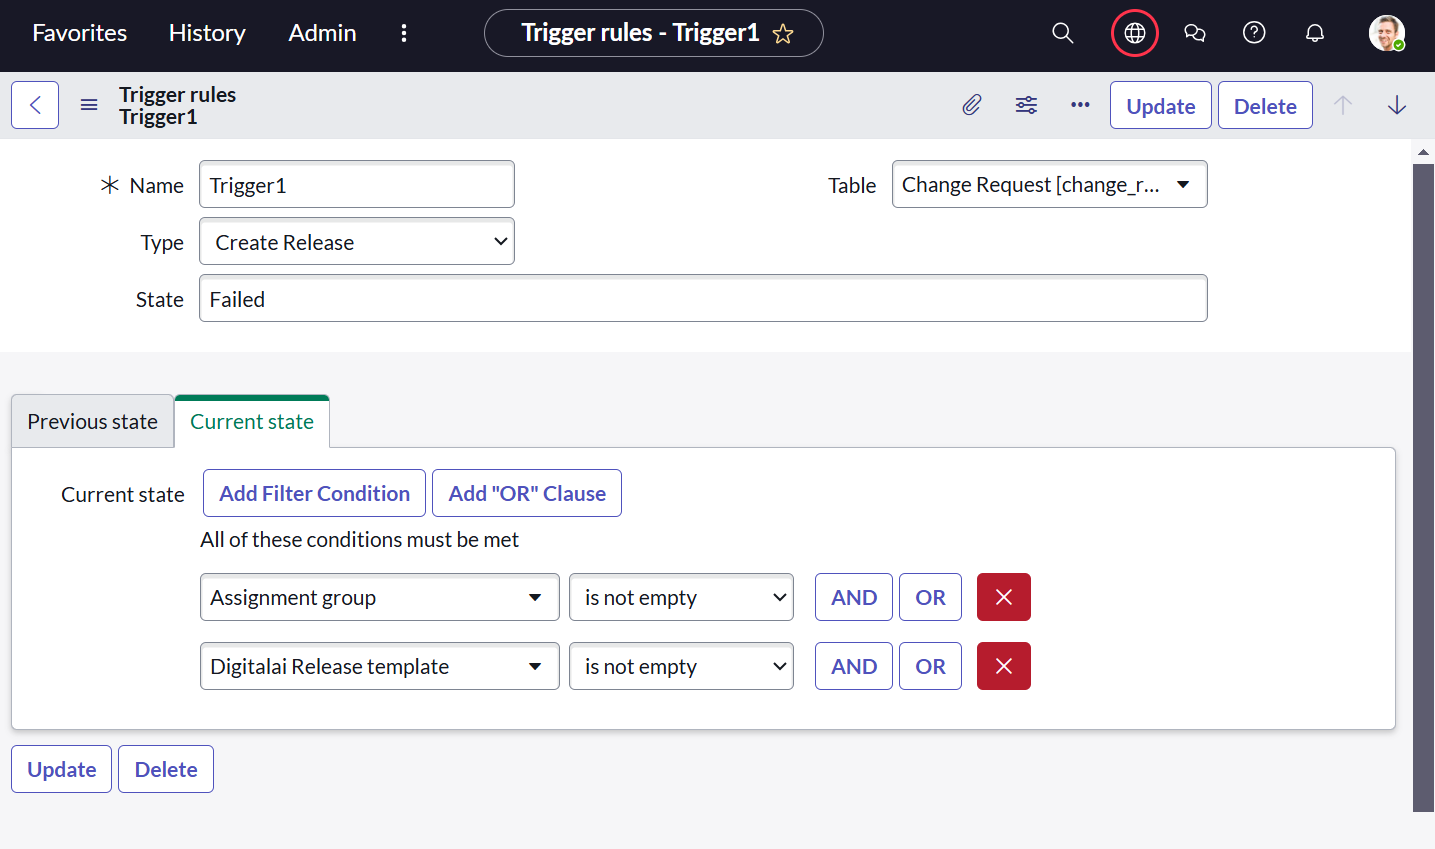
Set Up Trigger Rules in ServiceNow
Trigger rules in ServiceNow need to be set up to initiate actions on change events in communications between ServiceNow and Release. There are three communication options that can be used from ServiceNow:
- Create Release: initiate a release in Release
- Comment: leave a comment in Release
- Complete Task: complete a task in Release
To set up a trigger rule, in the ServiceNow app:
-
Navigate to Digitalai Release > Trigger rules and click New.
- A few samples are set up for you to review. You can either reuse these or create your own.
-
Add a Name for the rule and select a Type from the list.
-
In the Table list on the right side, select a table to apply the rule to. This will populate the available fields.
-
The Previous State and Current State tabs are used to compare the state of the release prior to and after the change event, and run the trigger rules if the conditions are met.
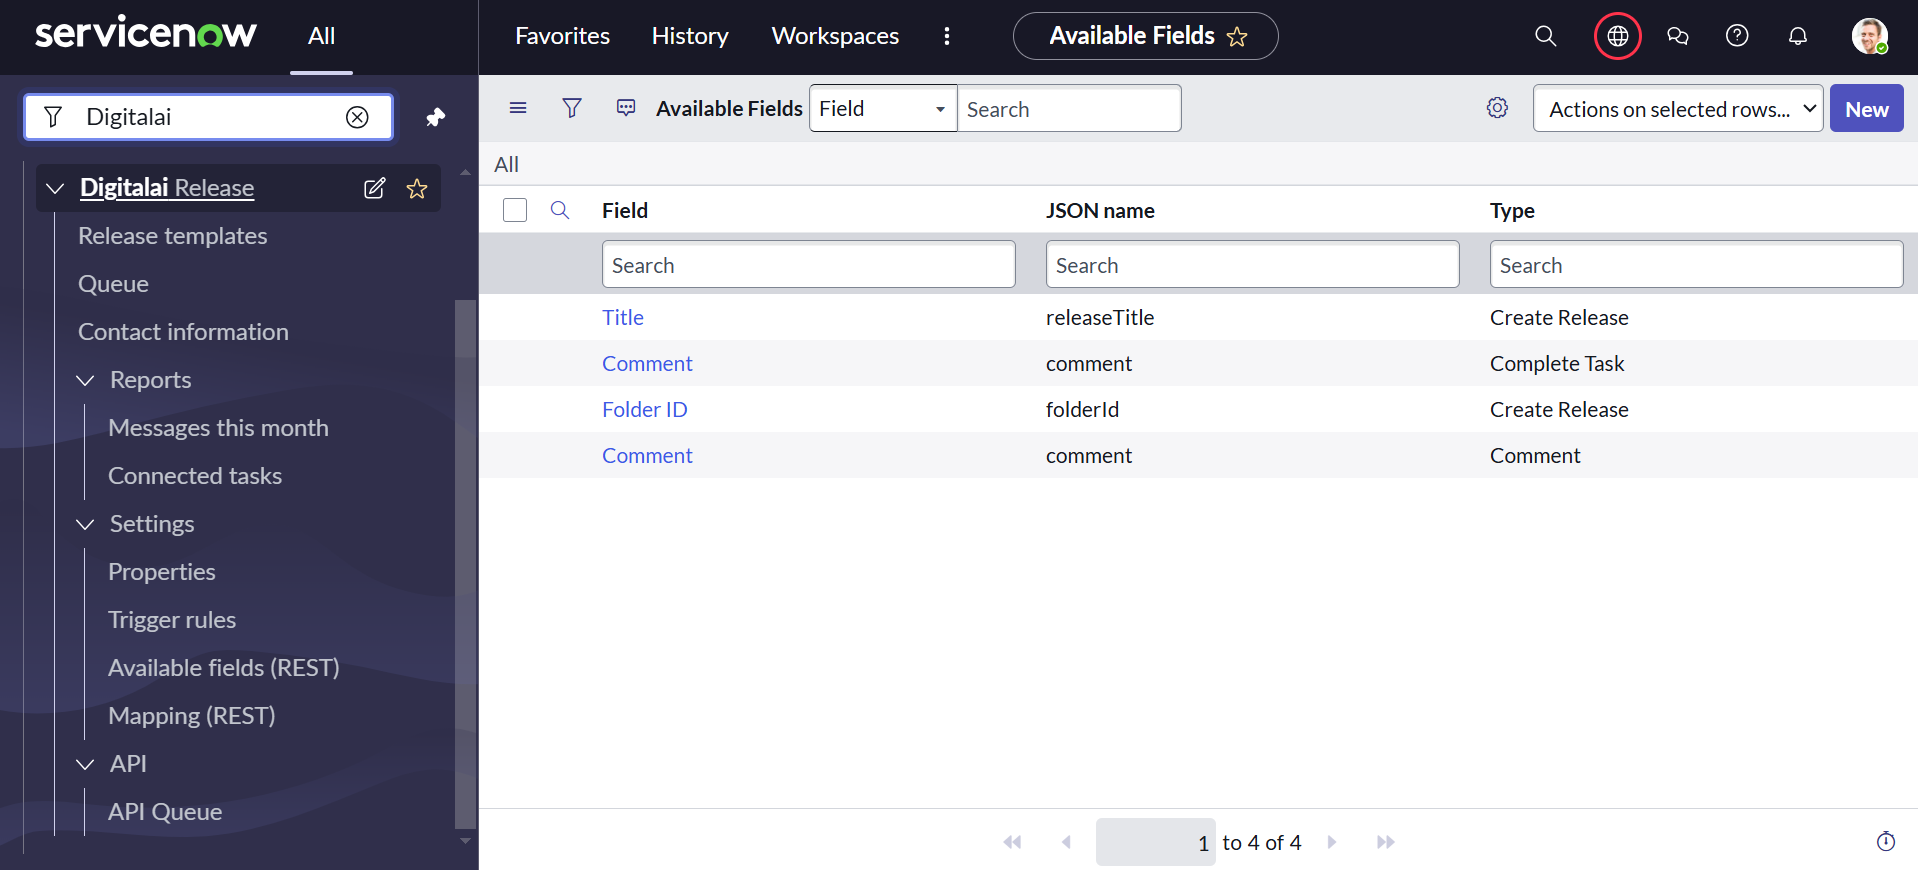
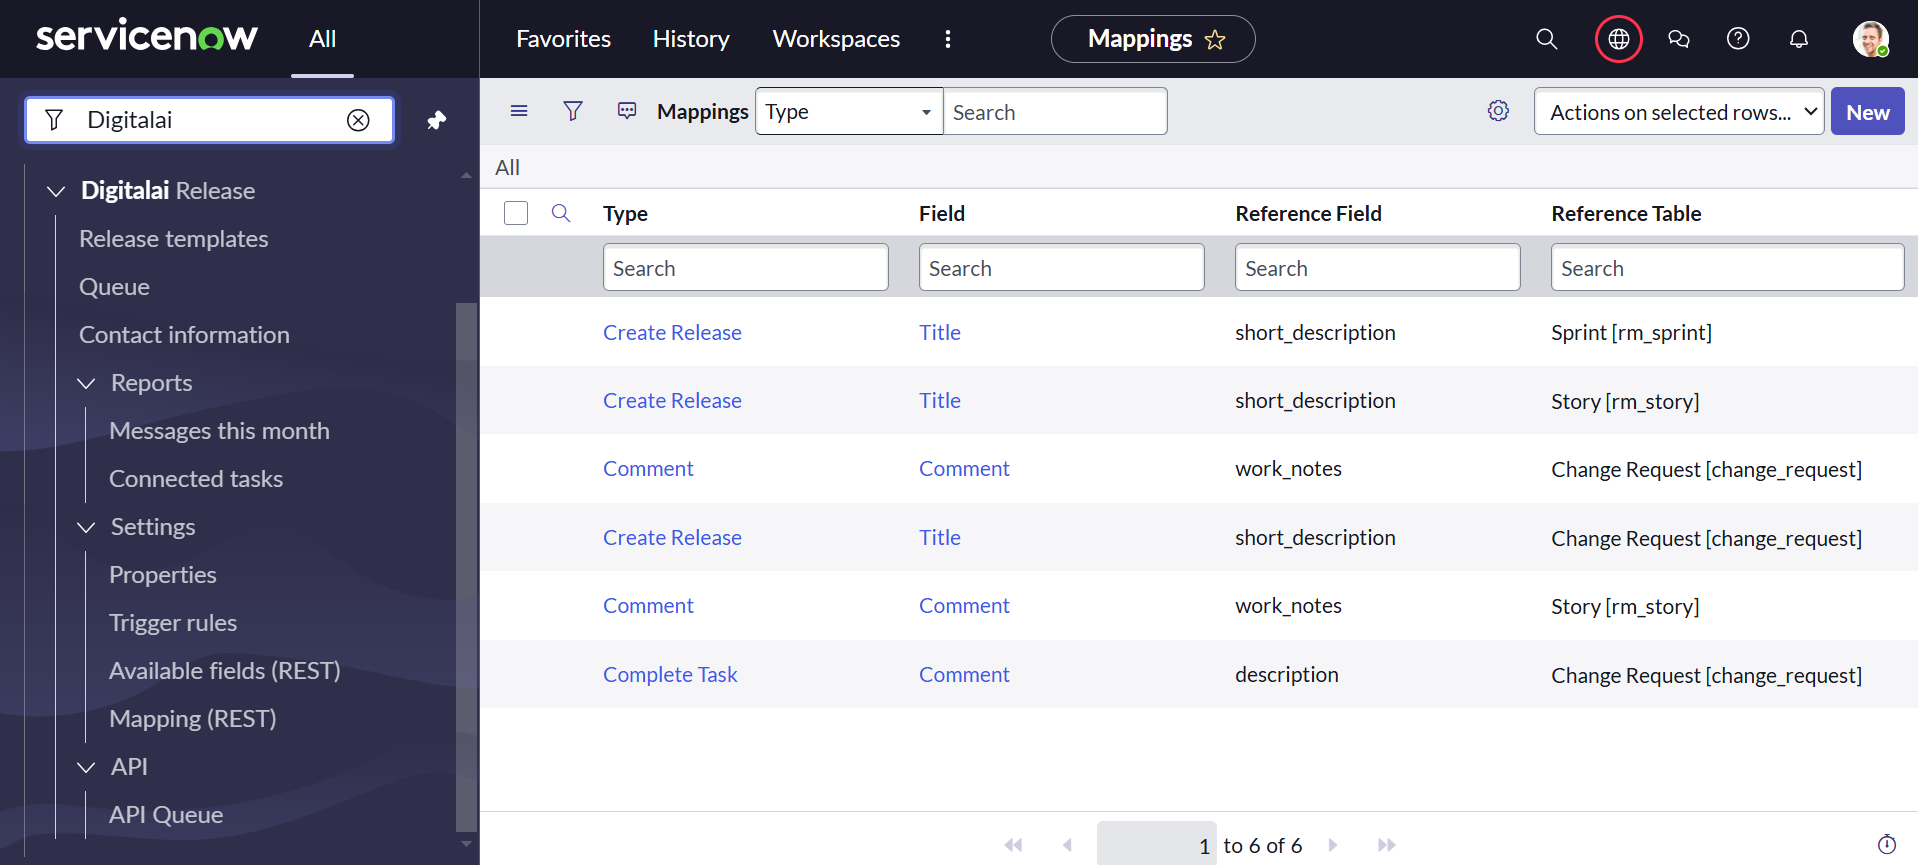
Available fields and field mappings exist next to the trigger rules. If you want to send different field information such as variables, from ServiceNow to Release, you must configure these mappings.
Example of Available fields
Example of Mapping
Initiate a Release From ServiceNow
-
Create a trigger rule for Create Release in Trigger rules.
-
In Change Request, click Create new.
-
Fill in the Description and Short description fields.
-
Click search icon next to Assignment group and Select an assignment group.
-
Scroll down and click the search icon next to the Digitalai Release template.
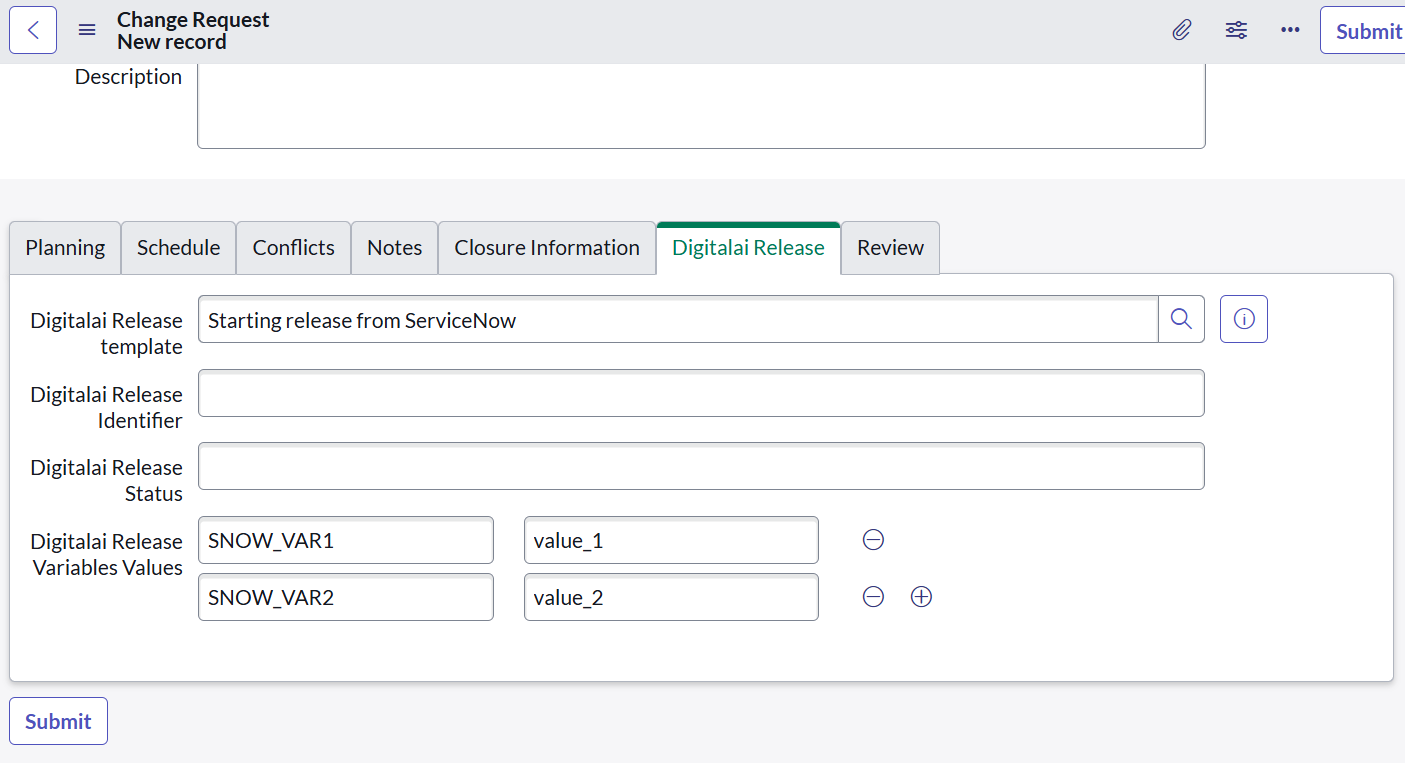
-
Select the name of your template.
-
Enter the Values to the Digitalai Release variables.
-
Right-click and select Save to store the change event. The form is reloaded upon saving and it will auto-populate the Digitalai Identifier and the Release status.

Digital.ai Release Variables Value Format
| Variable Type | Variable Format |
|---|---|
| Text | String of any type |
| List Box | List that allows you to choose a default value |
| Password | Must be greater than 8 characters. Must include a capital character, lowercase character, number and special character(ex: !@#$%^&*?/). Once the form is saved and reloaded the password will be masked (ExamplePassword12!) |
| Checkbox | This is a boolean value. This can be set by either typing false or true |
| Number | This is a number value which can be set to any value |
| List | This is a list of values. Unlike the box value it does not need to have a starting value set |
| Date | This date value can be set using the format (YYYY-MM-DD HH:MM:SS) |
| Key-value Map | This allows you to set Key and value. Using the format: Key_One:Val_One, Key_Three:Val_Three, Key_Two:Val_Two |
| Set | This allows you to store data with out repeating values. Using the format: Val_Two,Val_One,Val_Three |
| Placeholder | This allows you to refer to values in labels in the change request. Use the $ sign to access the value in a label, for example, Use $requested_by, to access the value of the Requested By label. Once saved, the placeholder will be converted to the associated value, for example, the image below shows the value System Administrator is referenced by using $requested_by |
| Important note about editing variables |
|---|
| These values must be created in Digital.ai Release. They can not be created or edited by adjusting the Variable names or using the plus button. You can edit the Variables values in ServiceNow. |
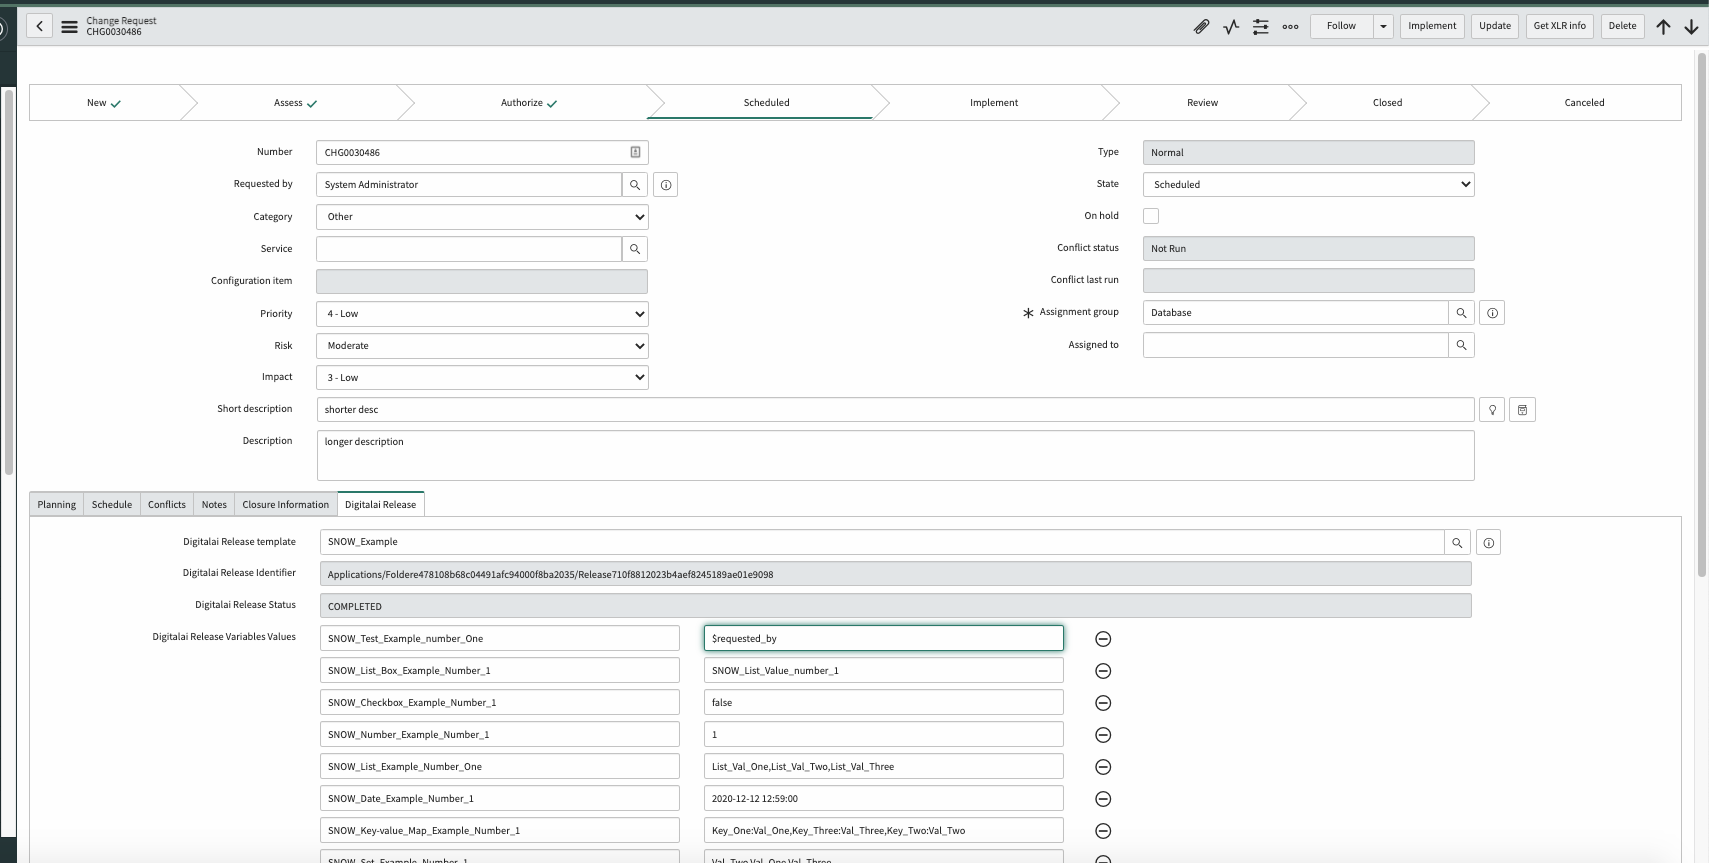 |
Complete a Gate Task When Change Request is Approved
To configure and complete a Gate task when a Change Request is approved in ServiceNow:
- In Digital.ai Release template, to create a Gate task, navigate to Core -> Gate.
- To get this task to run automatically, use the Tag "snow_approved".
- Gates allow for the user to either automatically run them, using "snow_approved" tag or by clicking Skip.
- In ServiceNow, create trigger rules for Create Release and Complete Task in trigger rules.
- Initiate a release by following the steps in Initiate a release from ServiceNow
- In Change Request record, click the Request approval on the top bar.
- Scroll to the bottom and select the Approvers tab.
- Select at least two approvers by checking the boxes next to their names.
- In the actions on selected row menu, select Approve.
- Click Get Digital.ai Release info on the top bar. This changes the Digitalai Release Status to IN_PROGRESS in ServiceNow.
- At the bottom of the page in Service now, return to the Approvers tab. Additional approvers should now be visible. Select the approvers and, in the actions on selected row menu, select Approve. When the change requests gets approved in ServiceNow, this will trigger the completion of all gate tasks that contain the tag 'snow_approved' in the associated Digital.ai release.
Information on Tasks in ServiceNow
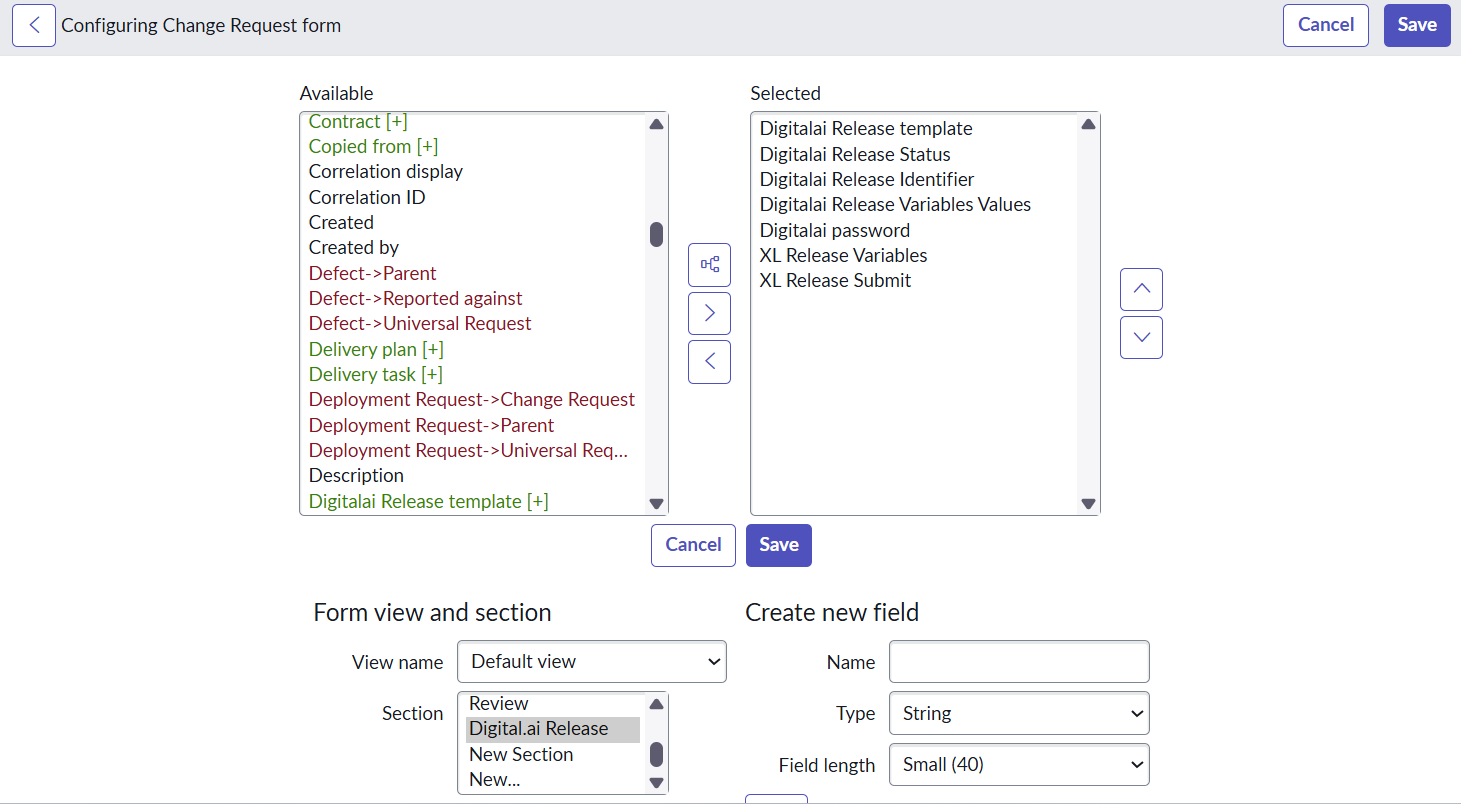
Four fields in ServiceNow are used for communicating with Digital.ai Release:
Digitalai Release template: the template to use when creating a release from ServiceNow.Digitalai Release Identifier: the identifier of a release in Digital.ai Release.Digitalai Release Status: the state of the release in Digital.ai Release.Digitalai Release Variables Values: the values of the variables in Digital.ai Release.
Configuring fields on Tasks in ServiceNow
Links on Tasks in ServiceNow
- The Get Digital.ai Release info action is available to retrieve the latest status of the release in Digital.ai Release
- The Navigate to Digital.ai Release related link navigates to the release in the Release user interface.