Using Deliveries
This topic describes how to create and manage deliveries.
Create a Delivery
There are two ways to create deliveries:
Create a Delivery Manually from a Pattern
To manually create a delivery from a pattern:
- From the navigation pane, click Folders.
- Select a folder and click the Patterns tab.
- Select a pattern from the list to open it, and click New delivery.
You can also click on the pattern to make changes and then click New delivery.
- Enter a name for the delivery.
- To create a delivery in the specific folder, you must select the folder from the dropdown. Otherwise, a delivery will be created inside the selected location.
- Enter a short description.
- Specify the start date and time and the end date and time for the delivery.
- Click Save.
For more information, see Managing delivery patterns.
Use a Task to Find or Create a Delivery
To find or create a delivery through a task, use the Find or create delivery task.
- Go to Releases > Releases and click a release to open it.
- In a phase, click Add task.
- From the drop-down, select Delivery > Find Or Create Delivery.
- Enter a name for the task and click Add.
- Click on the created task to configure it.
- Select a delivery pattern to filter existing deliveries.
- Select the search method to find the delivery:
- Latest delivery from pattern uses the most recent delivery created from the selected pattern
- Search by name allows you to find a specific delivery by name
- To create a new delivery if no existing delivery is found, check Fallback.
- Select the delivery folder from the drop-down. Also, you can choose a variable to select the folder for the delivery
- Assign a variable to the
Delivery IDoutput property, so you can later use it for other delivery tasks.
To create a delivery, you can also use a Create delivery task.
Manage Tracked Items with the Delivery Flow View
You can use the delivery flow view to manage the tracked items inside the delivery.
To open the delivery flow view:
- Go to Releases > Deliveries.
- You can search for a specific delivery by name, filter the deliveries by status, and order by Start date or End date.
- Click on the delivery or click Edit to open the delivery flow and edit the selected delivery.
To delete a delivery, click Delete.
You cannot change or delete stages or transitions of deliveries. After they've been created from a pattern, the flow of deliveries is considered immutable.
Manage Tracked Items
- The state of a tracked item can be reset in a stage so that the associated activities (for example, deployments) can easily be restarted in the participating releases.
- Releases interacting with tracked items are tracked per stage, so that you can see the exact release that has contributed to an item in a particular stage.
From the delivery flow view, you can:
- Filter the tracked items by name.
- Create a new tracked item.
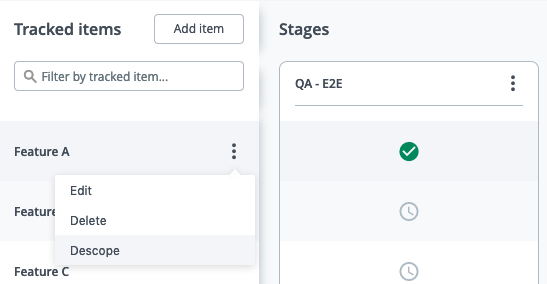
- Edit, delete, or descope/rescope tracked items from the
context menu.

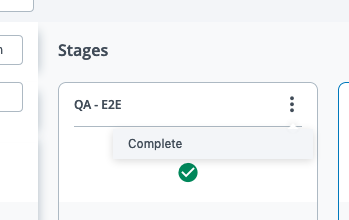
- Skip or complete tracked items manually from the
context menu on each stage. Items can't be completed or skipped on completed stages.

Complete Stages
You can manually complete a stage from its context menu. However, Deliveries can automatically complete when all tracked items are completed or skipped in all the stages.

- Stages must be completed sequentially.
- All the items that are still in progress in the selected stage will be skipped in the stage and descoped.
- Stages can be reopened, but they have to be reopened sequentially (in reverse).
For more information on how to add a Stage Owner, see Stage Owner.
Using Transitions
If there must be an approval before items can move past a certain stage, a transition must be created after it.
- Only tracked items that are completed or skipped in all stages before the transition can be executed.
- A transition can be executed repeatedly as long as the stage before it is not completed.
- If you choose to also complete stages after transitioning, all the items that weren't transitioned (were still in progress or not chosen to be transitioned) will be skipped in stages where they were still in progress and descoped.
Edit Delivery Properties
To edit the delivery, select the delivery and click Properties on the left navigation bar. You can edit the name of the delivery, the short description, the delivery start date, and delivery end date.
View Timeline
To view the delivery timeline, select the delivery and click Timeline on the left navigation bar. The timeline will show the start and end date of the delivery, and start and end dates of linked releases.
Activity Logs
To view the delivery activity logs, select the delivery and click Activity logs on the left navigation bar.

Synchronize Releases through Delivery Events
By creating tasks inside release that complete tracked items or wait for events in a delivery (synchronization points), multiple releases can be synchronized in their execution.
Wait for Stage
Using a Wait for stage task, releases can be synchronized on the event of completion of a stage in a delivery.
Wait for Tracked Item
Using Wait for tracked items task, a release can be synchronized on the events of appearance or completion of items in a stage in a delivery. In the moment of execution of this task, the items must exist in the delivery and not be descoped, otherwise the task will fail.
Complete Tracked Items in a Stage
Using Mark tracked items task, items can be completed in a stage in a delivery through a release. In the moment of execution of this task, the items must exist in the delivery and not be descoped, otherwise the task will fail.
How to Descope Releases from a Delivery
When designing your release synchronization, it is important to understand the difference between how the Wait for stage and Wait for tracked item task types. This will help you to use tracked items to descope releases.
In a delivery, whenever a tracked item is descoped, this will only fail the delivery tasks that are referencing that tracked item such as Wait for tracked item and Mark tracked items tasks, but any other task types including Wait for stage will continue. So, if you want to use tracked items to manage your releases, you should place a Wait for tracked items task in an appropriate place on the release flow.
If a release contains a Wait for stage task, but does not contain a Wait for tracked item task, the releases will always continue even if the release's tracked items are descoped from a delivery. Wait for stage forces the release to pause until a delivery has passed a milestone, but since a delivery will normally contain several releases, the releases will all continue when the delivery moves forward.
On the other hand, a release will not really be synchronized with a delivery unless it contains a Wait for stage task. In general, you should use a Wait for stage task in feature-independent releases, while Wait for tracked item tasks are used for feature releases where progress is related to certain features.
Consider the following scenario:
Releases A and B are part of a delivery. Both releases use the Mark tracked items task type in the beginning to set up their link with the delivery. Release A uses a Wait for stage task to prevent it from going to Production, while Release B uses a Wait for tracked items task to prevent it from going to Production.
Scenario 1 The business decides to descope the tracked item of Release A but not B. The result is that the release continues, and causes the delivery to fail at a later stage when the release requires a Mark tracked items task to be done before it can be completed.
Scenario 2 The business decides to descope the tracked item of Release B but not A. The result is that the release fails as intended, but the delivery continues and Release A is able to be completed.