How to Integrate Deploy with the Platform
This guide provides step-by-step instructions for integrating Digital.ai Deploy with the Digital.ai Platform.
The Platform uses your existing single-sign on (SSO) infrastructure to securely authenticate users in Deploy using the same corporate credentials they already use. Acting as a bridge between your identity provider (IdP) and Deploy, the Platform grants access to Deploy based on user data from your IdP, eliminating the need for unique credentials in Deploy. This integration also allows you to map user groups in your IdP to specific roles in Deploy.
This guide assumes that you have already installed Deploy and configured one or more roles. If you have not yet done so, see the Deploy documentation
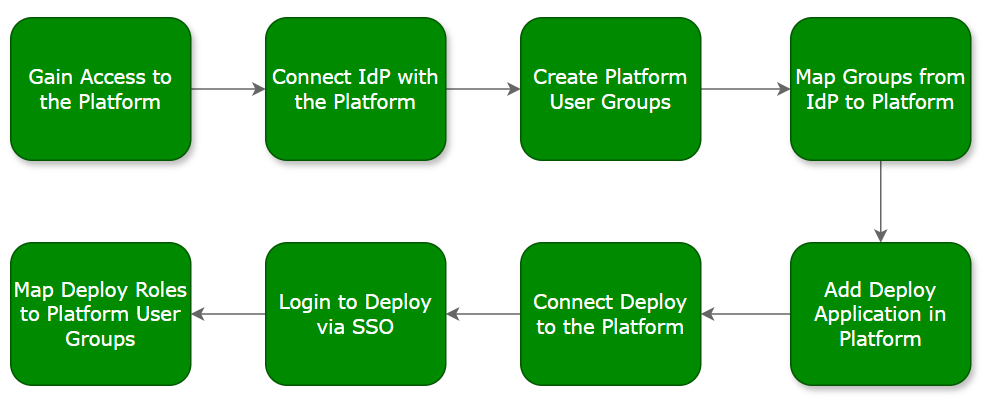
The following diagram summarizes the workflow required to complete this integration:
Step 1: Gain Access to the Platform
Before doing anything else, you need an administrator user for your Platform account.
It is possible that an initial admin user could have already been created for you when your Digital.ai account was established, so we recommend checking for an existing administrator in your organization before reaching out to Digital.ai support. However, if you have no record of an administrator being created, then you should contact your Digital.ai representative to request an initial set of credentials. This initial administrator can invite others as needed.
During this process, you should have also received a unique URL for your Platform account, which you will use to perform all the tasks in this guide.
Your unique URL is formatted like this: https://CUSTOMERNAME.REGION.digital.ai
For example: https://exampletech.us.digital.ai
Step 2: Connect Identity Provider with the Platform
In this step, you'll learn how to connect your corporate IdP with the Digital.ai Platform.
The process differs slightly based on whether you are using an OIDC provider or SAML provider. These differences are noted when appropriate.
Gather Required Data
Before you begin, you must obtain some essential details from your IdP.
This information can be obtained by reviewing the Digital.ai application configured in your IdP. If you have not already created an application for Digital.ai, you must do so before continuing. We recommend working with your IT team or whoever manages SSO administration at your company.
For OIDC Connections
- Client ID
- Client secret
- metadata URL (
.well-known/openid-configuration endpoint) - The claim names for the following user information: first name, last name, username, email
For SAML Connections
- metadata URL (different IdPs may have different names for this)
- The assertion names for the following user information: first name, last name, username, email.
Establish SSO Connection
To start, click the Setup identity provider button on the Overview page to open the configuration wizard. Alternatively, you can click Identity Providers in the left navigation, then click the Add identity provider button.
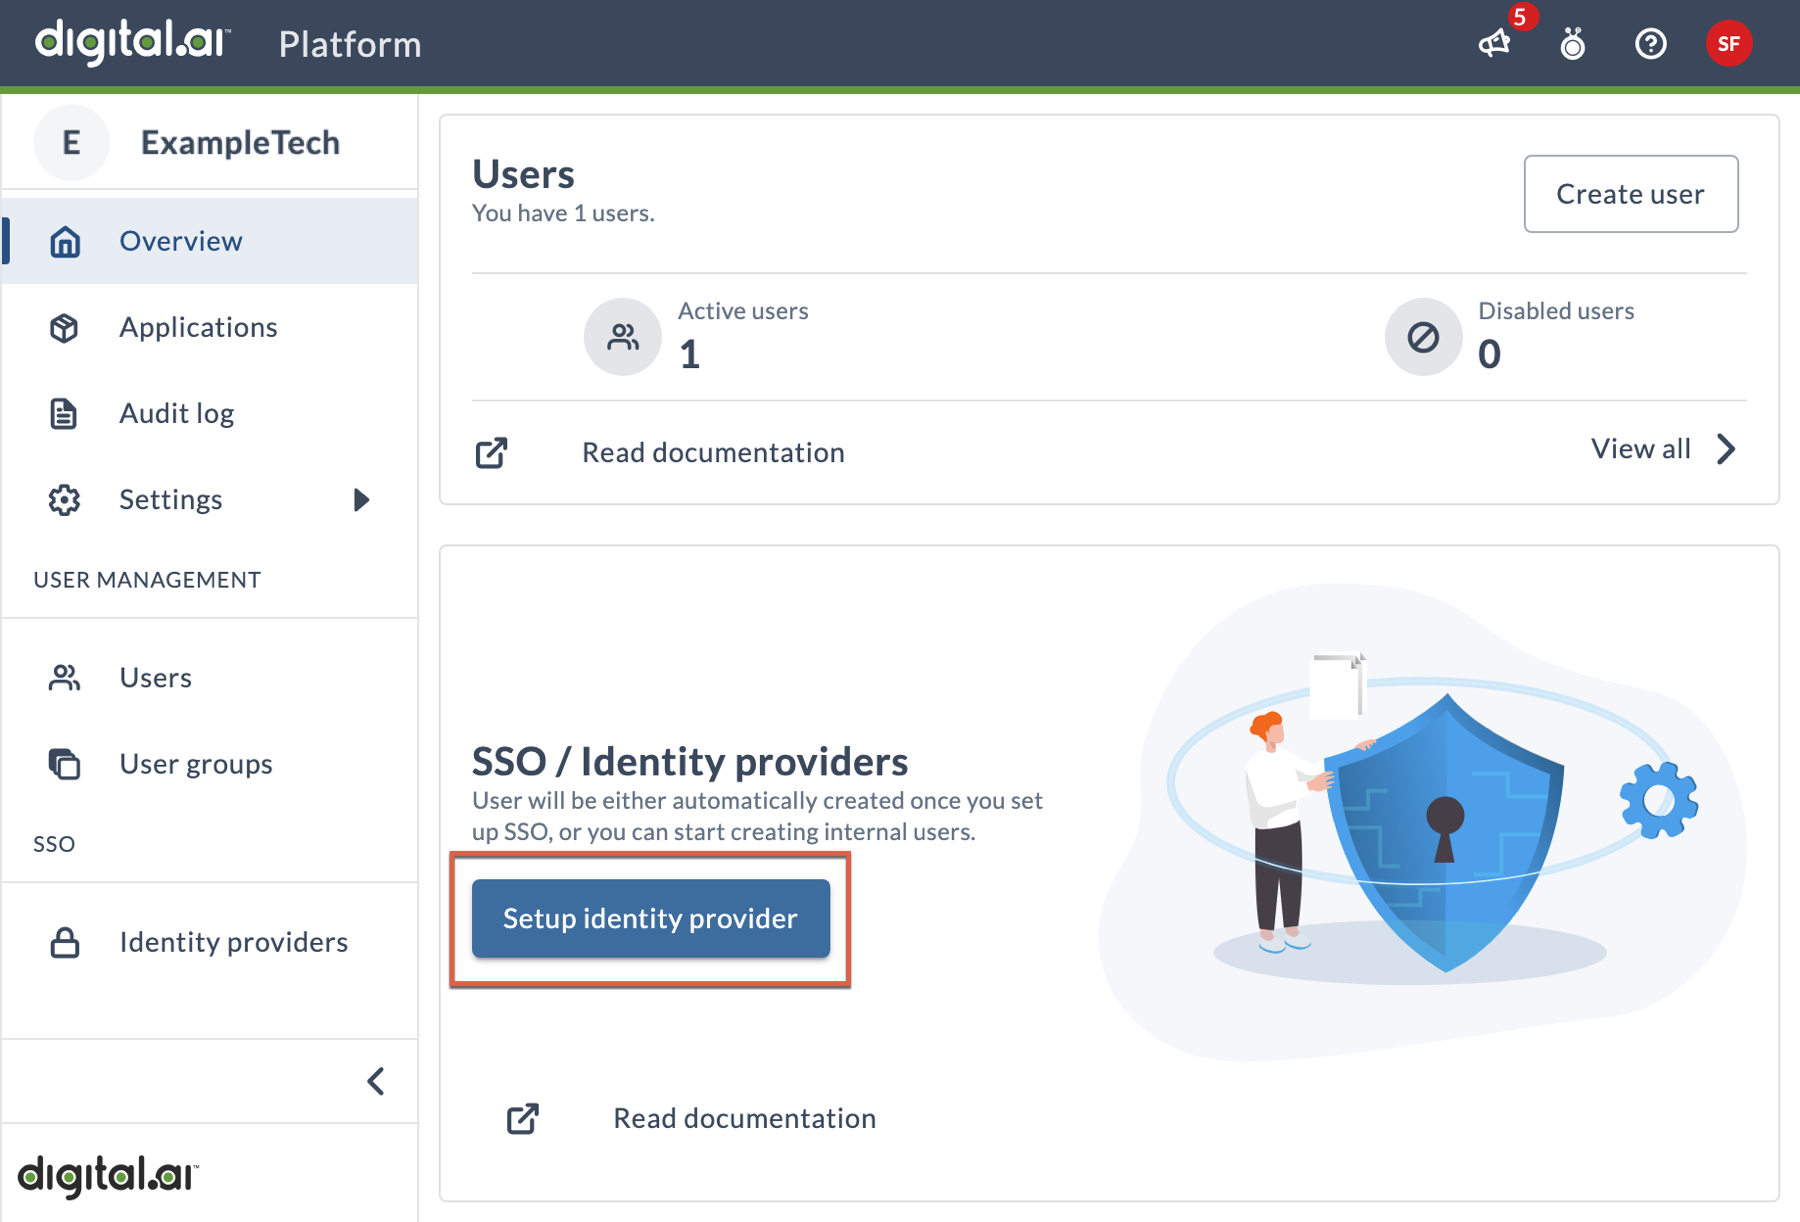
This wizard leads you through all the steps necessary to connect your IdP to the Platform. Most pages in the wizard include descriptions for each field and option, so you should be able to follow along easily, but this section includes some conceptual and clarifying information that will help you through the process.
Select provider
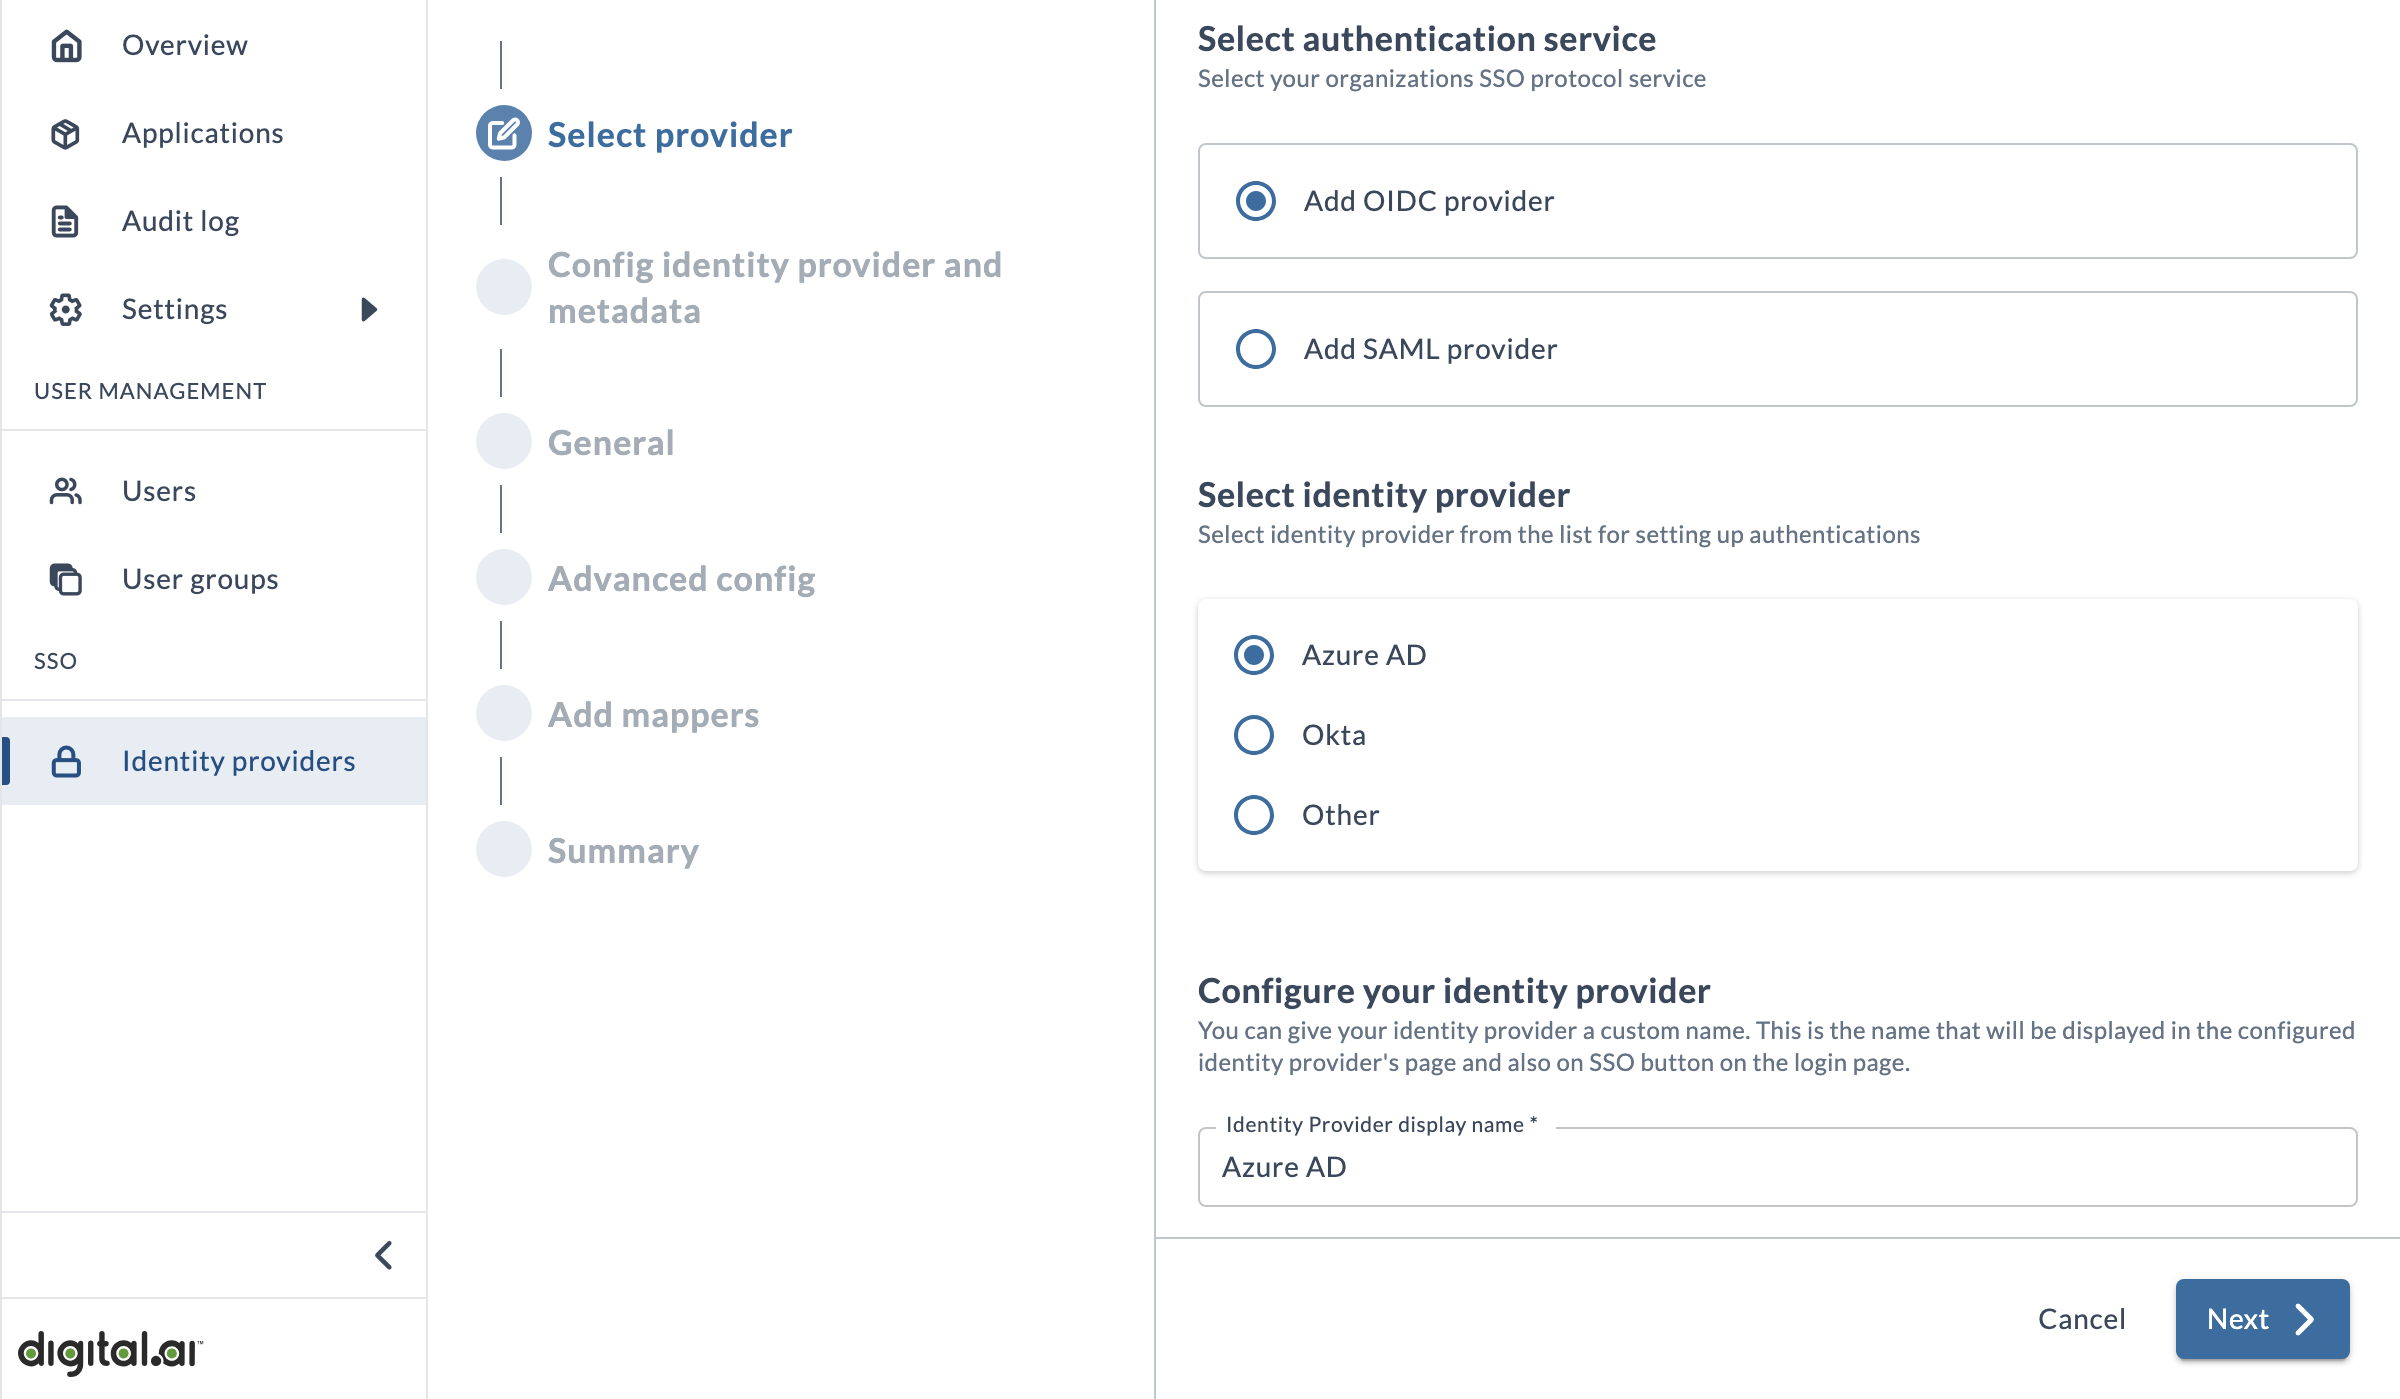
On this page you'll enter basic details about your IdP, such as the SSO protocol service and the name that will appear on the login button.
Config identity provider and metadata
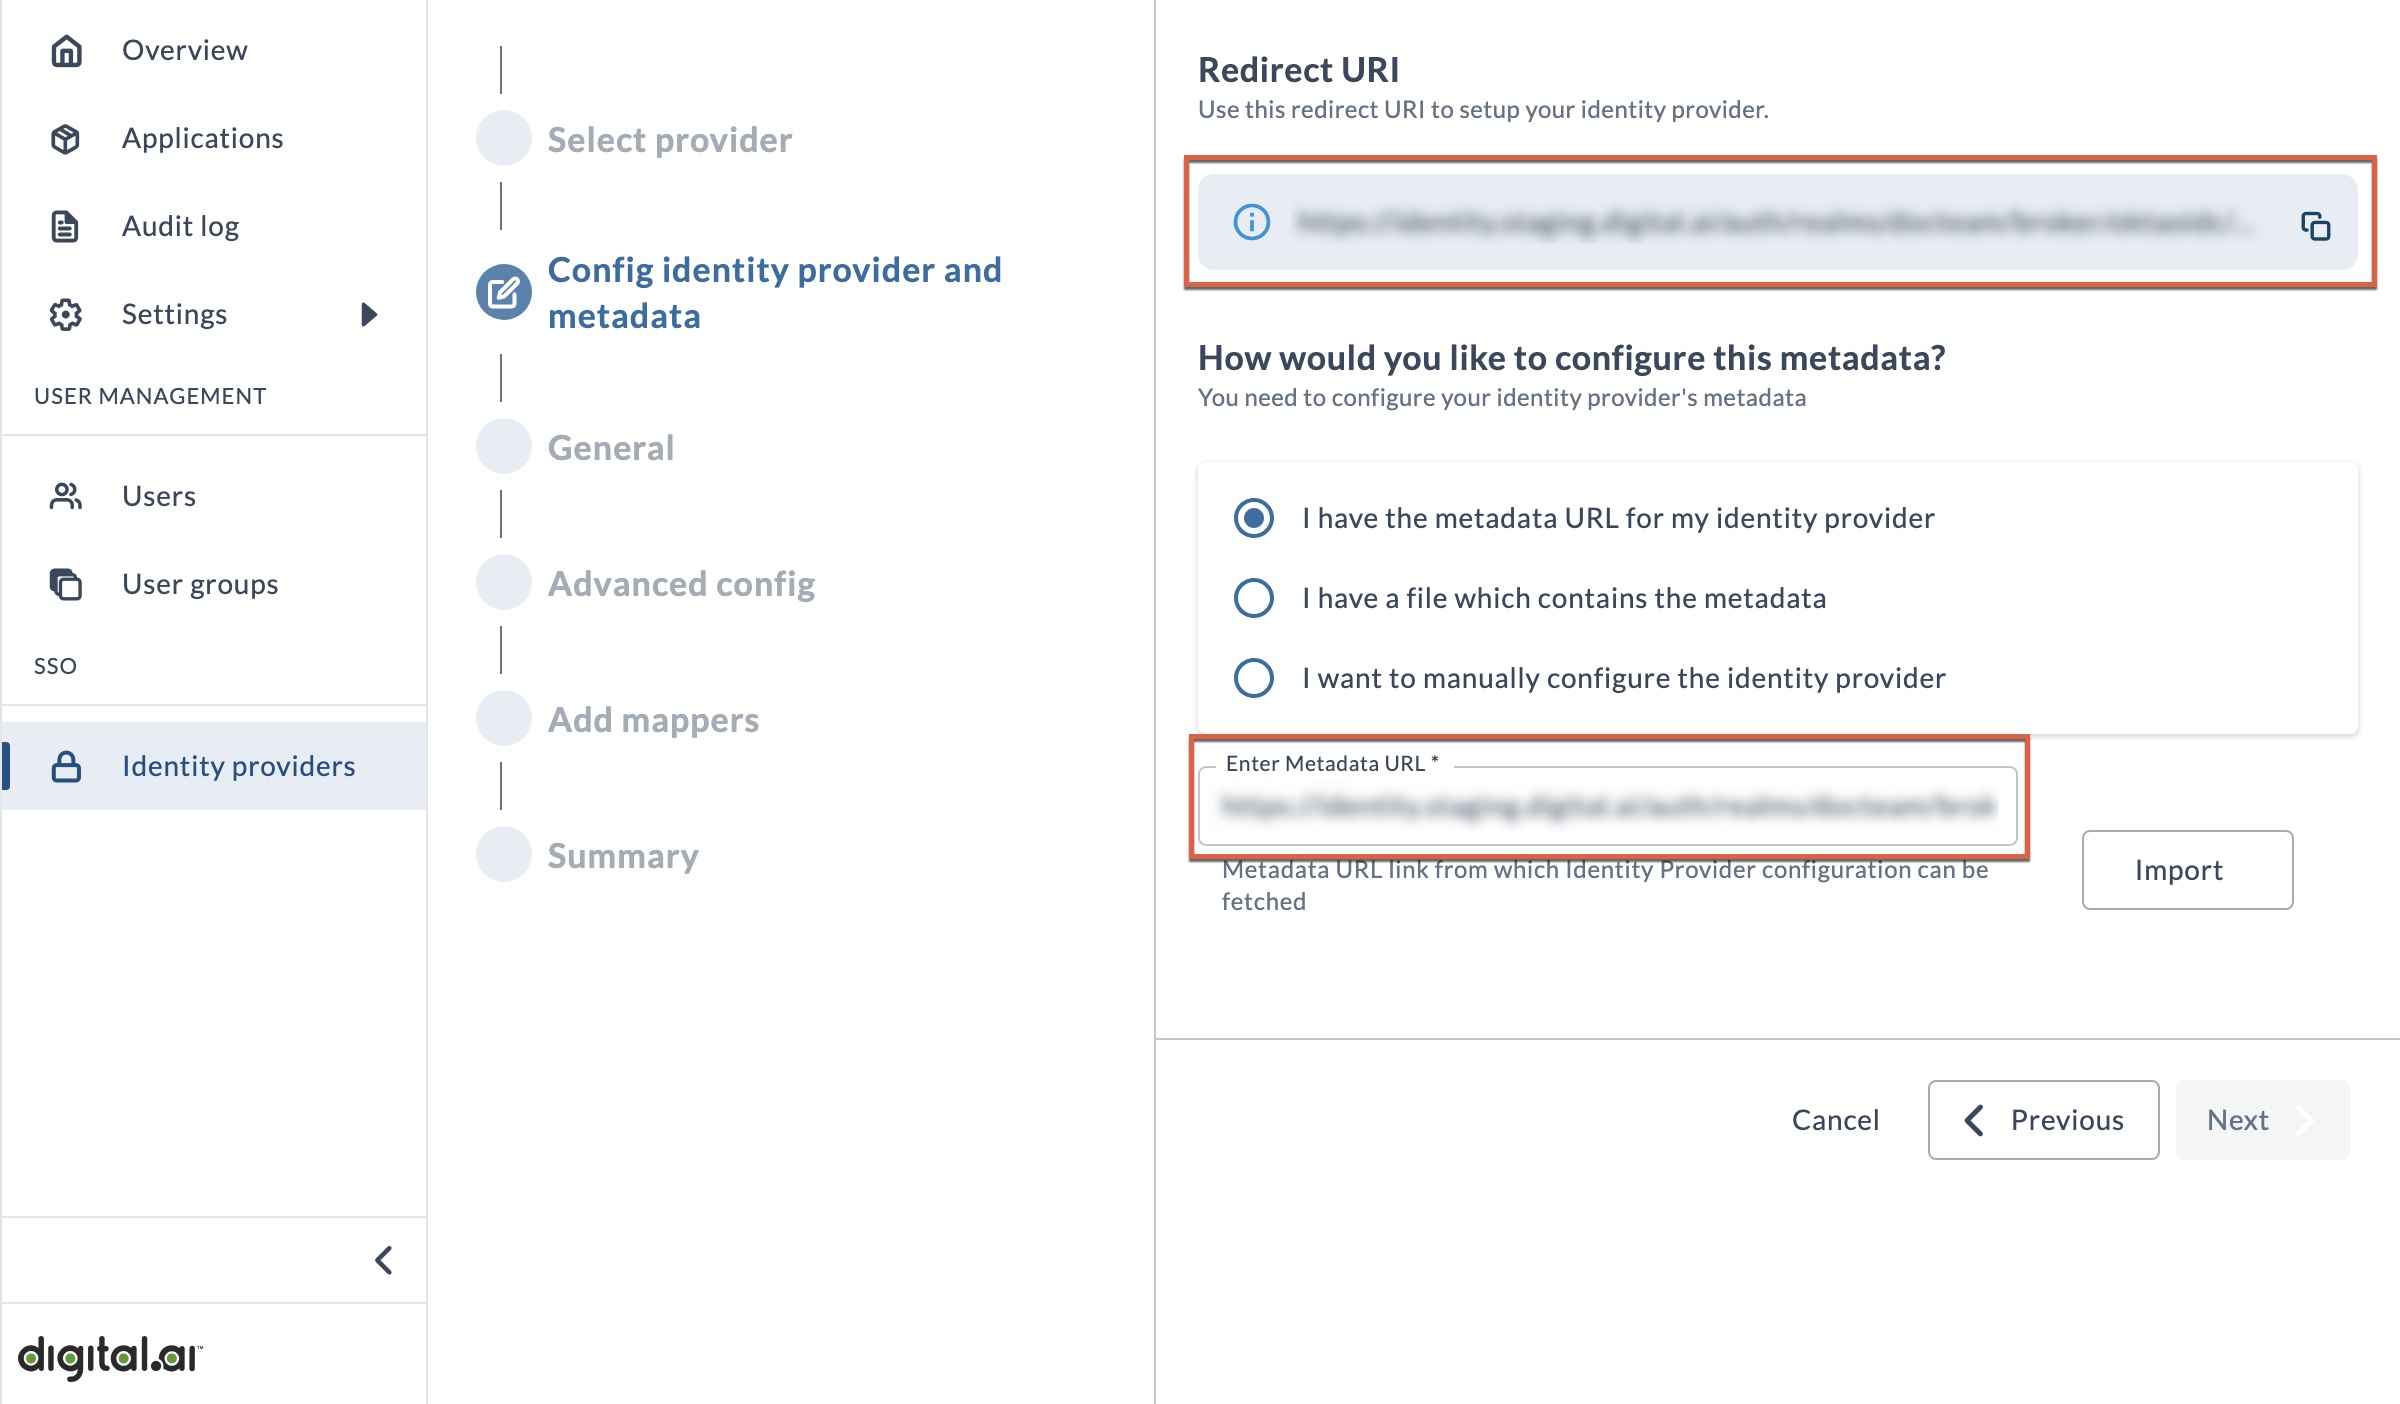
This page provides you with the Redirect URI for your Platform site, and gives you the opportunity to prepopulate the rest of the wizard with necessary details
First, you'll need to copy the Redirect URI and then open a new browser tab or window to move over to your IdP account. There, use the Redirect URI to identify the Digital.ai Platform as a valid redirect URL in your IdP account. The process for completing this task will differ depending on which IdP you use. Depending on your role in your organization, you may need assistance from IT or whoever manages SSO administration at your company.
Once you've done this, you should be able to find the metadata URL if you hadn't already.
Now choose I have the metadata URL for my identity provider and paste the metadata URL into the Enter Metadata URL field, then click Import.
General
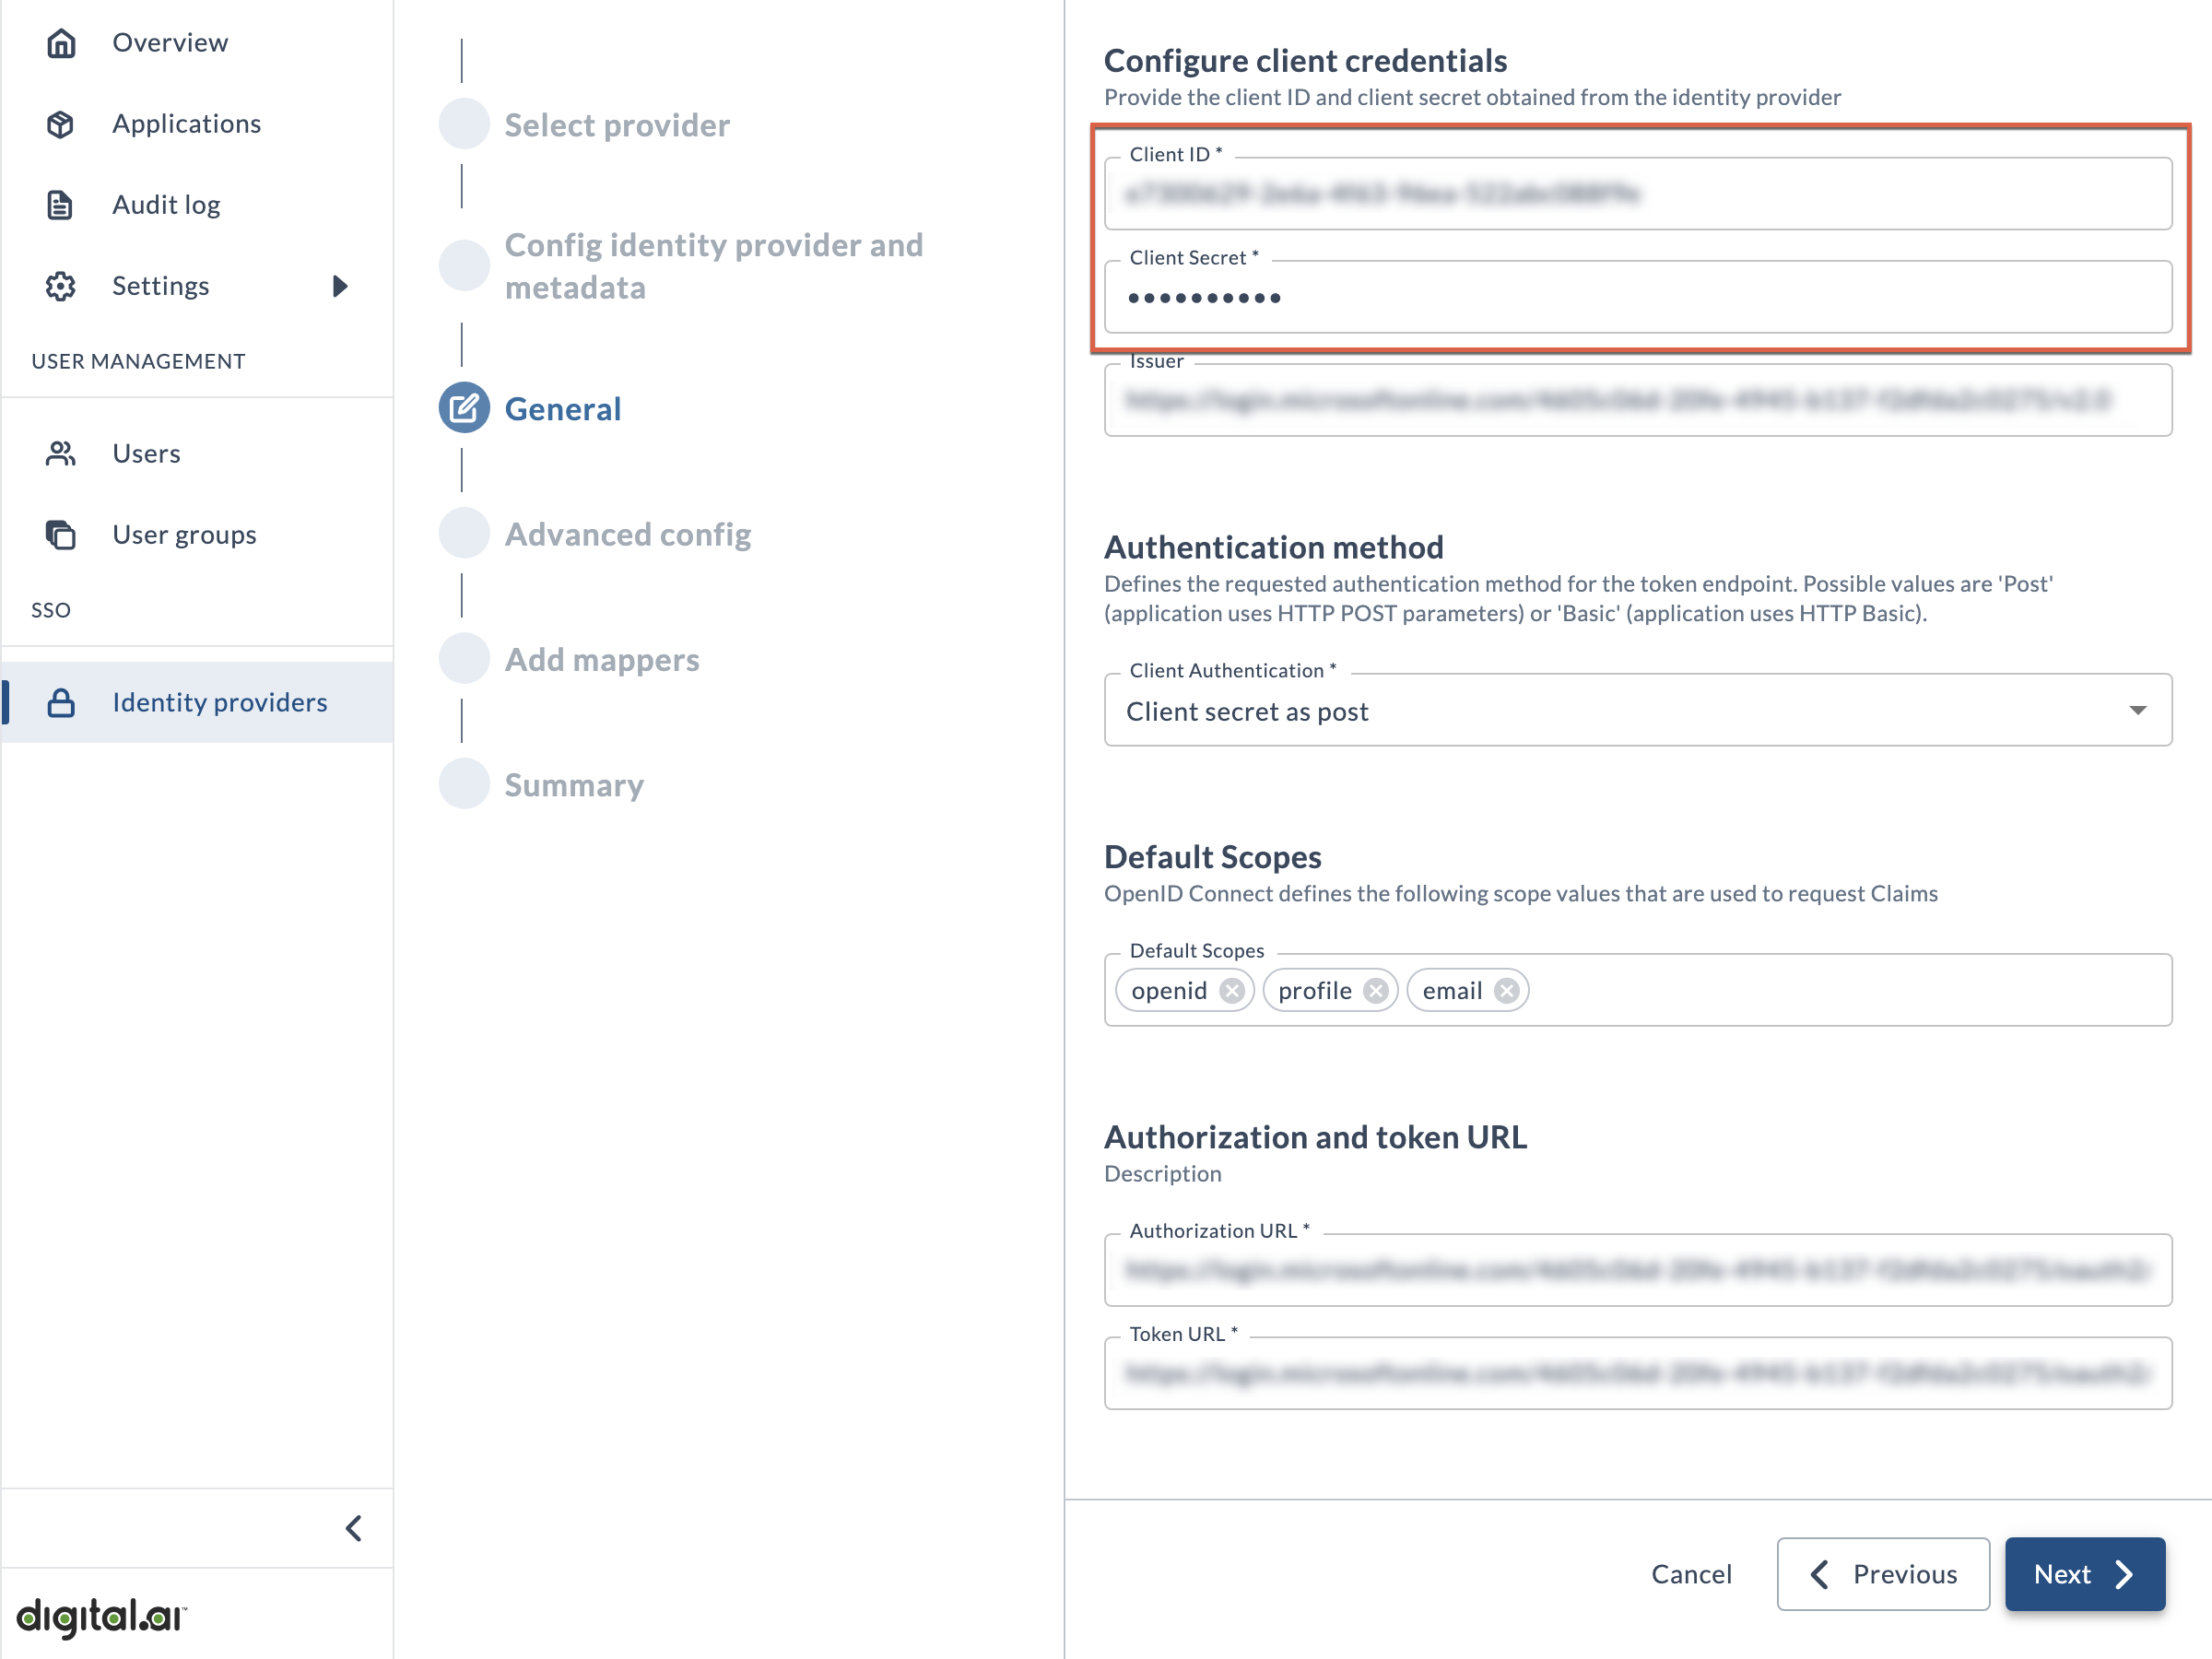
On this page, paste your Client ID and Client Secret values (which you obtained in the prerequisite step) into the appropriate fields.
The remaining fields on the page will be automatically completed, so you can accept all the defaults and continue to the next step in the wizard.
Advanced config
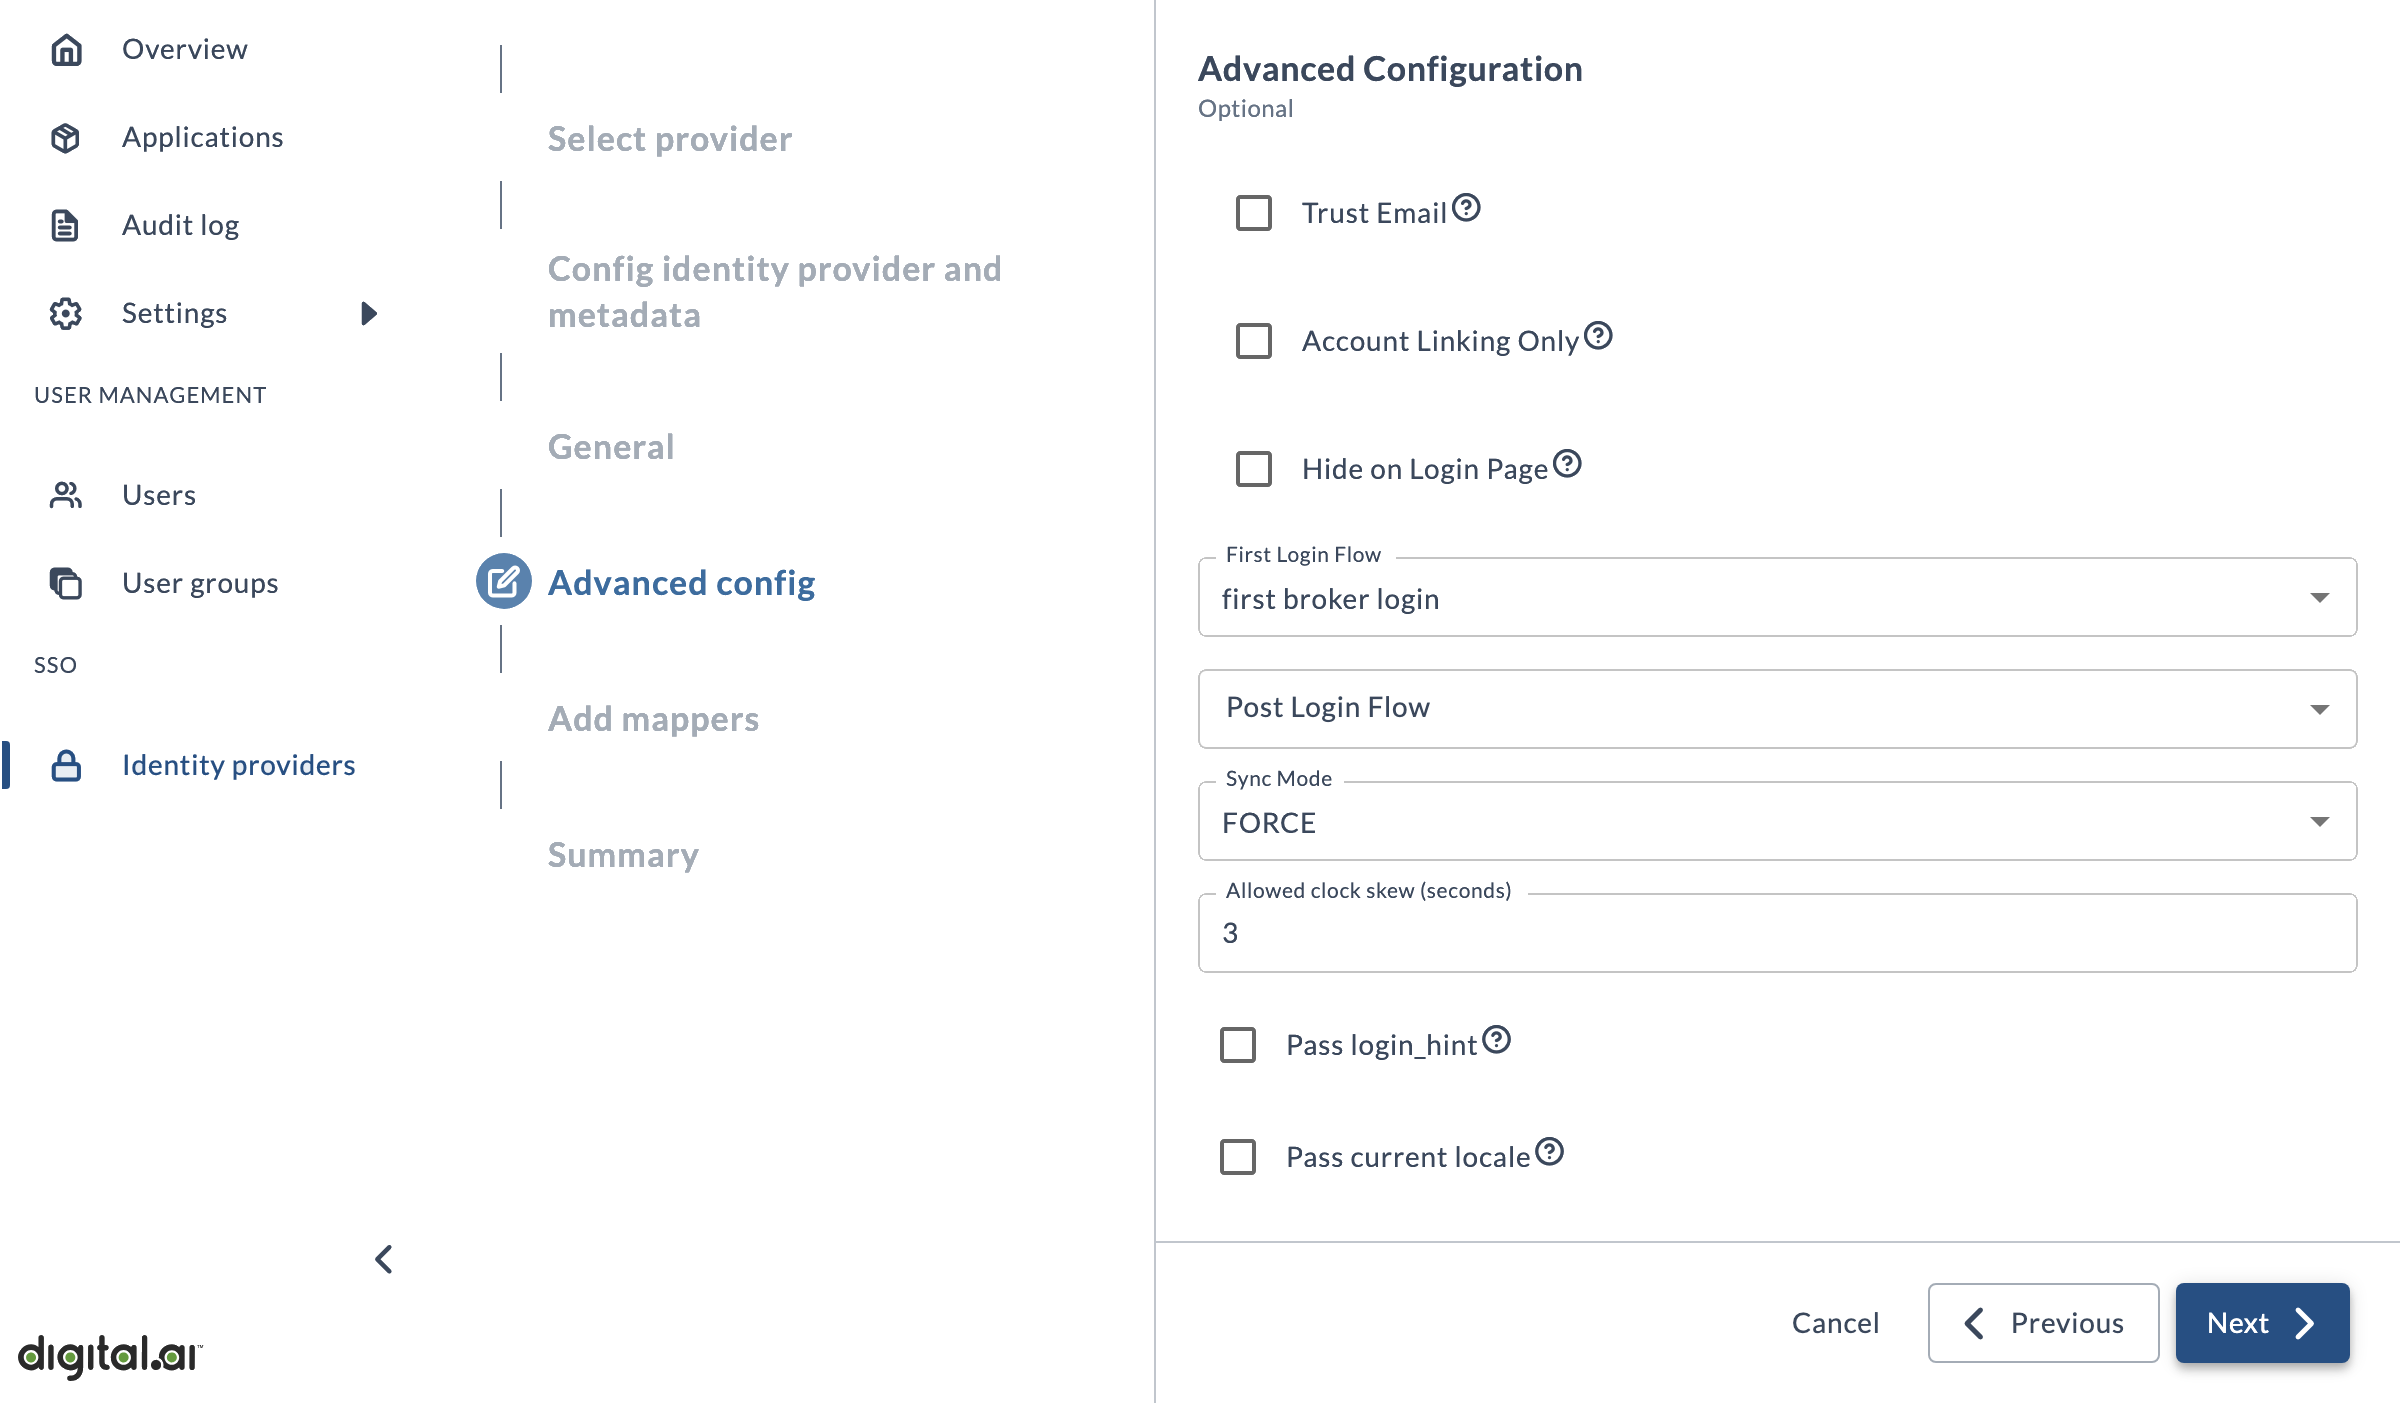
This page is entirely optional. Unless you have been specifically told otherwise, you can accept all the defaults and click Next.
Add mappers
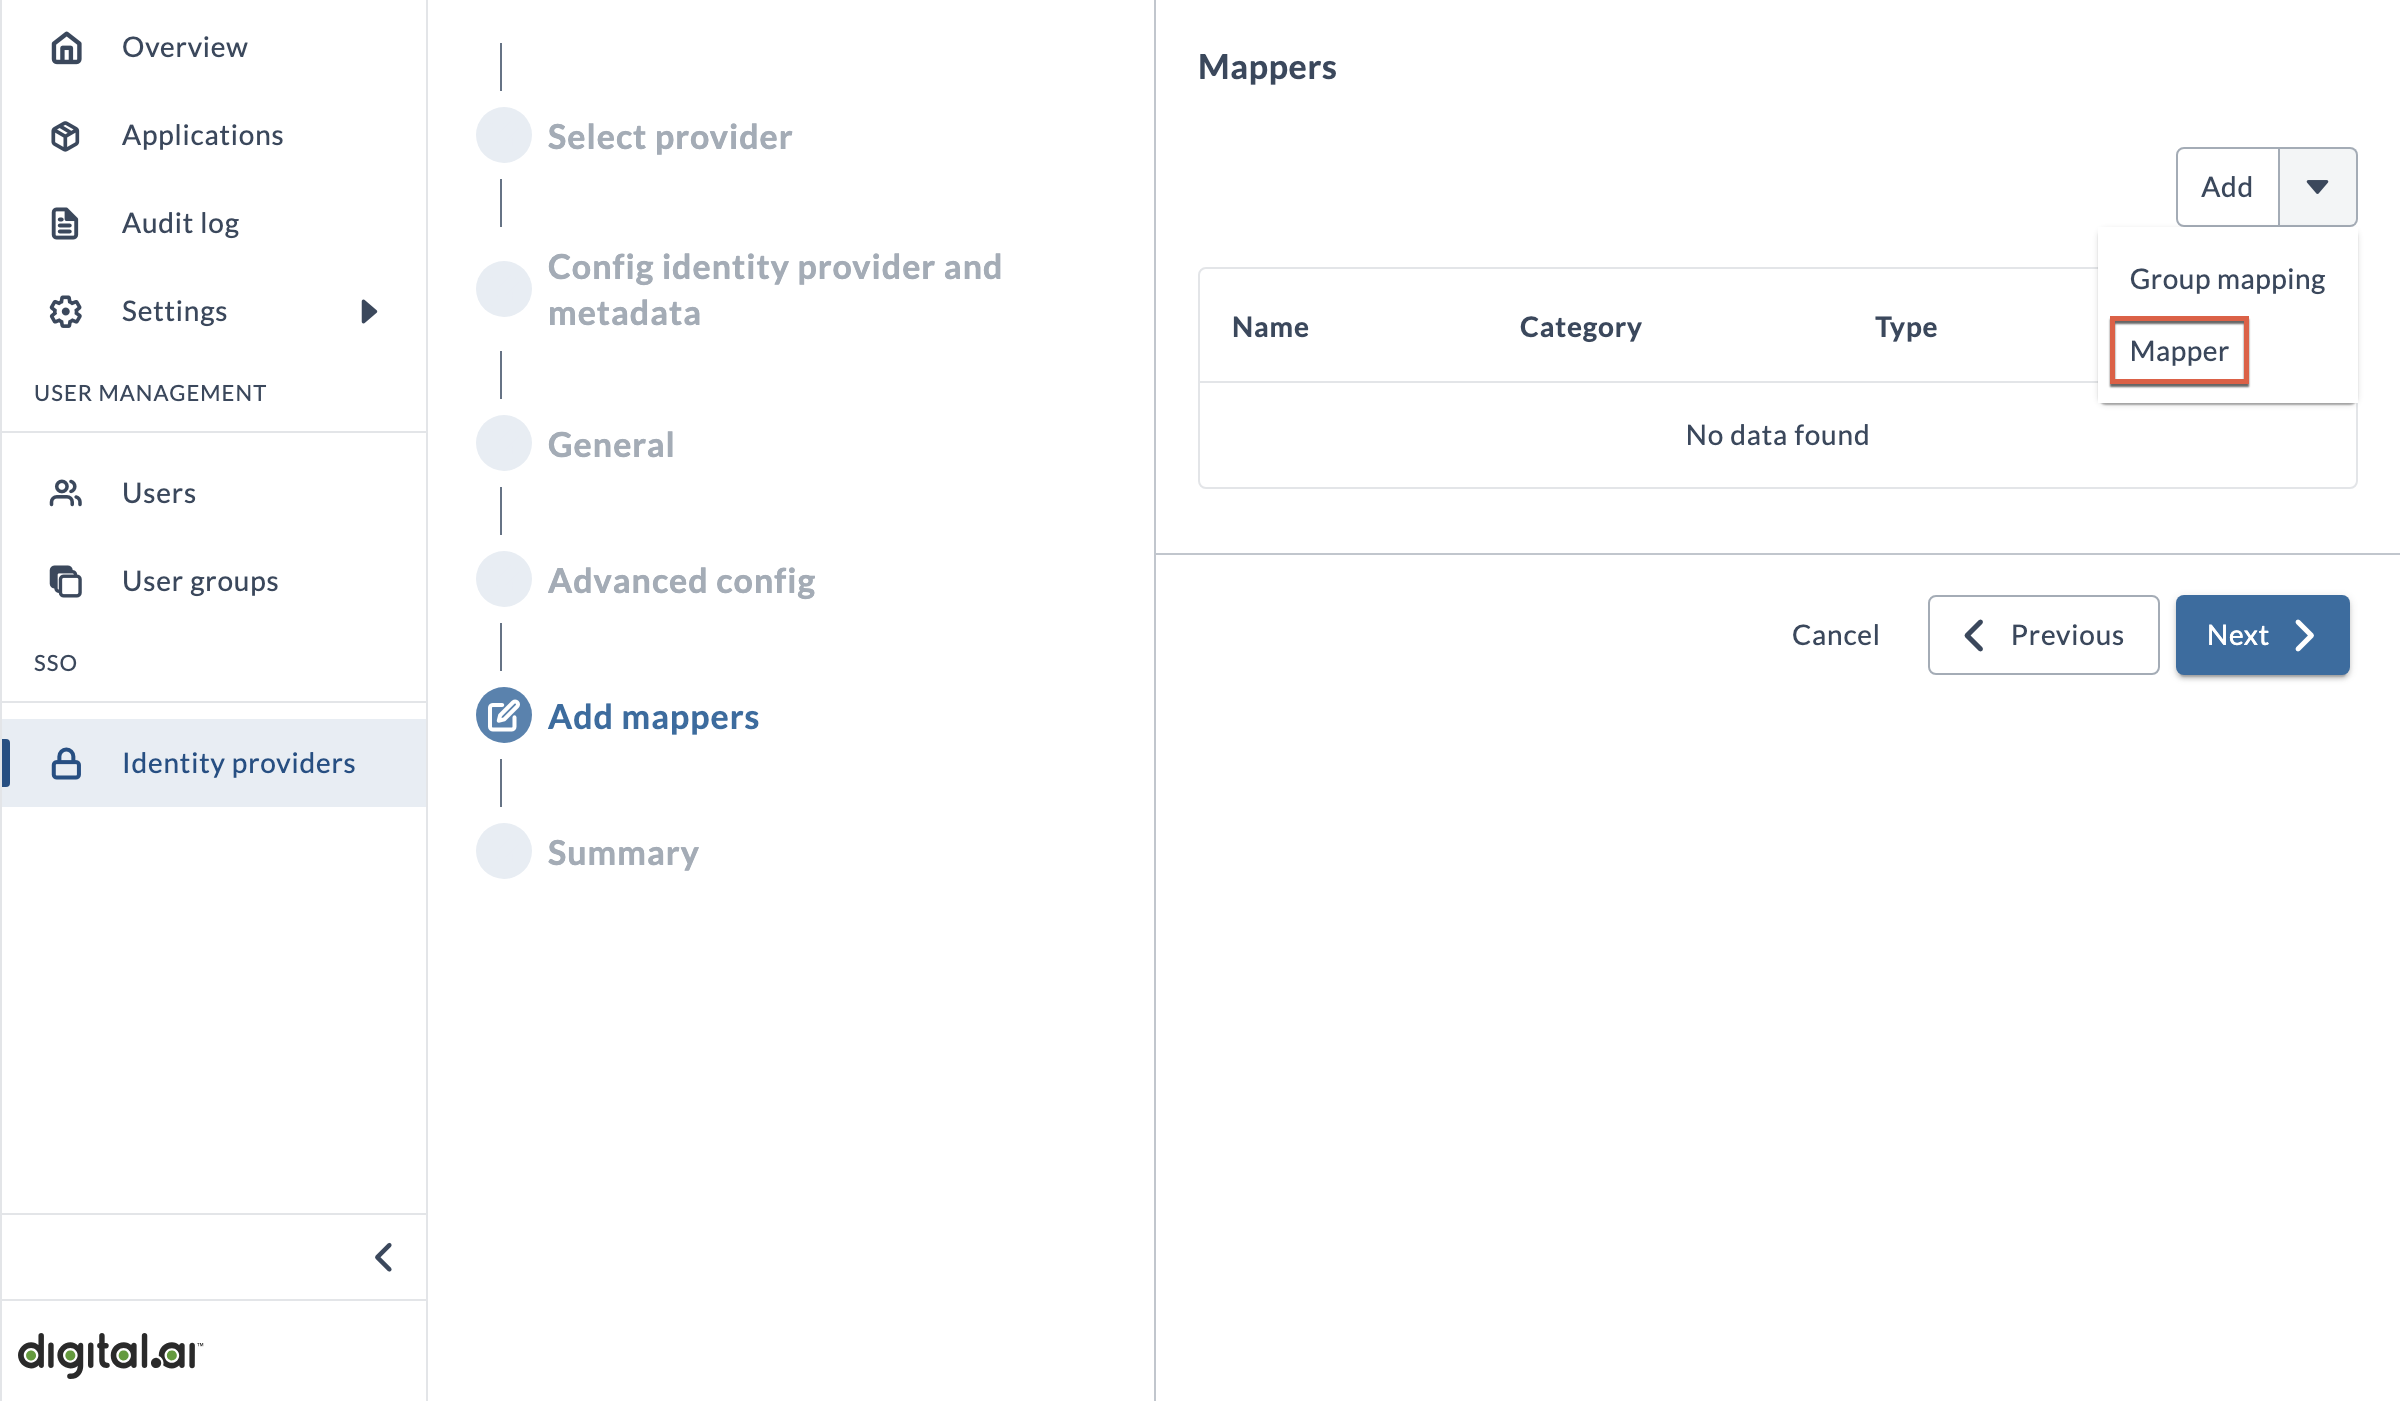
This page allows you to add mappers to ensure that user data from your IdP is properly understood by the Platform. Your identity provider shares information about your users with Digital.ai in the form of key/value pairs (known as claims or assertions, depending on the IdP), and the Platform uses this data to create users in our system.
Mappers are required for SAML connections, but optional for OIDC connections unless your IdP uses non-standard claim names.
OIDC
Whether or not you need to use mappers to handle this data is entirely dependent on your organization's unique situation, and in general the Digital.ai Platform expects to receive user attributes based on the set of standard claims as defined by OpenID. You can view the list of standard claims here: https://openid.net/specs/openid-connect-core-1_0.html#StandardClaim.
If your data is stored as the claims identified in this list (i.e. given_name, family_name, email, etc.), then you typically would not need to bother creating any attribute mappers.
For example, if your IdP uses the standard claim "email": john@example.com, the Platform will automatically map that to the Platform's email user attribute.
However, if your IdP uses a claim called "email_address": john@example.com, then you would need to create a mapper to correctly get that data into the Platform's email user attribute.
SAML
Unlike OIDC, the SAML protocol has no standard naming conventions for the attributes it stores (which SAML tokens refer to as assertions). That is why we require mappers for SAML connections, because each IdP's assertions may be named differently. So in order for the Platform to understand the data correctly, you must provide the assertion values as they are named in your IdP.
When creating mappers for SAML connections, you must add mappers for the following user data: first name, last name, email.
Username data is automatically pulled from the NameID attribute (based on the NameID Policy Format / Principal Type fields defined in the SAML IdP). You do not need to create a mapper for username if you need to override the default assertion.
How to Add Mappers
If you have determined that you need to add mappers, then follow this procedure:
- Click the Add drop-down arrow, and select Mapper.
- In the Add mapper window, set the following fields:
- Name is merely a way to identify the mapper. Enter something like
First Name Mapper. - Sync Mode controls whether an update to a user attribute in your IdP will cause an update in the Platform. We suggest using INHERIT.
- FORCE always updates the Platform user when there is a change in your IdP.
- IMPORT never updates the Platform user after they are created the first time, regardless of changes in your IdP.
- INHERIT uses the value that has been configured on the Advanced config page of this IdP connection.
- Mapper Type should be set to Attribute Importer.
- (For OIDC providers only) Claim is the name of the claim as specified by your IdP.
- User Attribute Name is the Platform user attribute that the data will be mapped to. This should be set to
username,email,firstName, orlastNamedepending on the data you're mapping. - (For SAML providers only) Attribute name is the name of the assertion as specified in your IdP's SAML token. You can add the name in either Attribute Name or Friendly Name (you must complete at least one of the fields, but you do not need to complete both).
- Click Add Mapper.
- Repeat the previous steps to add additional mappers.
Summary
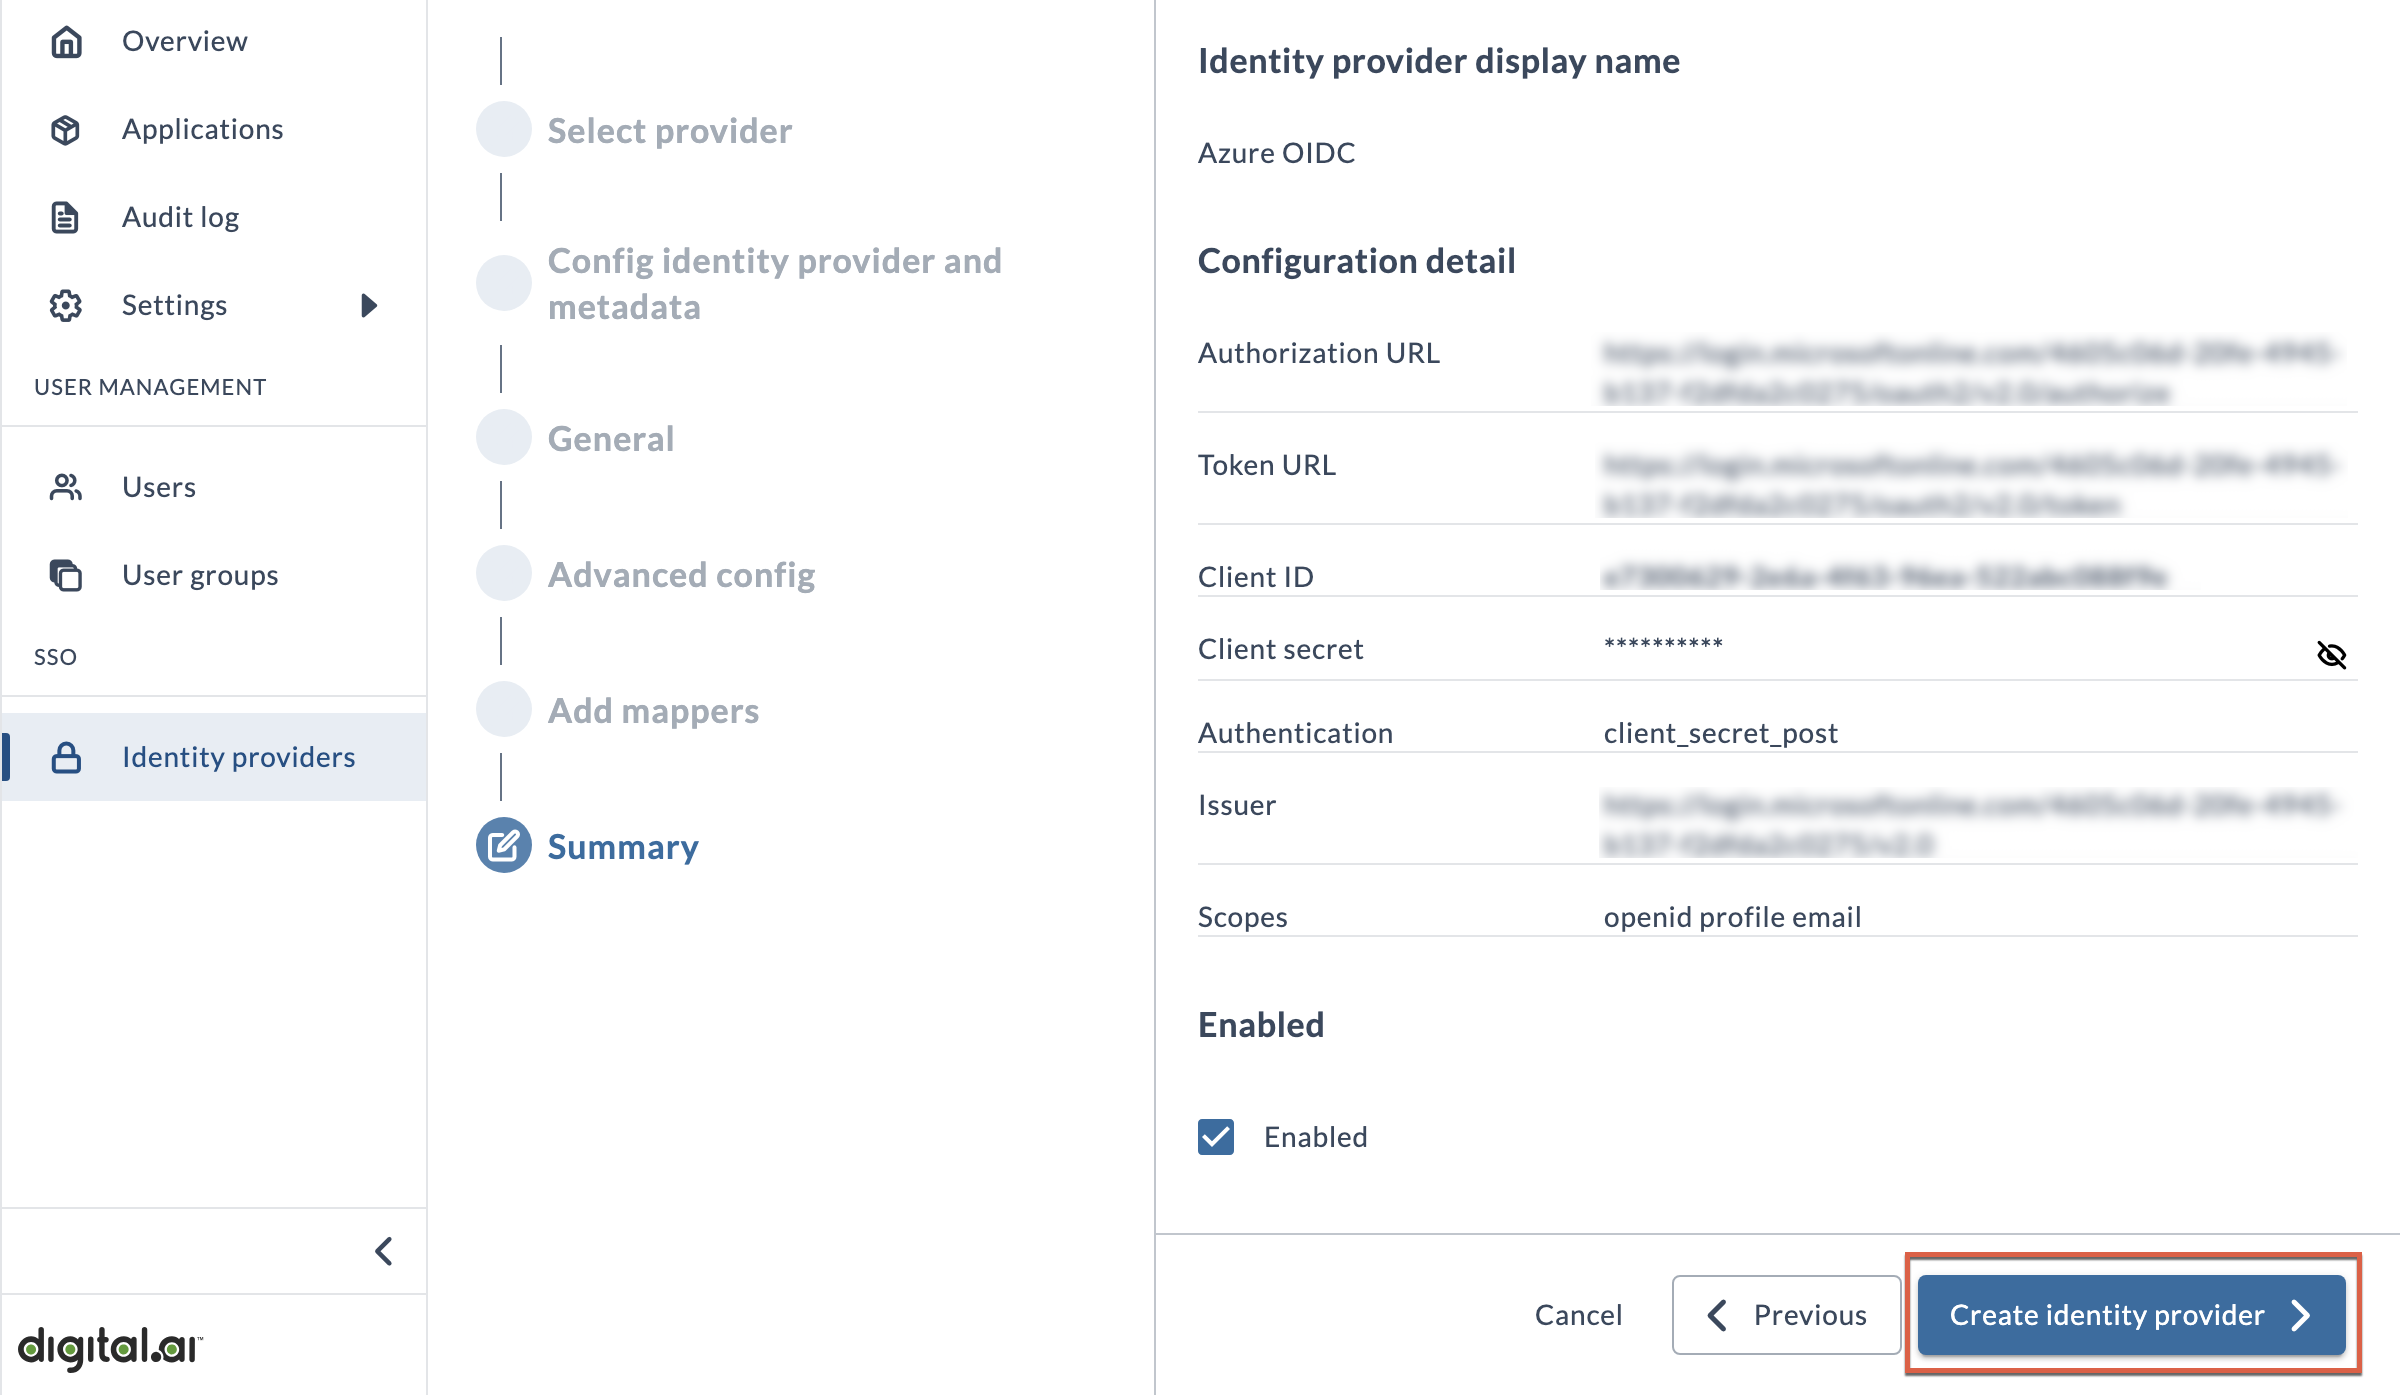
This page provides an overview of the configuration details for informational purposes.
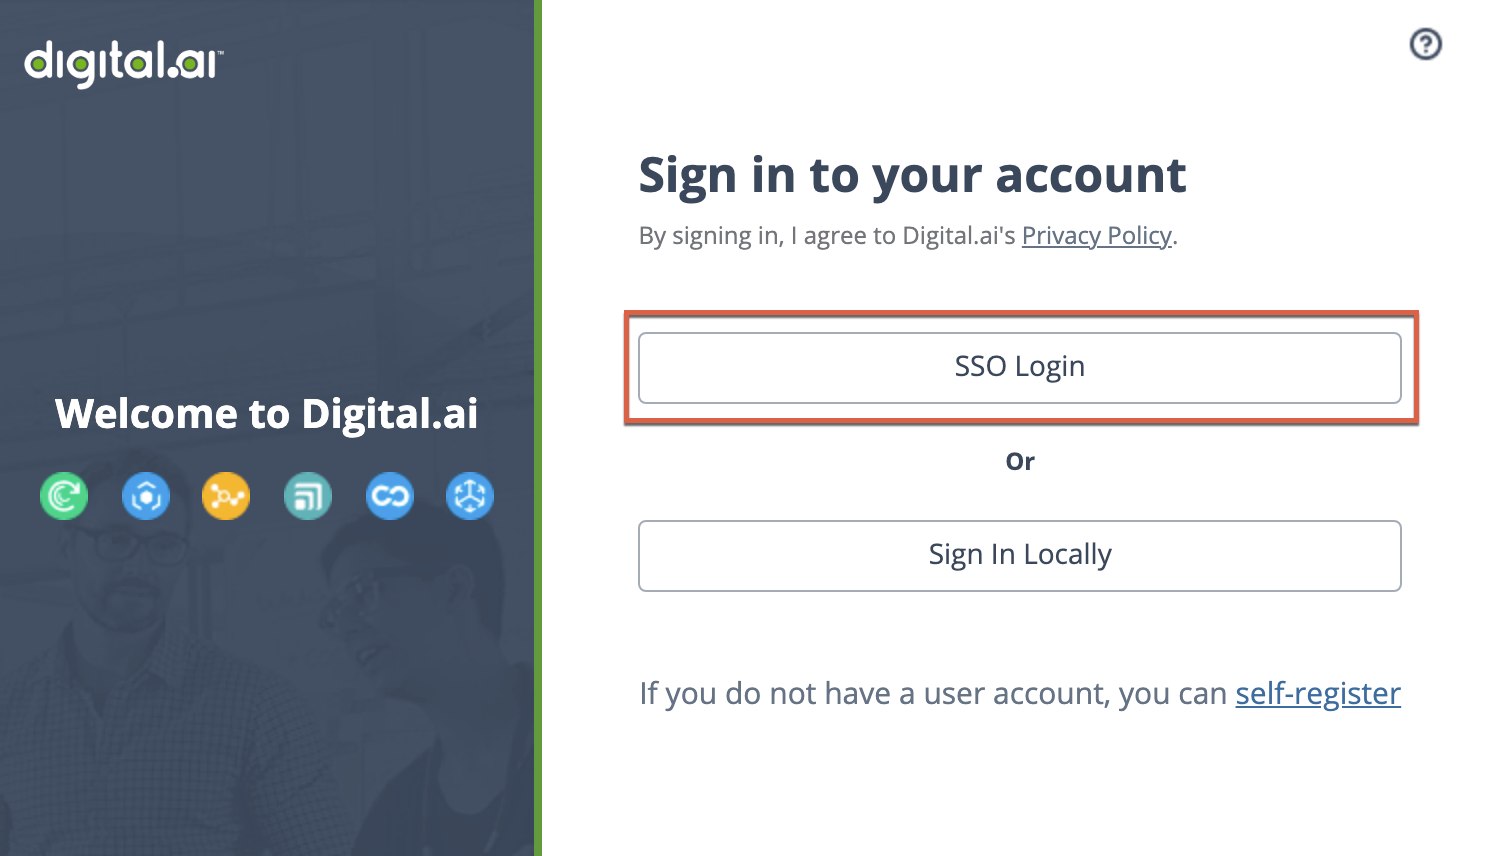
To complete the wizard, click Create identity provider. A new button will now appear on the Platform login page with the name you added at the beginning of this procedure.
Set IdP as Default
We recommend setting this IdP as default, which will skip the Platform login screen and send users to the IdP authentication page as if they had clicked the button for it. If they already have an active session, most IdPs will redirect the user to the application directly and they will not see a login screen at all.
To set the IdP as default, return to the Identity providers page and click the star icon under Actions.

If you need to override the default IdP login screen and authenticate using your local credentials, you can append the following query parameter to the end of your Digital.ai Platform account URL: /?loginIdp=local. For example: https://exampletech.digital.ai/?loginIdp=local.
Test SSO Connection
To ensure that you have properly connected with your IdP, you should now log out of the Platform and attempt to log in again using the newly configured IdP button (or via automatic redirect to your IdP if you set it as default per the previous section).
If everything has been configured properly, and as long as you are logged into a session with your IdP, you will be automatically logged in to the Platform.
Assign Administrator Role to SSO User
We recommend continuing through the rest of this guide while logged in as your SSO user. However, as you will notice, your SSO user does not have administrator permissions by default. So, you should now use your local admin user to give the administrator role to your SSO user.
To get back to your local administrator user account, you can use the URL override mentioned previously. You can then use your local administrator account to assign the account-admin role to your SSO user (Users > Actions > Edit > Roles).
You can now log back in as your SSO user and continue on through the rest of the process.
Step 3: Manage Roles and User Groups
In this step, you'll learn how to create user groups in the Platform and use them to ensure that your users inherit specified group assignments from your IdP in order to have the proper roles and permissions in Deploy.
Let's assume that you have the following user groups configured in your IdP:
- allAdmins
- analysts
- endUsers
And you have the following roles configured in Deploy:
- Administrator User
- Digital.ai Analytics Service User
- End User
Here, the Platform will act as a bridge between the data in your IdP (user groups) and the permissions in Deploy (roles). Once you've completed this rest of this guide, all of your users will be automatically assigned roles in Deploy based on their associated user groups in the IdP.
For example, if Doug is part of the allAdmins group in Entra ID, then he will automatically be assigned the Administrator User role in Deploy.
Group mapping is only available for OIDC connections.
Find Group Name / ID
Before you proceed, you must retrieve the name or object ID (Entra ID only) of the group claim from your IdP. Where and how you find this information will differ depending on what IdP you're using.
Specifically for Entra ID, you must use the object ID of the group, rather than the group name, because that is the field which Entra ID passes to OIDC applications like the Platform.
Create User Groups
Before group membership can be inherited from your IdP, you need to create one or more user groups in the Platform.
The Platform does not create any groups automatically; you must manually create a corresponding group in the Platform for every IdP group that you want to map.
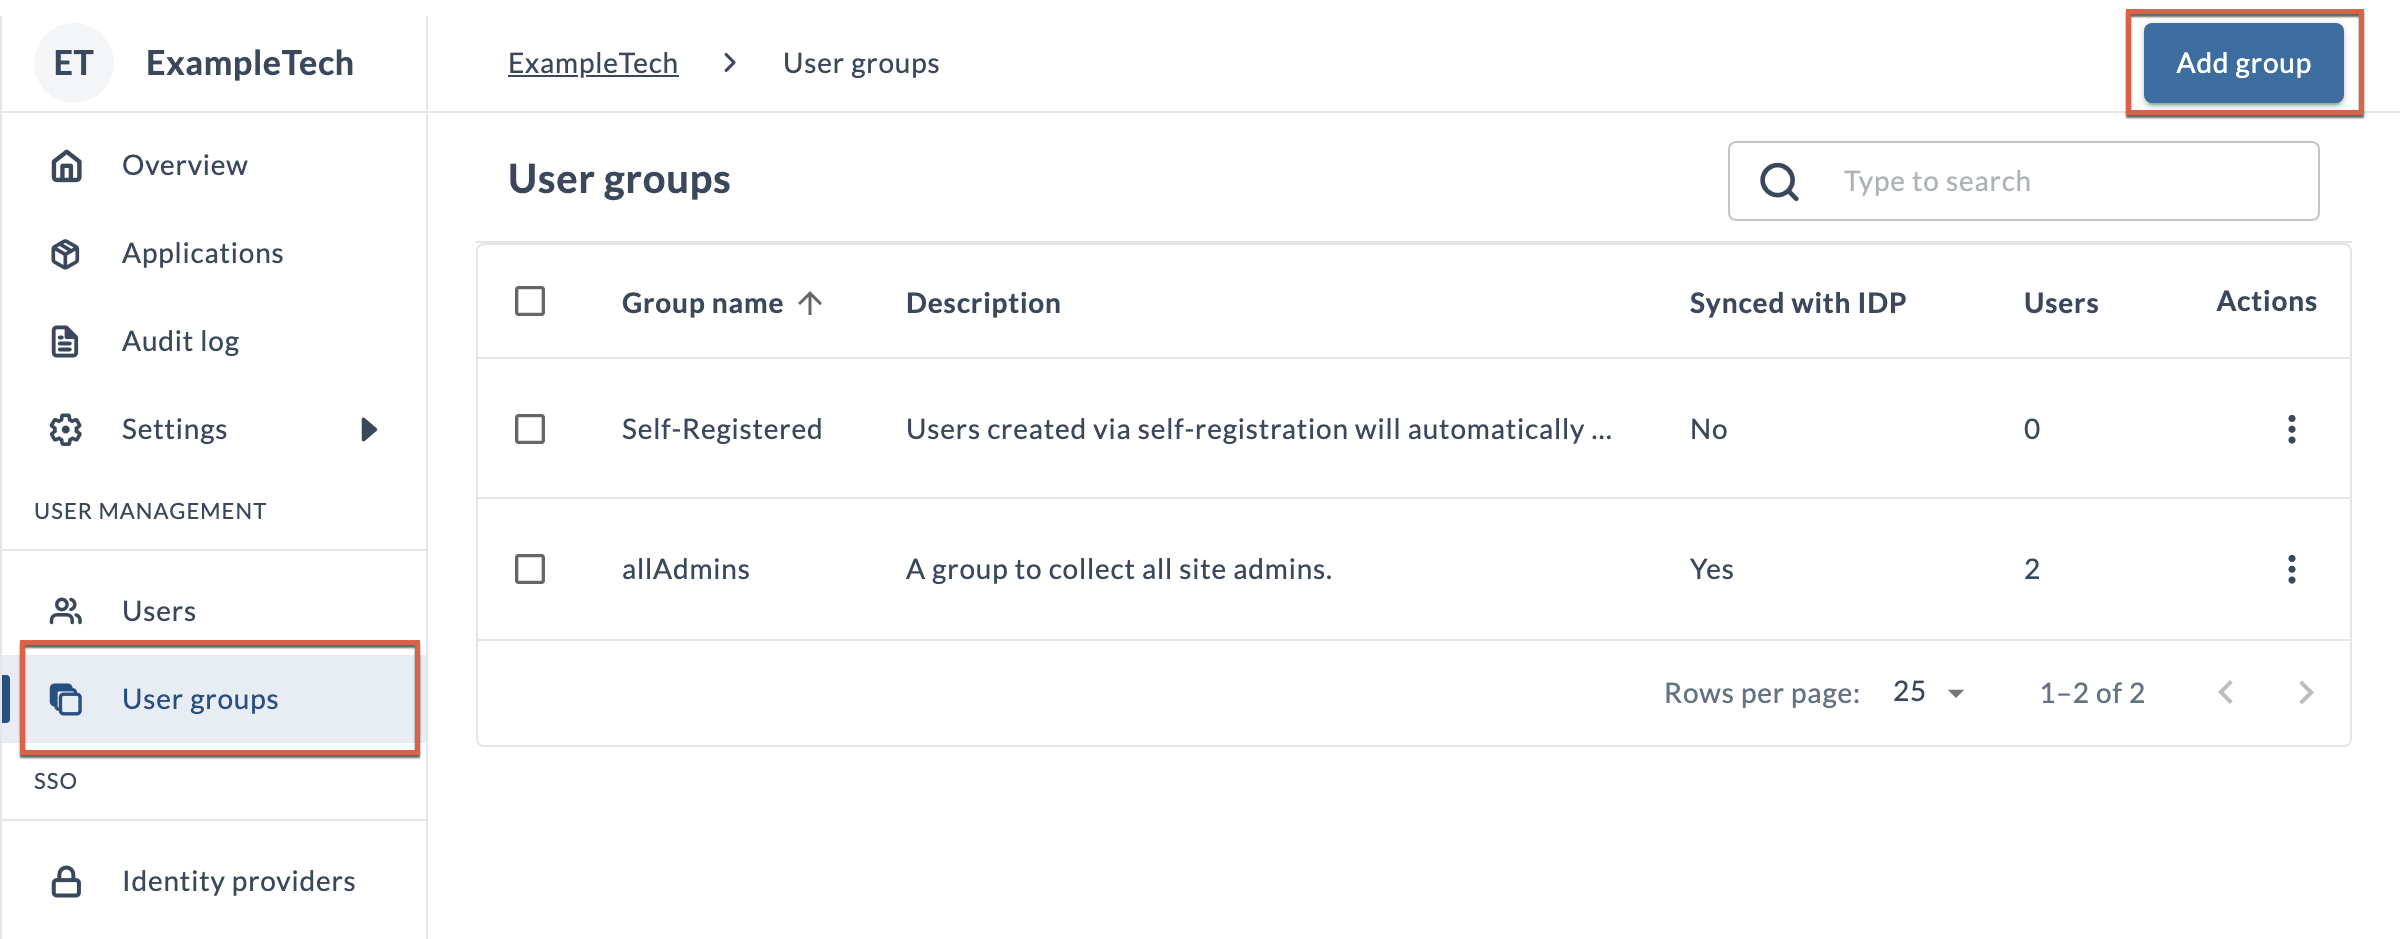
To begin adding a group, click User groups in the left navigation, and then click Add group.
- In Group name, add a name for the group. This name must exactly match the group name or object ID (Entra ID only) as it exists in your IdP.
- In Description, you can elaborate on the purpose of the group.
- Select Sync with IdP.
- For this initial setup, you do not need to manually add any users.
- Click Create user group.
Repeat this process to add additional groups as necessary.
IdP Group to Platform Group Mapping
Now, you'll create a mapper to enroll users in the correct Platform groups. This is important in order to bridge the gap between your IdP and Deploy, so that users can be automatically assigned the appropriate roles in Deploy.
You only need to create one mapper for this purpose, as it will pass all group IDs from your IdP and place users in correct groups in the Platform.
- In the left navigation, under SSO, click Identity providers.
- Find the IdP you want to edit, then click the Edit icon under Actions.
- Click Next until you reach the Mappers page.
- Click the Add dropdown and click Group mapping.
- In Claim, enter the name or object ID (Entra ID only) of the group claim from your IdP.
- Click Add mapper.
IdP Group to Platform Role Mapping
You may also want to create mappers to assign Platform-specific roles to users based on their group assignments in your IdP (for example, if you want to give the account-admin Platform role to users in the allAdmins IdP group).
This will only affect users that need to work in the Platform itself (administrators, dashboard authors, IT personnel, etc), and would not have any impact on users or permissions in Deploy. Deploy-specific roles will be configured later in this guide.
Users are automatically assigned the account-user Platform role by default if you do not create these mappers.
The available Platform roles are:
account-admin: Users with this role have access to all aspects of the Platform, including user management, dataset and dashboard configuration, SSO configuration, account settings, audit logs, etc.account-application-admin: Users with this role has all the same permissions as the account-admin, except for SSO configuration.account-analytics-author: Users with this role can view, add, and edit datasets and dashboards, as well as access assigned Digital.ai applications, support and documentation portals, and edit their own basic preferences.account-user: Users with this role are limited to viewing dashboards, accessing assigned Digital.ai applications, support and documentation portals, and editing their own basic preferences.
This mapping can be especially useful if you know that certain non-admin users will be responsible for managing your analytics dashboards. You should be sure to assign the account-analytics-author to any users who do not also need administrator permissions.
- On the same Mappers page, click the Add dropdown and click Mapper.
- In Name, enter something descriptive like
allAdmins mapper. - Leave Sync Mode as INHERIT.
- In Mapper Type, choose Advanced Claim to Role.
- In New Key, enter
groups. - In New Value, enter the name or object ID (Entra ID only) of the group claim from your IdP.
- In Select Role, choose the Platform role that this group's users should belong to.
- Click Add mapper.
- Repeat the previous step for each group that you want to map to a role.
Step 4: Connect Deploy to the Platform
In this step, you'll learn how to establish a connection between the Platform and your Deploy instance for user management / login purposes. This step does not cover setting up the Cloud Connector or Data Collector.
Add Deploy as an Application in the Platform
First, you need to define your Deploy instance as an application in the Platform. This will then allow you to download a configuration file that you can embed into your Deploy build in order for Deploy to understand the configurations you've been making in the Platform.
- In the left navigation, click Applications.
- Click Applications.
- Click Create application.
- In Select application, choose Deploy.
- In Instance name, enter a descriptive name for this instance.
- Choose whether this will be a production or non-production instance.
- Enter the URL for your Deploy instance.
<deploy url>/oidc-login
- On the Advanced configuration page, click Next.
- On the Mappers page, click Next.
- On the Get client ID & secret page, click Download to download the Deploy configuration file. In Deploy configuration file, you can view the configuration file for this application. Copy and save this information when configuring Deploy.
- Click Complete.
At the end of creating an application, a summary of the application and instance details are displayed. In Deploy configuration file, you can view the configuration file for this application. Copy and save this information for configuring your application as mentioned in the 10th point.
Digital.ai Deploy has no direct support for SAML. However, you can integrate Deploy as an OIDC client with the Digital.ai Platform Identity Service and in turn connect the Digital.ai Platform Identity Service to your SAML-compliant IDP.
JVM Sites
Java Virtual Machine (JVM) is a software-based engine that runs Java programs. It takes the bytecode (compiled Java code) and converts it into machine code that your computer can understand. It allows Java programs to be written once and run anywhere (Write Once, Run Anywhere).
The Deploy product is a Java-based application, meaning it runs within a Java Virtual Machine (JVM). JVM provides the runtime environment to execute the Deploy server's application code. Since Deploy runs on a JVM, it can be deployed on various operating systems (Linux, Windows, macOS) without modification, supporting the platform’s integration needs.
The OIDC Authentication plugin is a Java-based component that runs within the Deploy server’s JVM. Configuring it allows secure communication between Deploy and the Identity Service.
Do this on the Digital.ai Deploy server to integrate Deploy as on OIDC client with the Digital.ai Identity Service.
-
Install and enable the OIDC Authentication plugin, modify the
Defaultconfiguration property toOIDCin theXL_DEPLOY_SERVER_HOME/centralConfiguration/deploy-server.yamlfile. -
To configure the OIDC Authentication plugin, add the following YAML code snippet to the
XL_DEPLOY_SERVER_HOME/centralConfiguration/deploy-oidc.yamlfile.deploy.security:
auth:
providers:
oidc:
loginMethodDescription:
clientId: "<Your client ID>"
clientSecret: "<Your client secret>"
issuer: "<Enter the Open ID Provider Issuer>" # for example "https://identity.staging.digital.ai/auth/realms/demoaccount"
redirectUri: "<deploy url>/login/external-login"
postLogoutRedirectUri: "<deploy url>/login/external-login"
rolesClaimName: "realm_access.roles"
userNameClaimName: "preferred_username"
emailClaim: "email"
fullNameClaim: "name"noteThe above configuration automatically fetches the required configuration from the discovery endpoint.
Log on to Deploy and Add the Admin User
Log on to Deploy and add the local Admin User.
- Log on to Deploy as an Administrator.
- Create a role named
Adminand add the Digital.ai Platform's admin user to that role. - Assign Admin permissions to this
Adminrole you created.
Restart the Deploy Server
Restart the Deploy server and navigate to appropriate instance URL. If you set a default IdP earlier, you should now be automatically redirected to the Platform authentication and seamlessly logged in to Deploy. If not, you should use the SSO login button to log into Deploy as your SSO user.
Configure Roles in Deploy
For this last step, you must update your roles in Deploy to ensure that they properly sync with the Platform user groups you created earlier.
In Deploy, go to Settings > Users and permissions > Roles and edit any of the roles. In Principals, add the Platform user group name that corresponds to this role. Repeat this for all roles that you want to inherit group assignments. You may optionally want to create new roles for this purpose, depending on how your workflow is configured.
For example, edit the role called Administrator User, and add allAdmins as a Principal for the role.
Next Steps
At this point you have successfully connected Deploy with the Platform. From here, you can move on to any of the following tasks (and more that aren't listed here):
- Inform your users that they can begin accessing Deploy with their corporate SSO credentials.
- You may also want to instruct them to stop using their old application-specific login credentials entirely to avoid any confusion caused by using multiple user accounts.
- Begin configuring Analytics dashboards. For more information, see Dashboards.