Set up an Active-Active Cluster
This topic describes how to set up an active-active cluster for Deploy with multiple master and multiple external workers.
HA Active-Active Setup
- In a HA cluster configuration, there are two types of cluster setups: Active-Active and Active Hot Standby.
- Digital.ai Deploy is recommended to be set up in a multi-node, Active-Active cluster, as it provides realtime load balancing capability.
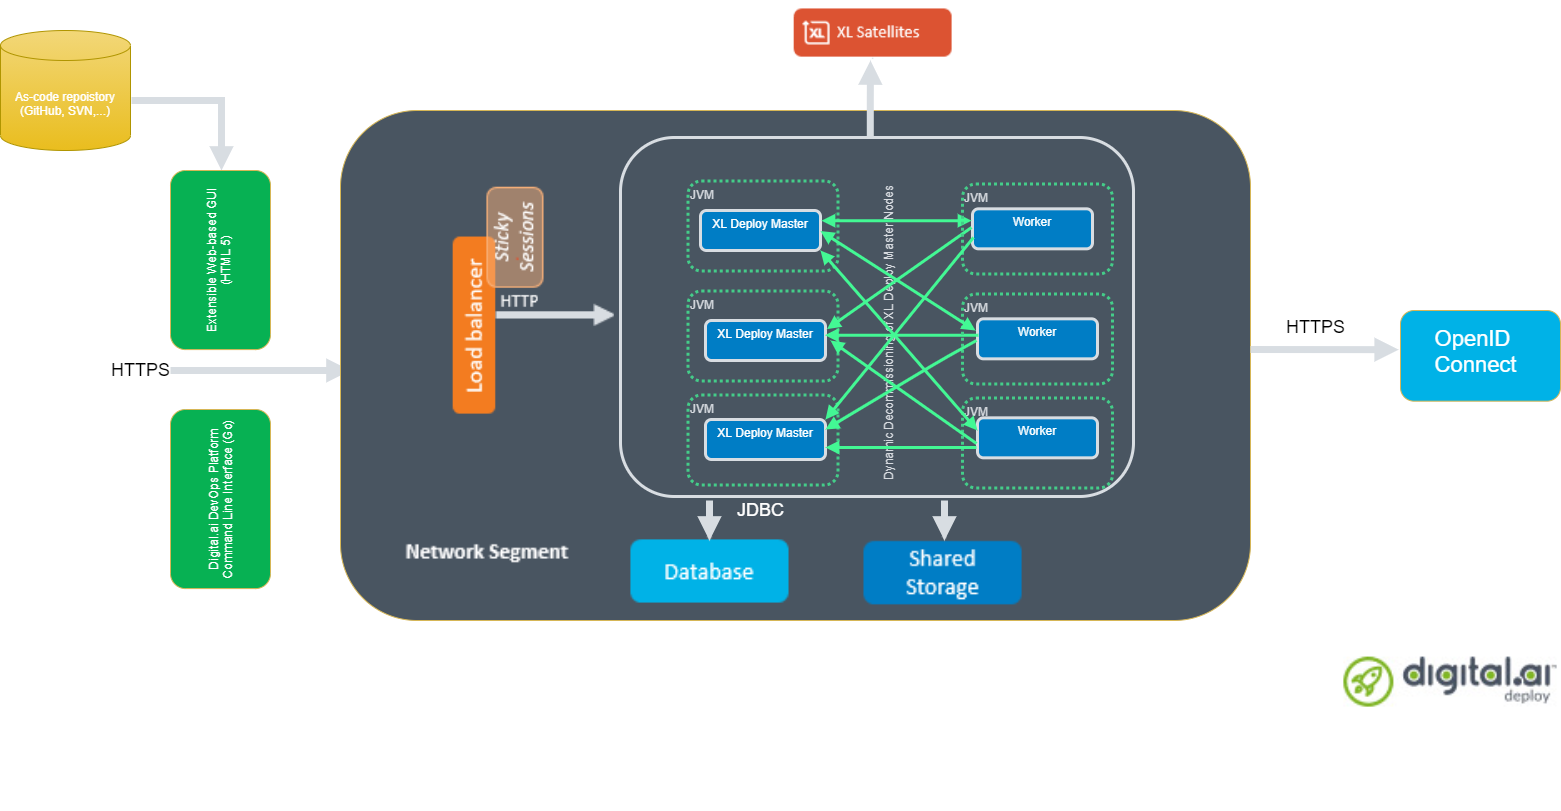
- In a multi-node setup, you can have multiple masters and multiple workers, with the workers connected to each of the masters.
- A master node is a Deploy server you log on to in order to access the Deploy user interface and create configuration items, such as infrastructure, environments, applications, and so on.
- The multiple masters ensure continuous functioning in case of failover and the multiple workers ensure uninterrupted task execution and scalability.
- Deployment tasks and Control tasks are assigned to the Deploy worker that performs the task execution.
- The multiple masters are controlled by a load balancer.
The Deploy masters and workers must have similar configuration (database, ActiveMQ, plugins, and so on). A worker cannot run the tasks assigned by the master if the configuration differs.
Requirements to Set Up an Active-Active Cluster
- Three or more Deploy stateless master nodes
- Three or more external Deploy worker nodes
- An external database server, for example PostgreSQL
- A load balancer that receives HTTP(S) traffic and forwards that to the Deploy master nodes. For more information, see HAProxy load balancer documentation.
- ActiveMQ
- A shared drive location to store exported CIs and reports.
Important: It is always recommended to have a multi-node setup with odd number of nodes to facilitate high fault tolerance in production environments. It is also recommended not to have a cluster with more than five nodes to prevent database latency issues. You can, however, with some database configuration tuning, have a cluster with more than five nodes. Contact Digital.ai Support for more information about setting up a cluster with more than five nodes.
About the Setup
Let us consider the following multi-node Deploy setup for illustrative purposes:
- Three Deploy masters (Master 1, Master 2, and Master 3)
- Three workers (Worker 1, Worker 2, and Worker 3)
- One load balancer
- One ActiveMQ server (JMS broker)
- One database server—PostgreSQL
Step 1: Download and extract the latest Deploy application to Master 1 Server
- Create a folder for installation from where you will execute the installation tasks. This will be the root directory.
- Download the Deploy ZIP package from the Deploy Software Distribution site (requires customer login).
Step 2: Install the Deploy license
- Download the Deploy license file from the Deploy Software Distribution site
- Copy your license file to the
confdirectory of the root directory.
Step 3: Configure the external Postgres database node
You must set up a database for the Deploy to store data. Create and configure an empty database before you start Deploy installation. During the installation, Deploy creates the database schema on the database you created. Optionally, you can have separate database for the operational and reporting databases. For more information about creating two separate databases, see Separate Databases for Reporting and Repository in Deploy.
Use a industrial-grade external database server, for example PostgreSQL, for production use. For more information, see Configure the Database and Artifacts Repository.
For more information about how to create Postgres database, see the PostgreSQL documentation.
Step 4: Configure the Postgres JDBC driver
- Download the Postgres JDBC driver. See PostgreSQL JDBC driver.
- Copy the JAR file to the
libfolder of the root directory.
Step 5: Update the deploy-repository.yaml file with the external database details
-
In the root folder, go to
centralConfigurationfolder and open thedeploy-repository.yamlfile. -
Configure the parameters to point to the database schema as shown in the following sample configuration:
xl:repository:database:db-driver-class-name: "org.postgresql.Driver"db-password: "samplepassword"db-url: "jdbc:postgresql://<IP address of the external database server>/postgres"db-username: "sample-user"max-pool-size: 10artifacts.root: "build/artifacts"
Step 6: Download the ActiveMQ client
- Download the JMS message broker—ActiveMQ client.
- Add JMS
.jarfile—org.apache.activemq:activemq-clientto thelibfolder of the root directory.
Step 7: Set up the ActiveMQ node
-
Run ActiveMQ in the Docker container.
-
From the
centralConfigurationfolder of the root directory, opendeploy-task.yamlfile. -
Set the
in-process-workerparameter tofalse. -
Update the JMS details as shown in the sample configuration:
deploy:task:queue:external:jms-driver-classname: org.apache.ActiveMQConnectionFactoryjms-url: tcp://<IP address of the ActiveMQ server node>:61616jms-username: adminjms-password: admin
Step 8: Set up the Load Balancer node
- To install the HA proxy (load balancer), run:
yum install -y haproxy - Enable the HA proxy by running the following command:
systemctl enable haproxy - To start the HA proxy, run:
systemctl start haproxy - Run the following command to check the status:
systemctl status haproxy
Step 9: Update the hostname of the Master 1 node
- From the
conffolder of the root directory, open thedeployit.conffile. - Update the
server.hostnameparameter with the hostname of the master server. - Update the
deploy.cluster.node.portparameter with the port number. For example,deploy.cluster.node.port=25520—default port number is 25520.
Step 10: Update the deploy-cluster.yaml file with the cluster mode
Digital.ai Deploy 22.3 brings you the following changes related to the high availability (HA) cluster setup:
- You can no longer set
modetodefaultin thedeploy-cluster.yamlfile and have Digital.ai Deploy run in HA active-active cluster mode. - You must set
modetofullin thedeploy-cluster.yamlfile if you want to run Deploy in HA active-active cluster mode.
Here's an example deploy-cluster.yaml configuration file with mode set to full.
deploy:
  cluster:
    pekko:
      actor:
        loggers:
        - org.apache.pekko.event.slf4j.Slf4jLogger
        loglevel: INFO
        provider: org.apache.pekko.cluster.ClusterActorRefProvider
      cluster:
        auto-down-unreachable-after: 15s
        custom-downing:
          down-removal-margin: 10s
          stable-after: 10s
        downing-provider-class: ''
    membership:
      heartbeat: 10 seconds
      jdbc:
        connection-timeout: 30 seconds
        idle-timeout: 10 minutes
        leak-connection-threshold: 15 seconds
        max-life-time: 30 minutes
        max-pool-size: 1
        minimum-idle: 1
        password: '{cipher}gfdqswdksahgdksahgdkas'
        pool-name: ClusterPool
        url: ''
        username: ''
      ttl: 60 seconds
    mode: full
    name: xld-active-cluster
- The
deploy.cluster.pekko.remoteobject has been removed from thedeploy-cluster.yamlfile.
Provide database access to register active nodes to a membership table by adding a cluster.membership configuration containing the following keys:
| Parameter | Description |
|---|---|
jdbc.url | JDBC URL that describes the database connection details; for example, "jdbc:oracle:thin:@oracle.hostname.com:1521:SID". |
jdbc.username | User name to use when logging into the database. |
jdbc.password | Password to use when logging into the database. After you complete the setup, the password will be encrypted and stored in a secured format. |
jdbc.leak-connection-threshold | This property controls the amount of time that a connection can be out of the pool before a message is logged indicating a possible connection leak. A value of 0 means leak detection is disabled. The lowest acceptable value for enabling leak detection is 2 seconds. Increase the leak-connection-threshold to 2 or 3 minutes if the connection fails due to JDBC connection leaks. |
You can set up Deploy to reuse the same database URL, username, and password for both the cluster membership information and for the repository configuration as set in the deploy-repository.yaml file.
Here's an example deploy-cluster.yaml file:
deploy.cluster:
  mode: full
  membership:
    jdbc:
      connection-timeout: 30 seconds
      idle-timeout: 10 minutes
      leak-connection-threshold: 2 minutes
      max-life-time: 30 minutes
      max-pool-size: 1
      minimum-idle: 1
      password: '{cipher}dxxxxxxxxxxxxxxxxxxxxxxxxxxxxxx'
      pool-name: ClusterPool
      url: "jdbc:mysql://db/xldrepo?useSSL=false"
      username: <my_username>
Step 10: Start the Master 1 node
-
Start by Master 1 node by running the following command:
On Unix systems:
.bin/run.sh -setupOn Windows:
run.cmd -setup -
Follow the on-screen instructions.
Note: You do not need to run the server setup command for each master node.
Step 11: Copy the configuration to all the master nodes in the cluster
- Compress the configuration you created in the root directory of the Master 1 node into a ZIP file.
- Copy the ZIP file to all other nodes and extract the zip file on all the master nodes.
Step 12: Run Deploy as a Service
-
After you confirm the Deploy Master 1 runs without issue, you can install Deploy as a service by running the following command:
On Unix systems:
bin/install-service.shOn Windows:
bin\install-service.cmd -
Verify the logs by running the following command:
cat log/deployit.log.
Step 13: Configure the load balancer
-
In the load balancer server, go to the
/etc/haproxy/haproxy.cfgfile, and add the following:globallog 127.0.0.1 local0log 127.0.0.1 local1 noticelog-send-hostnamemaxconn 4096pidfile /var/run/haproxy.piduser haproxygroup haproxydaemonstats socket /var/run/haproxy.stats level adminssl-default-bind-options no-sslv3ssl-default-bind-ciphers ECDHE-RSA-AES128-GCM-SHA256:ECDHE-ECDSA-AES128-SHA256:ECDHE-RSA-AES128-SHA256:ECDHE-ECDSA-AES128-SHA:ECDHE-RSA-AES128-SHA:DHE-RSA-AES128-SHA:ECDHE-ECDSA-AES256-GCM-SHA384:ECDHE-RSA-AES256-GCM-SHA384:ECDHE-ECDSA-AES256-SHA384:ECDHE-RSA-AES256-SHA384:ECDHE-RSA-AES256-SHA:ECDHE-ECDSA-AES256-SHA:AES128-GCM-SHA256:AES128-SHA256:AES256-GCM-SHA384:AES256-SHA256defaultsbalance roundrobin/sourcelog globalmode httpoption redispatchoption httplogoption dontlognulloption forwardfortimeout connect 5000timeout client 50000timeout server 50000listen statsbind :1936mode httpstats enabletimeout connect 10stimeout client 1mtimeout server 1mstats hide-versionstats realm Haproxy\ Statisticsstats uri /stats auth stats:statsfrontend load_balancerbind :80reqadd X-Forwarded-Proto:\ http ( From 2.1x , use http-request add-header X-Forwarded-Proto http )maxconn 4096default_backend default_servicebackend default_serviceoption httpchk HEAD /deployit/ha/health HTTP/1.0<Hostname of the Master 1 node> MASTER1_IP:4516 check inter 2000 rise 2 fall 3<Hostname of the Master 2 node> MASTER2_IP:4516 check inter 2000 rise 2 fall 3<Hostname of the Master 3 node> MASTER3_IP:4516 check inter 2000 rise 2 fall 3
Note: The bind key defines the port number that is alloted to the load balancer node. Make sure you update the hostname and IP addresses for the master nodes.
Step 14: Run other master nodes in the cluster
- Update the
hostnameparameter with the IP address of the master server. See Step 9. - Repeat Step 12: Run Deploy as a Service on all the master nodes.
Step 15: Configure the worker
- Download the Deploy-Task-Engine from the Deploy Software Distribution site (requires customer log in).
- Extract the zip file to a worker node. This will be one of the Deploy workers.
- Remove the existing
pluginsdirectory from the Deploy Task Engine folder to avoid mismatch with the plugins you will copy from the Deploy Master in the next step. - Copy the
deployit.conffrom theXL_DEPLOY_SERVER/conf/directory to theDEPLOY_TASK_ENGINE/confdirectory. Note: This step is not required if you have installed Central Configuration as a standalone service.
Step 16: Synchronize the master and worker nodes
-
Synchronize the Deploy master and worker by copying the following artifacts from the Master 1 node to the Deploy Task Engine folder:
hotfixpluginsimportablePackagesconf/deploy-license.lic
Note: The worker uses rest of the configuration from the
CentralConfigurationdirectory (Deploy Master or a separate Central Configuration server if configured).
Step 17: Add drivers to the lib folder
Add the database and JMS broker drivers to the lib folder of Deploy worker folder.
Step 18: Start the Deploy Task Engine
-
Start by Deploy Task Engine by running the command shown in the following example:
On Unix systems:
DEPLOY_TASK_ENGINE_HOME/bin/run.sh -api http://xld-master-host:4516/ -master xld-master-host:8180 -port 8182 -name worker1On Windows:
DEPLOY_TASK_ENGINE_HOME\bin\run.cmd -api http://xld-master-host:4516/ -master xld-master-host:8180 -port 8184 -name worker1 -
Run the above command on all the worker nodes.
Step 19: Verify the worker status in Deploy interface
- Log in to Deploy.
- Click Monitoring > Workers.
- In the Worker Overview window, verify the
task-engineandin-processworker states.
The Deploy Task Engine (task-engine) will be in Connected state, while theIn-process-workerwill be in Disconnected state.