Deploy Applications Using GitHub Actions and Digital.ai Deploy
This guide demonstrates how to set up a GitHub Actions CI/CD pipeline to build, publish, and deploy applications using Digital.ai Deploy.
Overview
GitHub Actions is a workflow automation tool that allows you to communicate with third-party applications directly from your GitHub repository. Similar to Jenkins jobs, GitHub Actions workflows execute specific tasks independently. The Digital.ai Deploy GitHub Actions integration enables you to automate your deployment pipeline directly from GitHub.
Prerequisites
- Digital.ai Deploy (24.3 or later)
- A GitHub account
- Environment and Infrastructure configured in Digital.ai Deploy
What's Available in the GitHub Actions Integration
The Digital.ai Deploy GitHub Actions action includes several capabilities for building, publishing, and deploying packages with Digital.ai Deploy.
Key Features
- Create: Generate a new DAR package from a specified manifest file
- Publish: Upload a DAR package to Digital.ai Deploy
- Deploy: Deploy the package to a specified environment
- Combined Workflows: Run
create_publish,publish_deploy, orcreate_publish_deployto execute multiple steps in one workflow
Demo Repository
We have created a github-actions-deploy-demo repository that demonstrates how to use these actions. This repository includes:
- Multiple GitHub Actions workflow examples in the
.github/workflowsdirectory that demonstrate different approaches to building, publishing, and deploying applications - Sample deployment manifest files in the
manifestfolder that define the deployment package structure - A demo Java application—
DemoApplication.java - A
build.gradlefile for building the Java application
Step 1—Set up Your Digital.ai Deploy Servers
-
Log on to your Linux/Windows server as a root user.
-
Install Digital.ai Deploy.
- You must have a database (including the database driver), PostgreSQL for example, installed and configured for use with Digital.ai Deploy
tipIf you want to install Deploy using Docker images:
- Install Docker and Docker Compose
- See Install Deploy.
-
Start your Digital.ai Deploy server and log on to it.
Step 2—Create an Environment and Infrastructure in Digital.ai Deploy
- Log on to Digital.ai Deploy
- Create an Environment and Infrastructure configuration items in Deploy.
- Verify if the Environment and Infrastructure configuration items are created.
- Check the connection to your target infrastructure
Step 3—Fork and Configure the Demo Repository
- Fork the github-actions-deploy-demo repo GitHub repository and clone it.
- Go to the forked repository in GitHub and enable GitHub Actions for the forked repository.
Step 4—Review the Application Deployment Manifest File
- Go to your forked repository
github-actions-deploy-demoon GitHub. - The
my-manifest.xmlfile is included. This file contains the configuration for the deployment package.
Here's an example manifest file:
<?xml version="1.0" encoding="UTF-8"?>
<udm.DeploymentPackage version="2.0" application="appForAction">
  <application />
  <orchestrator />
  <deployables>
    <file.Archive name="/demoJar" file="/build/libs/demo-0.0.1.jar">
      <targetPath>/tmp</targetPath>
      <targetFileName>demo-0.0.1.jar</targetFileName>
    </file.Archive>
  </deployables>
  <applicationDependencies />
  <dependencyResolution>LATEST</dependencyResolution>
  <undeployDependencies>false</undeployDependencies>
  <templates />
  <boundTemplates />
</udm.DeploymentPackage>
For more information about manifest files, see Deploy Manifest Format
Step 5—Add GitHub Actions Secrets
-
Go to Settings > Secrets of your forked GitHub repository and add the following secrets.
- SERVERURL—the URL of the Digital.ai Deploy server
- USERNAME—the username for authenticating with Digital.ai Deploy
- PASSWORD—the password for authenticating with Digital.ai Deploy
The Deploy server must have a public IP address assigned to it. If you are trying this out for testing purposes and if you run the Deploy server in your localhost (in the absence of public IPs), use utilities such as ngrok to create a tunnel to expose your localhost (ports: 4516 and 5516 for Deploy and Release respectively) to the internet.
Step 6—Review the GitHub Actions Workflow
The demo repository includes multiple workflow examples in the .github/workflows directory that demonstrate different approaches to using the Digital.ai Deploy GitHub Actions integration. These file includes steps to:
- Checkout the code: Uses the
actions/checkout@v4action to clone the repository. - Set up JDK 17: Uses the
actions/setup-java@v4action to set up OpenJDK 17. - Grant Execute Permissions to Gradlew: Runs a shell command to make the Gradle wrapper executable.
- Build with Gradle: Executes the Gradle build command.
- Create, Publish, and Deploy Package: Uses the
digital-ai/github-actions-deploy@v4.0.0action to create, publish, and deploy the package.
Here's an example workflow:
name: 01 All single step - direct values

on: [workflow_dispatch]

jobs:
  build:
    runs-on: ubuntu-latest

    steps:
      - name: Checkout code
        uses: actions/checkout@v4

      - name: Set up JDK 17
        uses: actions/setup-java@v4
        with:
          distribution: 'adopt'
          java-version: '17'

      - name: Grant execute permissions to gradlew
        run: chmod +x ./gradlew

      - name: Build with Gradle
        id: build
        run: ./gradlew buildAllJars --no-daemon --console=plain

      - name: Create, Publish, and Deploy Package
        id: deploy
        uses: digital-ai/github-actions-deploy@v4.0.0
        with:
          serverUrl:     ${{ vars.SERVERURL }}
          username:      ${{ secrets.USERNAME }}
          password:      ${{ secrets.PASSWORD }}
          manifestPath:  'manifest/01-build-publish-deploy.xml'
          action:        'create_publish_deploy'
          outputPath:    'outputdar'
          versionNumber: '1.0'
          packageName:   'appForAction-1.0.dar'
          environmentId: 'Environments/envForAction1'
          rollback:      'true'
          maxTransientRetries: 10

      - name: Show Action Outputs
        run: |
          echo "DAR Package Path: ${{ steps.deploy.outputs.darPackagePath }}"
          echo "Deployment Package ID: ${{ steps.deploy.outputs.deploymentPackageId }}"
          echo "Deployment Task ID: ${{ steps.deploy.outputs.deploymentTaskId }}"
          echo "Rollback Task ID (if any): ${{ steps.deploy.outputs.rollbackTaskId }}"
The above workflow is triggered manually (workflow_dispatch). You can also trigger workflows through external events, scheduled events, or GitHub repository events (e.g., push, pull request, issue creation).
The action allows for customizable inputs, which you can modify according to your specific requirements:
| Name | Description | Required | Default |
|---|---|---|---|
| serverUrl | The URL of the Digital.ai Deploy server. | Yes | |
| username | The username for authenticating with Digital.ai Deploy. | Yes | |
| password | The password for authenticating with Digital.ai Deploy. | Yes | |
| action | Action to perform: create, publish, deploy. Supported actions are: create_publish, publish_deploy, create_publish_deploy. | No | create_publish_deploy |
| maxTransientRetries | The maximum number of retries when encountering transient errors. | No | 5 |
| manifestPath | The path to the deployit-manifest.xml file. Required for create_publish, create_publish_deploy actions. | Yes | |
| outputPath | The path for storing the newly created DAR package. Required for create_publish, create_publish_deploy actions. | Yes | |
| packageName | Optional. The name of the newly created DAR package. | No | package.dar |
| versionNumber | Optional. Specify a version number to set in your manifest file. | No | |
| darPackagePath | The relative path to the DAR package that will be published. Required for publish_deploy action. | Yes* | |
| deploymentPackageId | The ID of the DAR package that was returned by the publish action (or manually obtained from Digital.ai Deploy). Required for publish_deploy action. | Yes* | |
| environmentId | ID of the target environment in Digital.ai Deploy. Required for publish_deploy, create_publish_deploy actions. | Yes* | |
| rollback | Optional. Invoke a rollback in case of deployment failure. | No | false |
You are all set. Create a new version of the demo Java application, push the changes to the repository, and trigger the GitHub Actions workflow to deploy the application.
Step 7—Run the GitHub Actions Workflow
- Navigate to the Actions tab in your GitHub repository.
- Select the Build and Deploy Package workflow.
- Click the Run workflow.
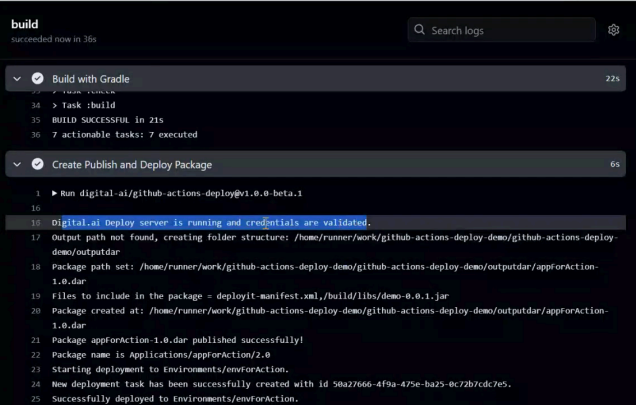
Step 8—View the GitHub Actions Build Job and Steps in the Console
After triggering the workflow, you can view the logs for the workflow job in the console:
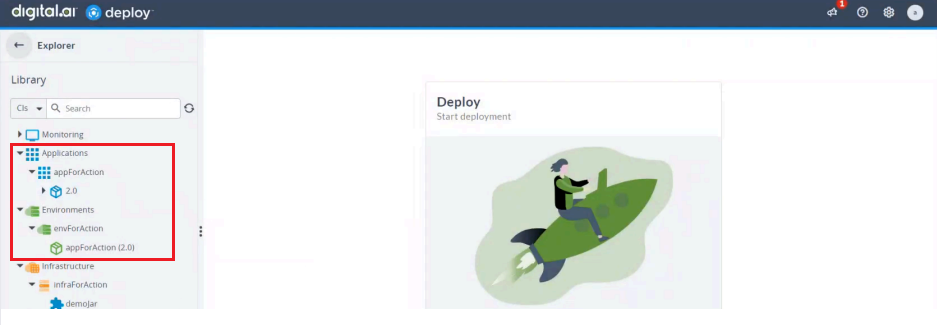
Step 9—Verify in Deploy
After running the workflow successfully, you can verify the deployment in Deploy. To do so:
- Log in to Digital.ai Deploy.
- Go to Applications and expand it.
- Verify that
appForActionhas been deployed to the specified target environment,envForAction.