Deploy provisioning example
This topic provides a step-by-step example that will help you get started with Deploy provisioning in cloud-based environments.
To follow this example, you need:
- An Amazon Web Services EC2 Machine Image (AMI) on which Puppet is installed.
- A Puppet manifest that will install Apache Tomcat in
/opt/apache-tomcat. - The sample PetClinic-war application provided with Deploy. This is optional.
Before you begin
To understand important concepts related to Deploy provisioning, see provisioning through Deploy.
To complete this tutorial, this scenario assumes:
- You have an installed instance of Deploy and are using a Unix-based operating system
- You are running Java 8 JDK
- You are running Puppet plugin version 6.0.0 or higher
Step 1 - Create an application
Deploy uses the same model for deployment packages and provisioning packages. Your first step is to create an application that will serve as a logical grouping of provisioning packages.
A provisioning package describes the:
- infrastructure items that should be created.
- environment to which infrastructure items will be associated.
From the Deploy GUI, create a new application:
- In the left pane, hover over Applications, click
, and select New > Application.
- In the Name field, type
PetClinicEnv. - Click Save.
Step 2 - Create a provisioning package
- Expand Applications.
- Hover over PetClinicEnv, click
, and select New > Provisioning Package.
- In the Name field, type
1.0.0. - Click Save.
Step 3 - Create provisionables and templates
A provisioning package consists of provisionables, which are virtual machine specifications, and templates for configuration items (CIs).
In this step you will create the following provisionables:
- an instance specification
- an SSH host template
- a Tomcat server template
- a Tomcat virtual host template
Create an instance specification
-
Hover over the 1.0.0 package, click
, and select New > aws > ec2 > InstanceSpec.
-
Enter the following properties:
Property Value Description Name tomcat-instance-specThe name of the CI. AWS AMI Your AWS AMI ID. For example, ami-d91be1ae.The ID of an AMI where Puppet is installed. Region The EC2 region of the AMI. For example, eu-west-1.The EC2 region, which must be valid for the AMI that you selected. AWS Security Group defaultThe security group of the AMI. Instance Type m1.smallThe size of the instance. AWS key pair name Your AWS key name Name of your EC2 SSH key pair. If you do not have an AWS key name, log in to the Amazon EC2 console, create a new key, and download it to your local machine. -
Click Save.
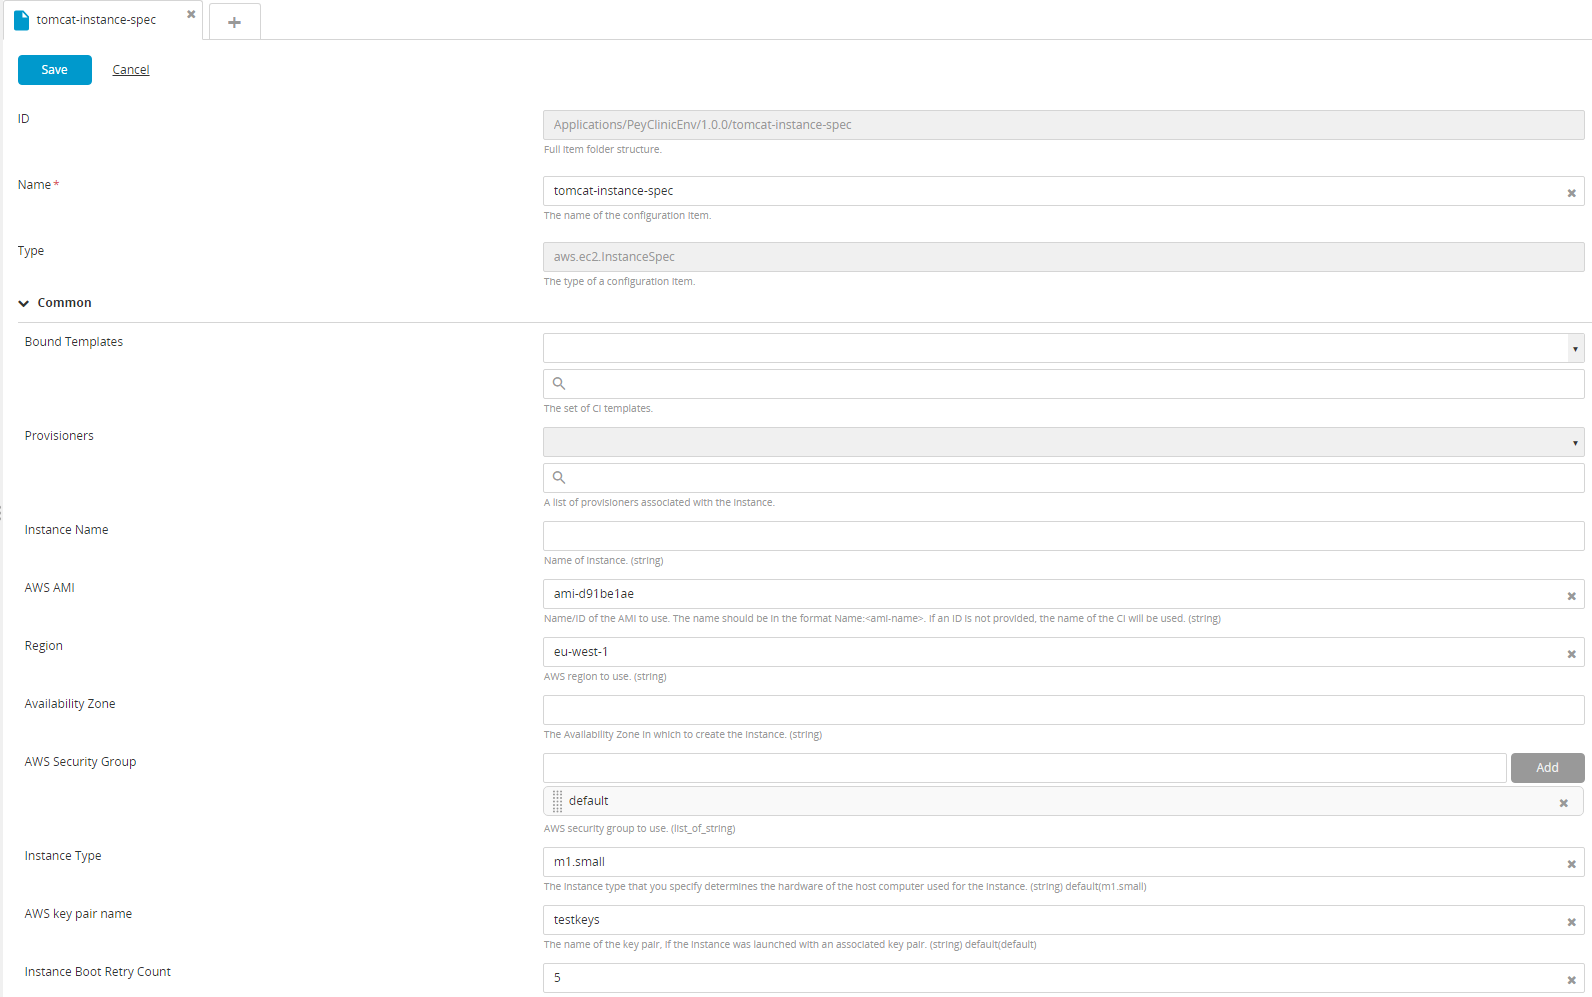
Create an SSH host template
-
Hover over the 1.0.0 package, click
, and select New > template > Overthere > SsHost.
-
Enter the following properties:
Property Value Description Name tomcat-hostThe name of the CI. Operating System UNIXOperating system of the virtual machine. Connection Type SUDOPuppet requires a SUDO connection. Address {{%publicHostname%}}This is a placeholder that will be resolved from the provisioned. Username ubuntuUser name for the EC2 machine. Private Key File SSH_DIRECTORY/{{%keyName%}}.pemThe location of the SSH key on your local machine to use when connecting to the EC2 instance. SSH_DIRECTORYis the directory where you store your SSH keys. for example,Users/yourusername/.ssh.SUDO username rootThe user name to use for SUDO operations. This property is located on the Advanced section. -
Click Save.
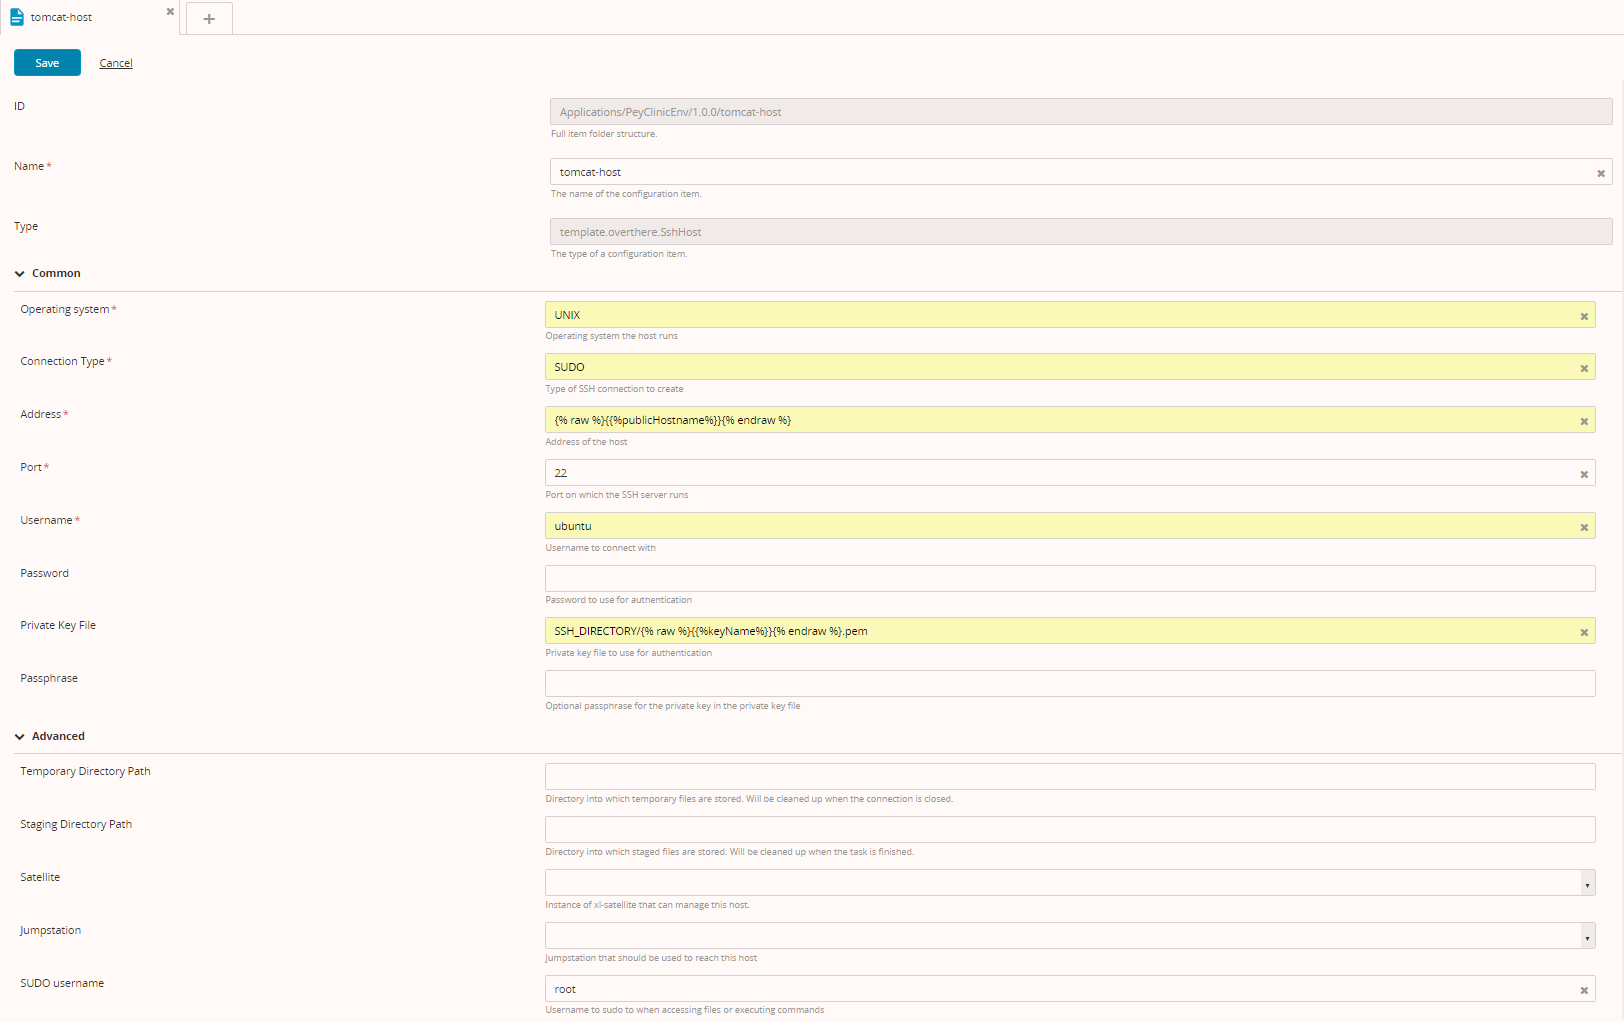
Create a Tomcat server template
-
Hover over the tomcat-host CI, click
, and select New > Template > Tomcat > Server.
-
Enter the following properties:
Property Value Description Name tomcat-serverThe name of the CI Home /opt/apache-tomcatPuppet will install Tomcat in this directory Start Command sh bin/startup.shThe command that will start Tomcat Stop Command sh bin/shutdown.shThe command that will stop Tomcat -
Click Save.
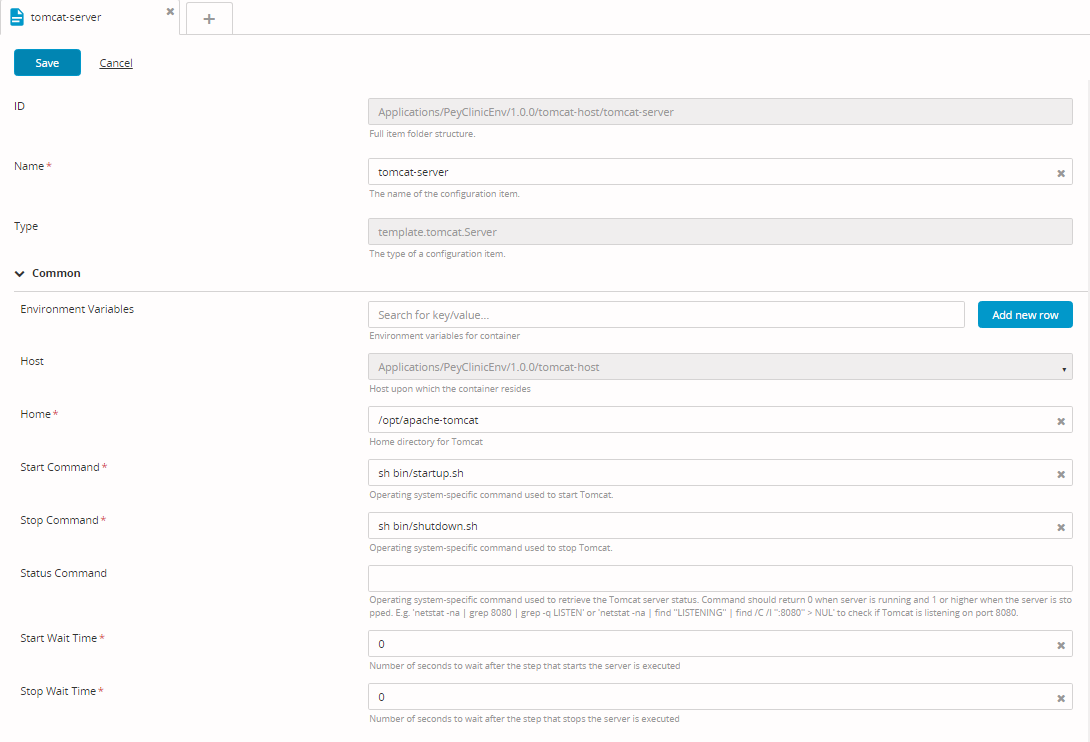
Create a Tomcat virtual host template
- Hover over the tomcat-server CI, click
, and select New > template > tomcat > VirtualHost.
- In the Name field, enter
tomcat-vh. - Click Save.
Create a directory to store generated CIs
- Hover over Infrastructure, click
, and select New > Directory.
- In the Name field, enter
Tomcat. - Click Save.
Step 4 - Bind the SSH host template to the instance spec
To bind the tomcat-host template to the tomcat-instance-spec provisionable:
-
Double-click tomcat-instance-spec to open it.
-
Go to the Common section.
-
Under Bound Templates, select
Applications/PetClinicEnv/1.0.0/tomcat-hostfrom the drop down list. -
Click Save.
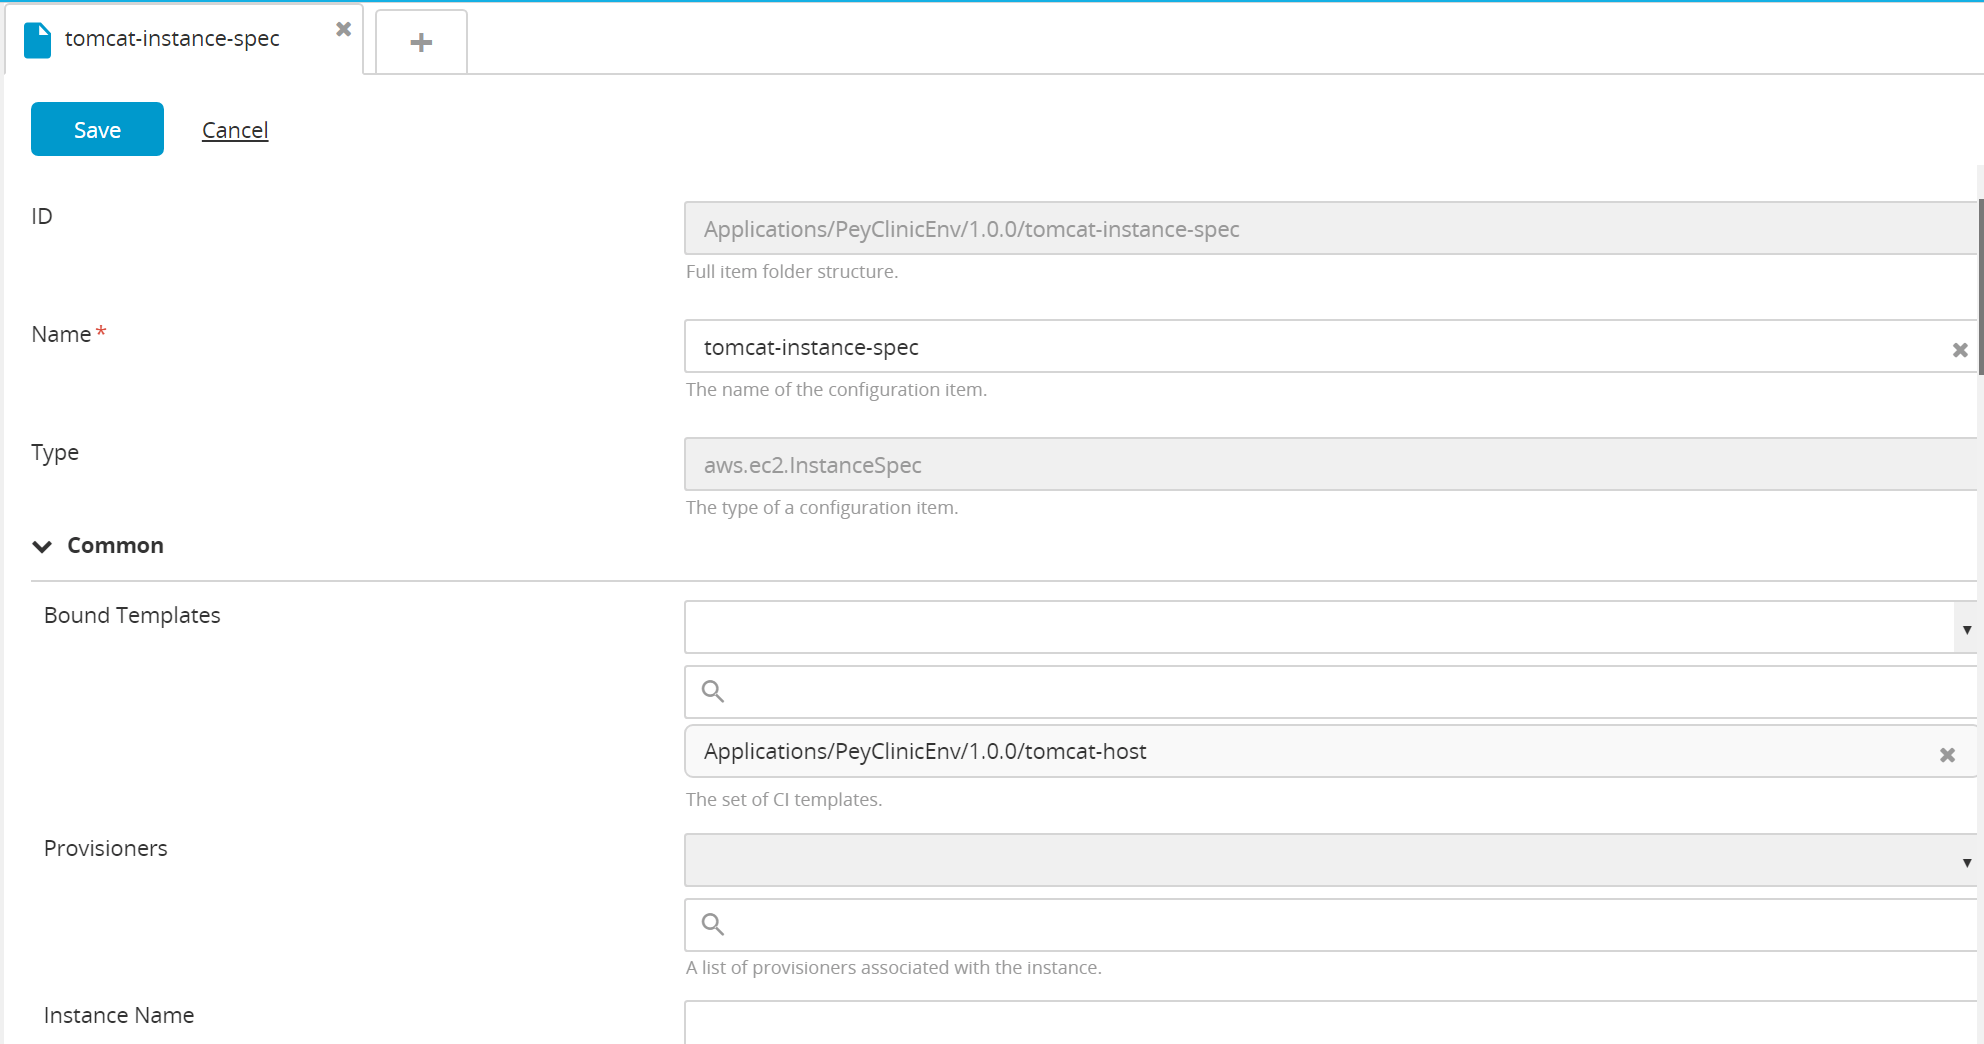
Step 5 - Add a Puppet provisioner
- Hover over tomcat-instance-spec, click
, and select New > Puppet > provisioner > Manifest.
- In the Name field, enter
install-tomcat. - In the Host Template field, select
tomcat-host. - In the Choose file field, click Browse and upload a Puppet manifest file that will install Tomcat.
You can also specify the Artifact location in File Uri field.
-
Click Save.
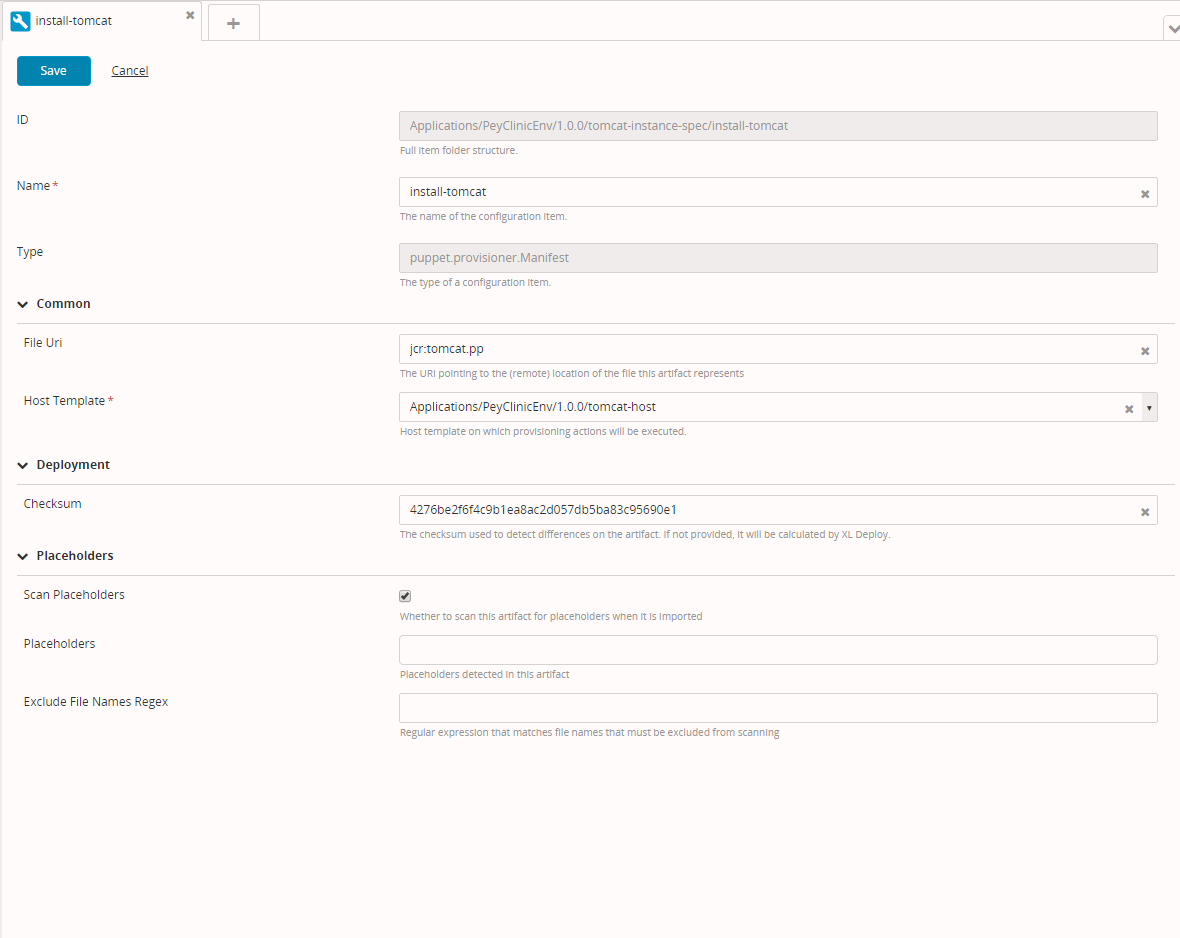
Add modules to the provisioner
-
Hover over the tomcat-instance-spec CI, click
, and select New > puppet > provisioner > Module.
-
In the Name field, enter
puppetlabs-tomcat. -
In the Host Template field, select
tomcat-host. -
In the Module Name field, enter
puppetlabs-tomcat. -
Click Save.
-
Repeat steps 1 to 5 and enter
puppetlabs-javafor the Name and Module Name fields.
If you open tomcat-instance-spec CI, you will see the modules.
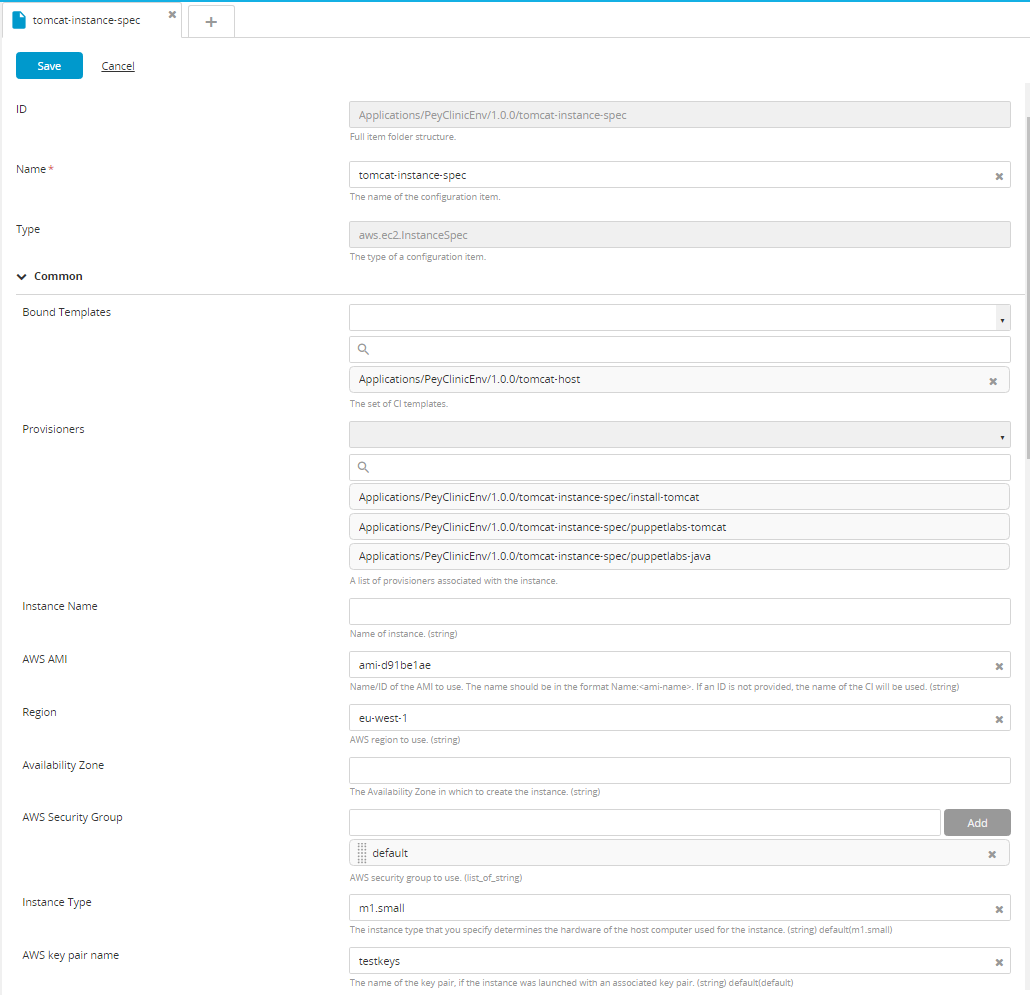
Step 6 Create the AWS provider
Create a new provider for Amazon Web Services (AWS):
- Hover over Infrastructure, click
, and select New > aws > Cloud.
- In the Name field, enter
AWS-EC2. - In the Access Key ID field, enter your AWS ID.
- In the and Secret Access Key field, enter AWS access key.
- Click Save.
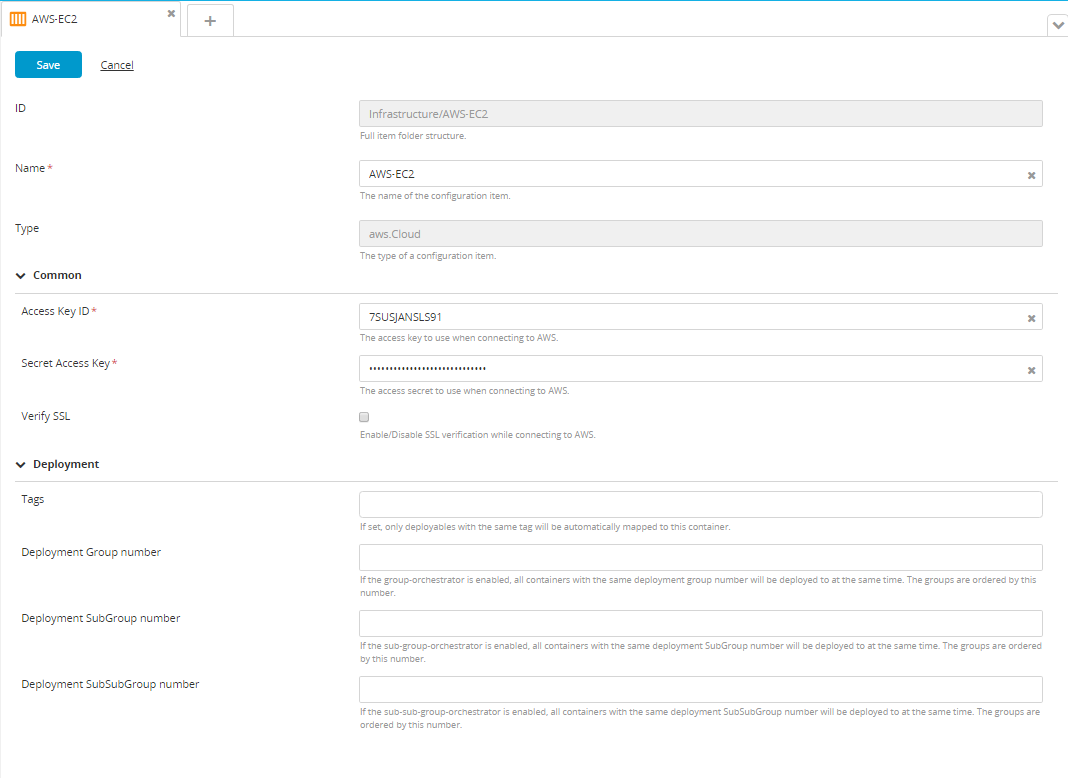
Step 7 Create an environment
Create an environment where the package will be provisioned:
- Hover over Environments, click
, and select New > Environment.
- In the Name box, enter
Cloud. - In the Containers section, select
Infrastructure/AWS-EC2from the drop down list. - In the Provisioning section, Directory Path field, enter
Tomcat. - Click Save.
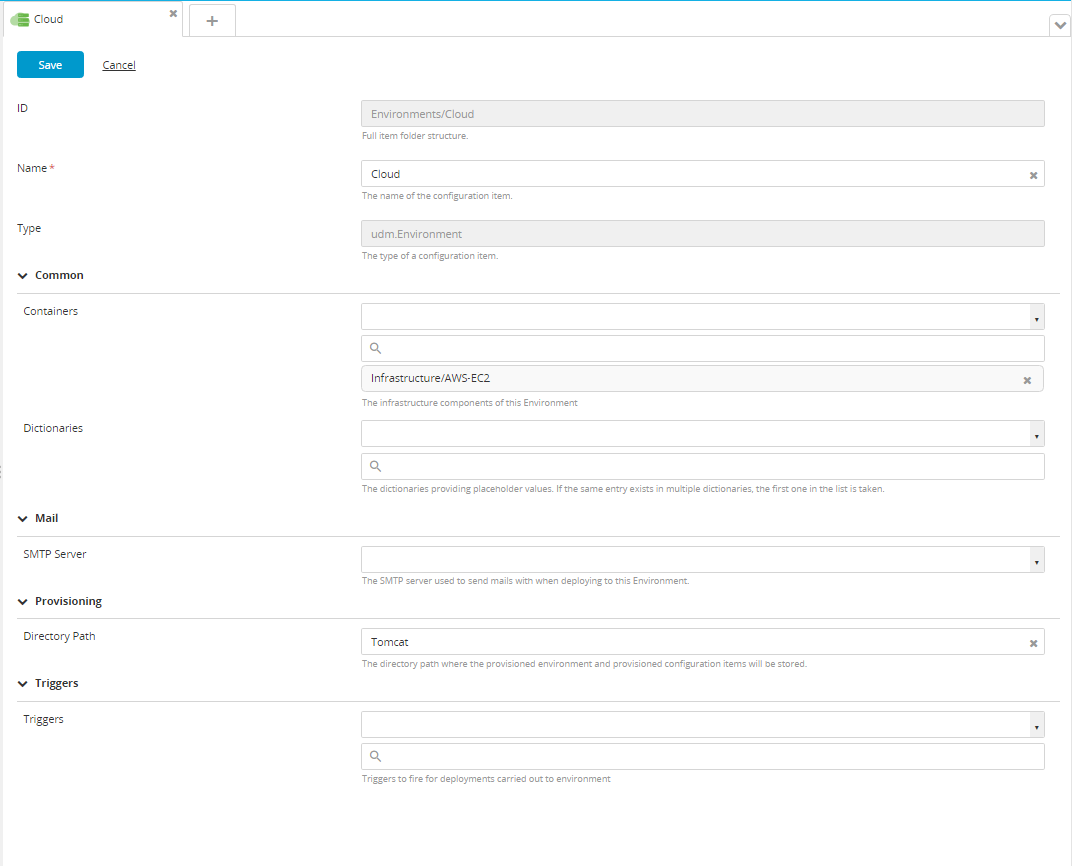
Step 8 Provision the environment
- Hover over 1.0.0, click
, and click Deploy.
- On the Environments page, select Cloud.
- Click Continue.
- Click Preview to view the deployment plan.
- Click Save.
- Click Deploy.
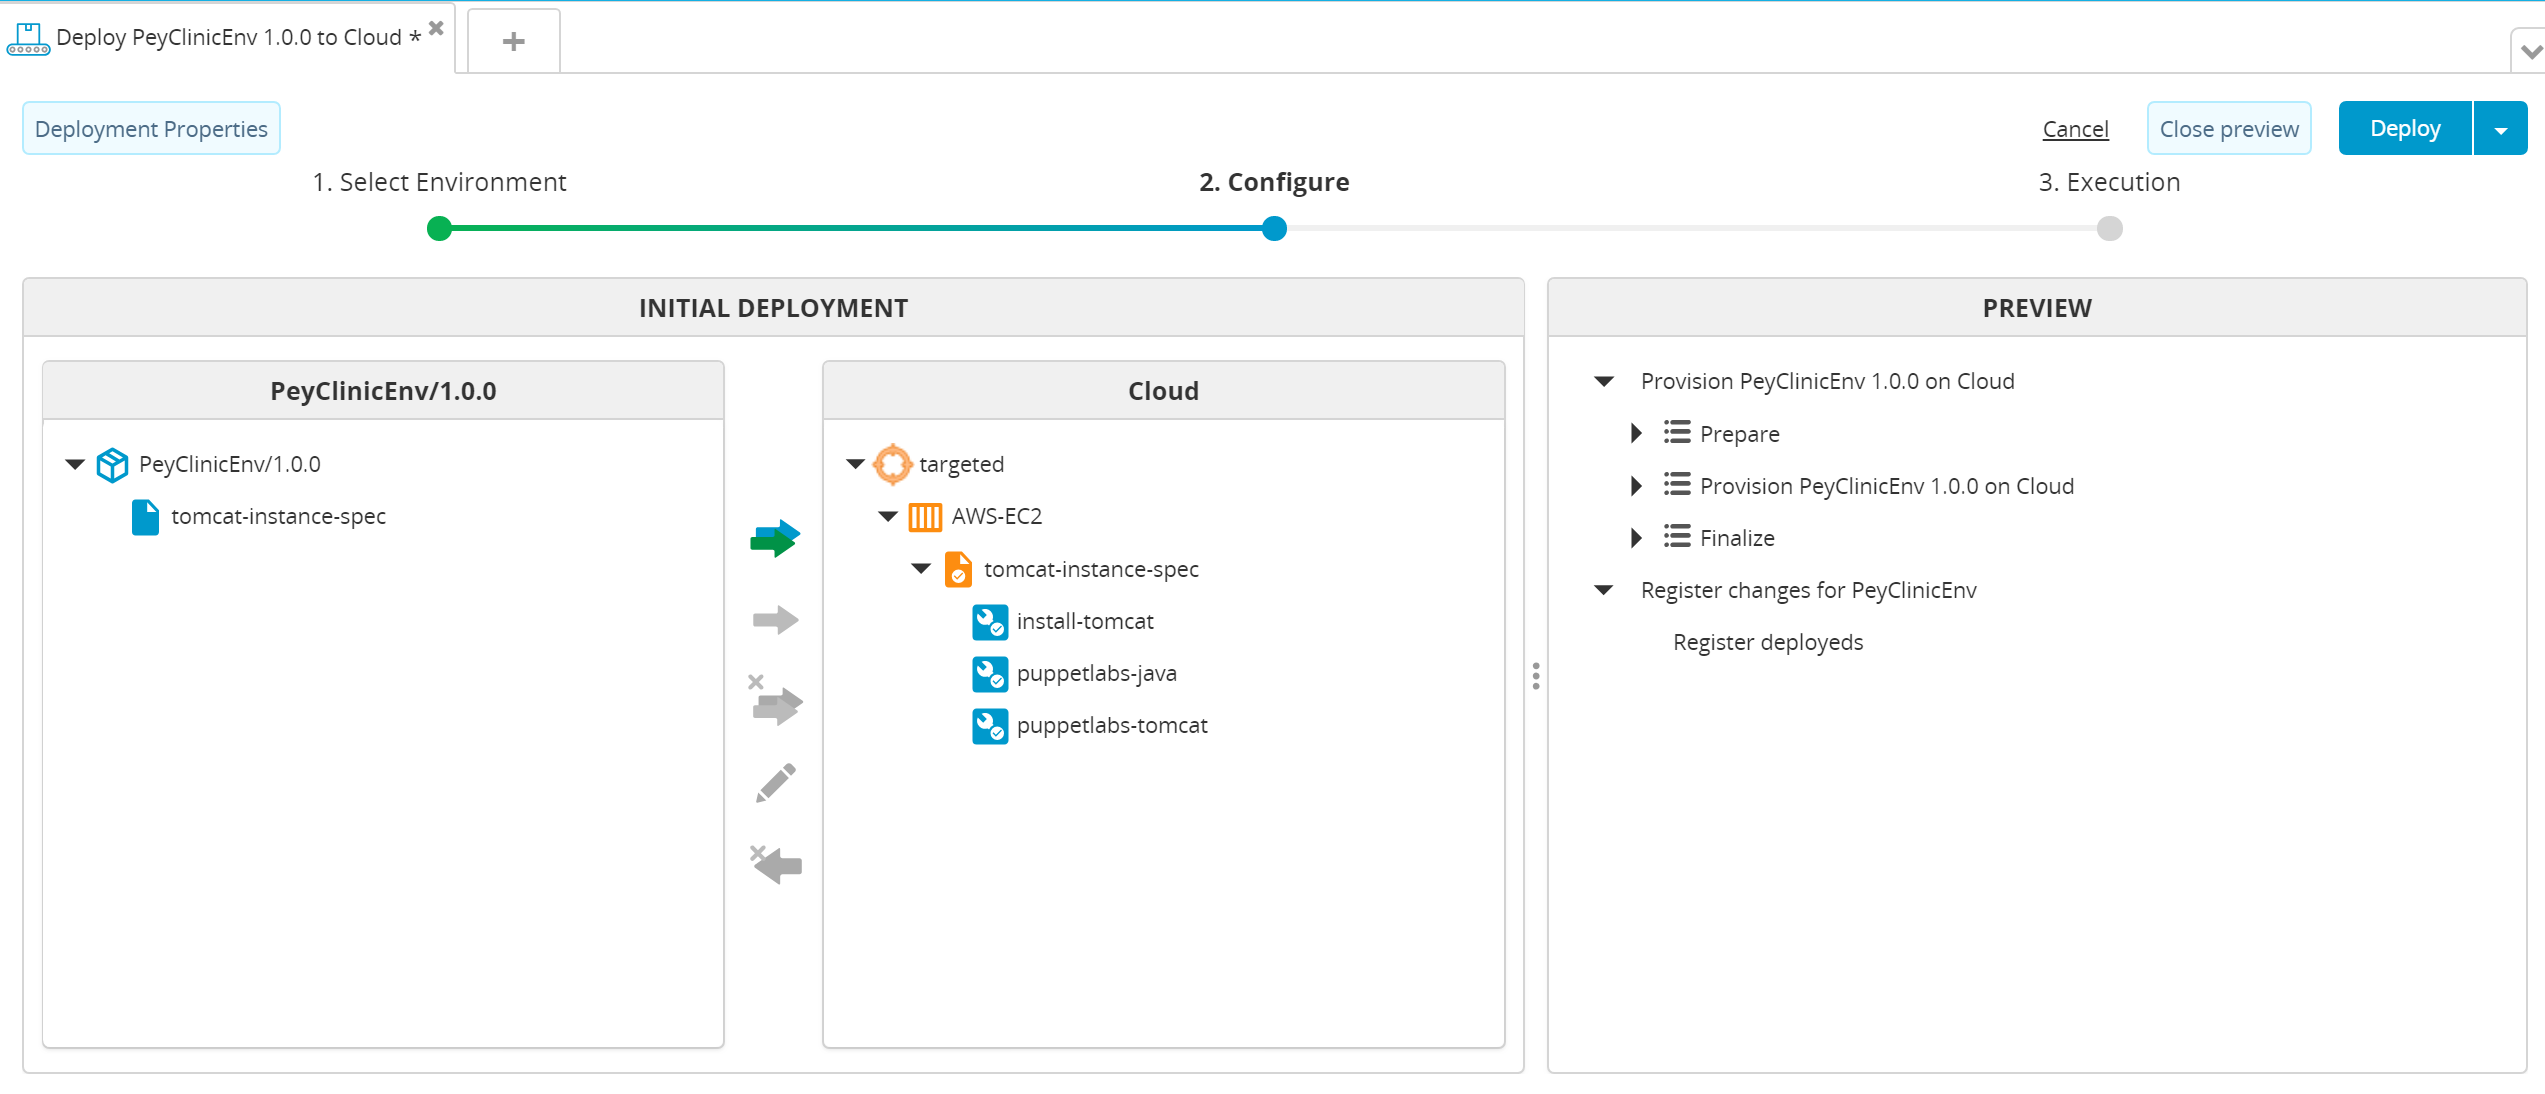
Results
You can see the generated CIs in the Repository:
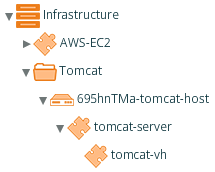
In this case, the unique provisioning ID was 695hnTMa.
You can also see that the CIs were added to the Cloud environment.
You can now import the sample package PetClinic-war/1.0 from the Deploy server and deploy it to the Cloud environment. When deployment is completed you will see the application running at http://<instance public IP address>:8080/petclinic. You can find the public IP address and other properties in the instance CI under the provider. For more information, see import a package and deploy an application