Deploy an App to AWS Using a Blueprint
Transitioning a microservice application to the Amazon Web Services (AWS) cloud infrastructure can be a daunting and complex task for a development team new to AWS. The Deploy/Release Blueprints for AWS can streamline the process of creating the AWS infrastructure, orchestrating the pipeline using Release, and deploying applications using Deploy.
This tutorial provides a working example to help you get started with DevOps as Code blueprints for AWS in Deploy and Release using a sample application provided in a public GitHub repository. The tutorial specifically demonstrates how you can use the Digital.ai Deploy/Release Microservice Application on Amazon EKS blueprint (microservices-ecommerce) to deploy a simple microservice demo application that consists of separate store, notification and invoice applications on Amazon Elastic Container Service for Kubernetes (EKS).
Review the Prerequisites
AWS Prerequisites
This tutorial requires AWS credentials including an AWS access key ID and AWS secret access key. Note: In a scenario in which you are already interacting with AWS using the AWS CLI, the blueprint configuration can pull existing credentials from your local configuration. If not, you can provide the credentials directly when running the blueprint.
GitHub Repository
This tutorial utilizes a Digital.ai GitHub repository that includes a folder and file structure for an sample microservices application that you will deploy to an EKS cluster in AWS using blueprint specifications.
Docker
A pre-built set of Docker containers is provided to simplify this tutorial. If not installed already, download and install:
You will also need a Docker Hub repository. You can use an existing Docker Hub repository or create a new one for this tutorial.
Step 1 Clone the GitHub Branch
To get started, fork and clone the sample GitHub repository.
For example, to clone the forked repository from the command line:
git clone https://github.com/<your-github-username>/e-commerce-microservice.git
Step 2 Review the Sample Application Architecture
The cloned repository includes the components and files for the microservices e-commerce demo application.

The sample application consists of three microservices applications:
- A gateway application (online store)
- An invoice application
- A notifications application
The following supporting files are also included:
- Docker compose files
- Kubernetes files
- Jenkins files
For details on the contents of each of these files, refer to the accompanying README file in each directory of the sample GitHub repository.
Step 3 Create Your Docker Environment
A docker-compose.yaml file is provided in the docker-compose/xebialabs folder to build the following Docker containers:
- A Deploy server
- A Release server with Connections settings that includes a defined connection to the Deploy server
- A Jenkins server with pre-defined jobs
- A container with the XL CLI installed.
***note
This instance of XL CLI is used internally among the Docker containers. You will also install the XL CLI on your local host later in this tutorial.
Step 4 Customize Docker Credentials and Add Licenses
Add Your GitHub and Docker Hub Credentials to docker-compose.yaml
-
Navigate to
e-commerce-microservice/docker-compose/xebialabs -
Set your GitHub and Docker Hub credentials by doing one of the following:
-
Edit the
docker-compose.yamlfile and replace the${GITHUB_USER},${DOCKER_USER}and${DOCKER_PASS}values with your own credentials:- GITHUB_USER=mygithubusername- DOCKER_USER=mydockerhubname- DOCKER_PASS=mydockerhubpasswordor set them as environment variables:
export GITHUB_USER=mygithubusernameexport DOCKER_USER=mydockerhubnameexport DOCKER_PASS=mydockerhubpassword -
Save the file.
Note: If you are using a private fork of the e-commerce microservices then you will have to set GITHUB_TOKEN values as well in the docker-compose.yaml file or in the environment. By default when you fork the repository it will be public.
Add the Deploy License File
Existing License
If you are already an Deploy user and you have a running instance of the product, you can copy and paste your deployit-license.lic file from your existing installation directory into the e-commerce-microservice/docker-compose/xebialabs/deploy/default-conf directory.
New License
If you do not have an existing license, you must apply for a trial license.
- Go to the Digital.ai trial site and follow the steps to obtain a trial license for Deploy.
- Navigate to
e-commerce-microservice/docker-compose/xebialabs/deploy/default-conf - Create a new file named
deployit-license.lic - Open this file and paste the Deploy license you received in email and save it.
Add the Release License File
Existing License
If you are already an Release user and you have a running instance of the product, you can copy and paste your xl-release-license.lic from your existing installation directory into the e-commerce-microservice/docker-compose/xebialabs/xl-release/default-conf directory.
New License
If you do not have an existing license, you must apply for a trial license.
- Go to the Digital.ai trial site and follow the steps to obtain a trial license for Release.
- Navigate to
e-commerce-microservice/docker-compose/xebialabs/xl-release/default-conf - Create a new file named
xl-release-license.lic - Open this file and paste the Release license you received in email and save it.
Step 5 Start Docker Containers
Now that your Docker credentials and licenses are configured, you can start the Docker containers using the following command from the docker-compose/xebialabs folder:
docker-compose up --build
If you already have Docker images for Release, Deploy, or Jenkins, you must remove them. Run docker ps -a to list all the images and then run docker rm <image-id> to remove the image for Release, Deploy, or Jenkins.
Once the environment is successfully up and running, you can use the docker ps command to list the running containers:
-
Deploy
-
Release
-
Jenkins
-
XL CLI
noteThe XL CLI container will run, perform its tasks and exit, so will not be in a constant running state. You can use the
docker ps -acommand to see all containers, regardless of whether they are running.
Step 6 Verify Applications Are Running
Ensure that you can successfully open the following applications in your browser:
- Deploy:
http://localhost:4516 - Release:
http://localhost:5516 - Jenkins:
http://localhost:8080
For each of these applications, the username and password are admin and admin.
Step 7 Run the XL CLI Blueprint Command
Run the blueprint command and answer a few simple questions specific to your deployment infrastructure.
For this tutorial, the XL CLI "wrapper" executable included in the root directory of the cloned repository is used to execute the commands. For details about the wrapper, see Using a wrapper script.
- Navigate to the root directory for the cloned repository.
- Type
./xlw blueprint. The list of available blueprints displays. - Select
aws/microservice-ecommerce. The XL CLI walks you through a series of prompts. - Press Enter to run the blueprint.
| Prompt | Description |
|---|---|
Do you want to provision a new AWS EKS cluster? | If you already have an EKS cluster configured, type N. You are prompted for the cluster name and endpoint. If you do not have an EKS cluster configured, type Y. You are prompted for a cluster name. For this tutorial, type e-commerce. |
Do you want to use AWS credentials from ~/.aws/credentials file? | If you have the AWS CLI installed, type Y and you will be given the choice of using credentials from the file or entering them manually.If you do not have the AWS CLI installed, type N. You are prompted for your AWS Access Key ID and AWS Secret Access Key. |
Select the AWS region | A list of available regions displays. Select the desired region. |
What is the name of the namespace? This should be same as the one used in Kubernetes files | Kubernetes namespaces help different projects, teams, or customers to share a Kubernetes cluster. For this tutorial, type xl-demo as it is the value configured in the provided Kubernetes files. |
Deploy URL for Release (This will only be used in the Release template) | For this tutorial, use the default: http://xl-deploy:4516 |
Step 8 Review Folders and Files Generated by the Blueprint
Executing the blueprint command generates the following folders and files in the repository:
- A
cloudformation-basic-eks-clusterfolder (includes CloudFormation templates required to provision the cluster). This folder is generated only if you elected to provision a new EKS cluster. - A
kubernetes-basic-eks-clusterfolder with theaws-auth-cm.yamlfile. - A
xebialabsfolder and the following new files:secrets.xlvalsvalues.xlvals.gitignore(this file is used for ignoring thesecrets.xlvalsfile for security purposes)xld-basic-eks-cluster-applications.yamlxld-basic-eks-cluster-environments.yamlxld-basic-eks-cluster-infrastructure.yamlxld-kubernetes-invoice-app.yamlxld-kubernetes-notification-app.yamlxld-kubernetes-store-app.yamlxld-microservice-ecommerce-cloudformation-applications.yamlxlr-microservice-ecommerce-pipeline-ci-cd.yamlxlr-microservice-ecommerce-pipeline-destroy.yaml
- A
xebialabs.yamlfile: A YAML file of the Import kind that lists multiple YAML files and executes them in order.
Commit and Push
Commit and push these generated files to your forked e-commerce-microservice repository
Step 9 Update a Kubernetes YAML File with Your Docker Hub Repository Name
The YAML files saved in the kubernetes folder of the store, invoice and notification application are used to deploy to a Kubernetes cluster:
For example in the store/kubernetes folder you will find:
store-deployment.ymlstore-mysql.ymlstore-service.yml
In the store-deployment.yml file, you must replace the current Docker Hub organization and repository with your own. Similarly, replace the same repository information in invoice/store-deployment.yml and notification/notification-deployment.yml
Replace the Docker Hub organization and repository (<your-dockerhub-user>/ecommerce-store) in the following line:
image: <your-dockerhub-user>/ecommerce-store:@IMAGE_TAG@
with your own organization and repository. For example:
image: myorg/myrepo:@IMAGE_TAG@
The @IMAGE_TAG@ will be automatically populated later in the tutorial when the Jenkins job runs.
Repeat the same process for invoice/store-deployment.yml and notification/notification-deployment.yml
Step 10 Apply the Deploy/Release YAML Files
The xebialabs.yaml that is generated by the blueprint is an Import kind YAML file that stacks the following YAML files into a single YAML and runs them sequentially:
apiVersion: xl/v1
kind: Import
metadata:
  imports:
  - xebialabs/xld-basic-eks-cluster-applications.yaml
  - xebialabs/xld-basic-eks-cluster-infrastructure.yaml
  - xebialabs/xld-basic-eks-cluster-environments.yaml
  - xebialabs/xld-microservice-ecommerce-cloudformation-applications.yaml
  - xebialabs/xlr-microservice-ecommerce-pipeline-ci-cd.yaml
  - xebialabs/xlr-microservice-ecommerce-pipeline-destroy.yaml
From the root directory of the cloned repository, run the following command:
./xlw apply -f xebialabs.yaml
View the resulting output that indicates the files were successfully applied.
Step 11 Check the Results in Deploy
Check the Deploy UI which should reflect the results of running the xebialabs/xld-basic-eks-cluster-infrastructure.yaml, xebialabs/xld-basic-eks-cluster-environments.yaml and the xebialabs/xld-microservice-ecommerce-cloudformation-applications.yaml specifications.
Applications Node
Open Deploy, click Explorer in the top bar, and expand Applications > e-commerce.
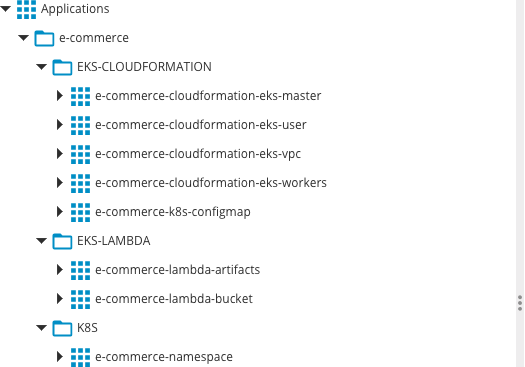
Under the e-commerce application, you see:
- EKS-CLOUDFORMATION: Includes the cloud formation stacks needed to create the infrastructure
- EKS-LAMBDA: Includes an app needed to create keypairs in AWS.
- K8S: Includes the Kubernetes applications. Note: At this point, the K8S node includes only the e-commerce-namespace application. Later, when the deployment is performed using the Jenkins CI/CD pipeline, multiple applications and a versioned package for the e-commerce-store microservice application will be created.
Environments and Infrastructure Nodes
Now let's look under the Environments and Infrastructure nodes in Deploy.
Expand Environments > e-commerce.

Under the e-commerce node, you now see the aws-cloudformation-e-commerce environment which references two infrastructure containers:
- aws-e-commerce
- eks-cloudformation
Under the Infrastructure node, you now see these infrastructure containers:
- aws-e-commerce: An
AWS.Cloudtype container used to deploy the EKS-LAMDA application. - eks-cloudformation: An
aws.cloudformation.Stacktype container used to deploy the EKS-CLOUDFORMATION applications and the microservice applications.
Step 12 Check the Results in Release
Finally, you can check Release which should reflect the results of running the xlr-pipeline-ci-cd.yaml and the xlr-pipeline-destroy.yaml specifications to create two new templates.
- Open Release and click Design > Folders.
- Click the e-commerce folder and the Templates tab. Note the two templates contained within:
- e-commerce-ci-cd: A CI-CD template to execute the deployment.
- e-commerce-destroy: A CI-CD template to destroy the deployment.
Step 13 Create and run a release in Release
- From the Templates tab, click the e-commerce-ci-cd. The template displays showing the release phases and tasks.
- Click New release.
- Type a name for the release. For this tutorial, type
build 1. - Click Create. The
e-commerce/build 1release is created. - Click Start Release.
Phase 1: Provision Infrastructure
The Provision infrastructure phase begins, provisioning the Lambda artifacts, the AWS VPC and IAM resources, and the AWS EKS cluster. You can observe the provisioning progress using the AWS CloudFormation UI.
Phase 2: Build E-commerce Application
Once the infrastructure is successfully provisioned, the Build e-commerce application phase begins. In this phase a Docker image is created for the Store microservice. For this tutorial, this is done using the Jenkins pipeline that is connected to the JenkinsFile.
You can observe the progress using the Jenkins UI. The Jenkins build process will add the container with the contents in the repository branch. Once complete, Jenkins will push the images to your Docker Hub repository so that they can later be pulled into AWS EKS.
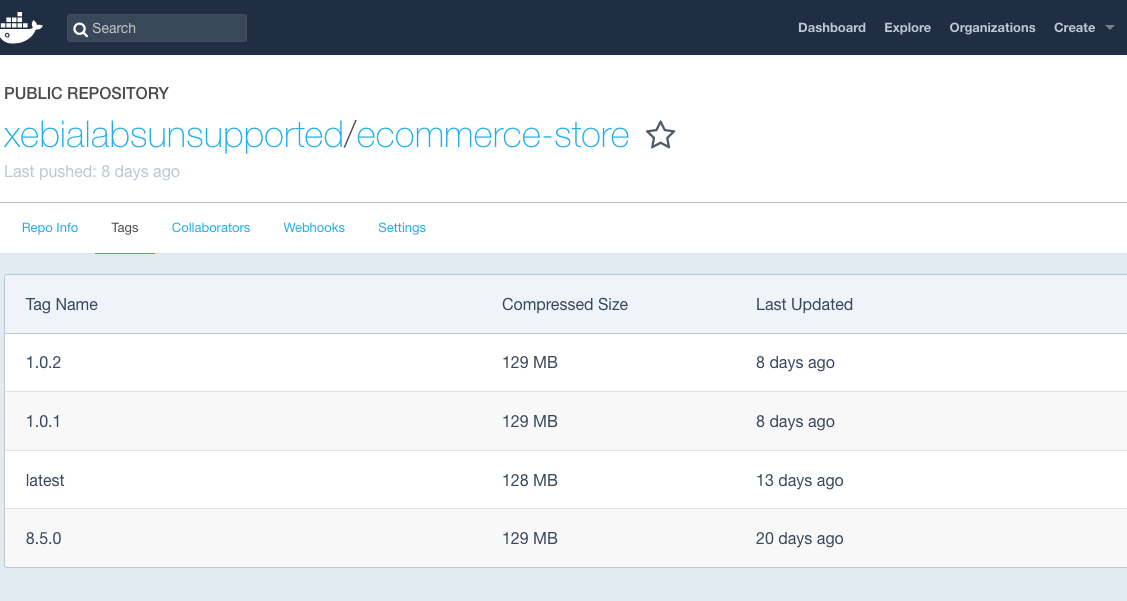
Once the Jenkins build is complete, you can log in to Docker Hub and observe the container that was built in the public repository.
Step 14 Check Deploy to Verify Kubernetes Applications Are Added
-
Return to Deploy, click Explorer in the top bar, and expand Applications > e-commerce.
-
Expand the K8S node.
-
Note the additional applications that were created.
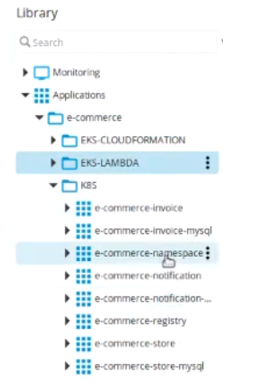
Before starting, the only application listed was e-commerce-namespace. Now, the full list of applications is included.
-
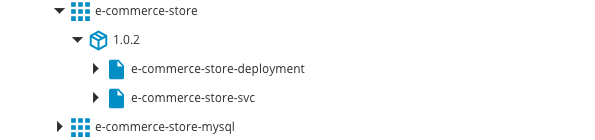
Expand the e-commerce-namespace node. A package (version 1.0.2) is now listed with two applications.
Step 15 Check Release Pipeline Progress
Return to Release and check the progress of the pipeline. Once the Deploy e-commerce application is complete, the Test phase starts, running integration and smoke tests.
When complete, a manual task called Verify application is highlighted. Click the Verify application task and open the provided URL in a new tab or browser.
The Digital.ai E-Commerce Store application displays.
Post-tutorial Cleanup
To ensure that no resources related to the tutorial are active on your AWS account, use the <app-name>-destroy template in Release to delete all of your stacks related to the application.
Conclusion
In this tutorial, the AWS EKS infrastructure was provisioned, the e-commerce application was deployed, and the process was observed using the Deploy and Release UIs. If you now want to update the deployed application, you can push the changes to your repository and create a new release using Release.