Datasets Creation
The dataset page helps you view, create, edit, duplicate, extend, and publish the dataset to meet your requirements. It facilitates the integration of datasets from various sources, allowing you to work with diverse data types and formats.
The dataset page has the following options:
- Select source instance: It enables you to choose the desired source instance to access datasets created within that specific environment. A source instance refers to a particular system or database from which data is extracted and integrated into the data warehouse environment.
- Grid and list view: You can view the datasets in grid and list view using these options. The list view presents data in a tabular format with rows and columns, making it easier to scan and compare values visually. The grid view presents data in a structured grid format, with each grid representing a dataset. The grid view is useful for comparing and analyzing multiple datasets simultaneously.
- Search dataset: It helps you to search for a dataset.
- Create dataset: It helps you to create a dataset.
Searching dataset
You can type a keyword in the Search dataset to search for a dataset.
Creating a dataset��
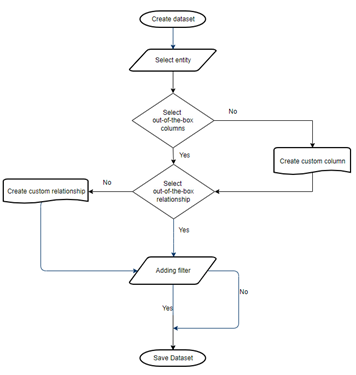
This task enables you to create a dataset. It enables you to create new datasets, defining the structure, schema, and properties of the data. It supports importing data from various sources and integrating it into datasets seamlessly. You can also edit, modify, or transform data within datasets, ensuring data quality and consistency. Here's a flowchart to understand the dataset creation process.
Prerequisites
Analytics author Access is required to duplicate out-of-the-box datasets and create or edit custom datasets.
Complete the following steps to create a dataset:
Selecting an entity
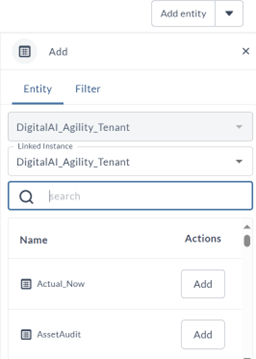
Entities are crucial in dataset creation as they provide a structured framework for organizing and representing data. Defining entities enables a clear understanding of the data stored and the relationships among various pieces of information. Complete the following steps to select an entity:
- Click Create dataset.
- Click Select source instance, and then select the required source instance.
- Click Linked instance, and then select the required instance.
- Click the + icon against entities to add the required entities from the entity list. If you accidentally closed the Add panel, you can reopen it by clicking on the Add entity button. By clicking on Add entity the panel should reappear, allowing you to resume the entity addition process without losing any progress.
You can search or use the scroll bar to select entities.
Choosing out-of-the-box columns
Out-of-the-box columns are vital for dataset entities, providing a foundation for data organization, standardization, and efficiency. They ensure data consistency and enhance the dataset's value for analysis and decision-making. Complete the following steps to select the out-of-the-box columns:
- Click the entity.
- In the Column tab, select the required columns, and then click Add. Note: You can do a single or multiple selection of columns.
- Click the edit button in the Explore dataset pane to modify the column’s name.
Creating custom object or column
The custom columns are typically derived from existing data within the dataset through calculations, transformations, or other manipulations to generate new insights or information. You can create a custom object or column using this option.
You cannot change the data object type that is attribute and metrics for the created data object.
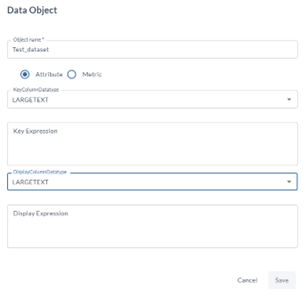
Complete the following steps to create the attributes:
- In the Explore dataset pane, click Create object.
- In the Data Object window, type the column or object name.
The column or object name must not contain any blank spaces.
- Select Attribute.
- Click KeyColumnDatatype, then select the required data type.
- Type Key expression.
Key column datatype and key expression are mandatory to create a custom column.
- Click DisplayColumnDatatype, then select the required data type.
- Type Display expression.
- Click Save.
Complete the following steps to create the metrics:
- In the Explore dataset pane, click Create object.
- Type of the object or column name.
- Select Metric.
- Click Aggregation Rule, then select the required aggregation.
- Click KeyColumnDatatype, then select the required data type.
- Type Key expression.
- Click Save.
You get a Data Object ABC was successfully created message once the data object or column is created.
Key expression
The key expression enables you to create a column or attribute that helps identify, organize, and relate data across tables. You can transform existing attributes to ensure uniqueness and aid in efficient querying and analysis. This expression plays a vital role in schema design and data modeling.
Example: Consider you have an Orders table that contains information about orders placed by customers. Each order has an Order ID and is associated with a Customer ID. you want to count the number of orders placed by each customer.
Here's how you can use a key expression along with the COUNT function to achieve this: "COUNT(OrderID)"
You can type # to select an entity.
| CustomerID | OrderCount |
|---|---|
| 101 | 3 |
| 102 | 1 |
| 103 | 1 |
This result shows the count of orders placed by each customer. Customer 101 has placed 3 orders, customer 102 has placed 1 order, and customer 103 has also placed 1 order.
Editing custom object or column
You can edit the existing object or column using this option. You can rename the column, adjust the property, edit the data, and rearrange the structure. Complete the following steps to edit the object or column:
- On the Explore dataset pane, click the edit button against the data object name.
- In the Data object dialog box, edit the required details.
- Click Save.
You get a Data Object ABC was successfully updated message once the object or column is edited.
Deleting custom object or column
This feature enables you to delete the custom object or column. Complete the following steps to delete the object or column:
- On the Explore dataset pane, click the delete button against the data object name.
- You get a Data Object ABC was successfully deleted message once the object or column is deleted.
Selecting out-of-the-box relationship
You can select a predefined relationship using this option. Out-of-the-box relationship provides a convenient and reliable approach to establishing data connections and promoting efficiency, accuracy, and consistency in data analysis and reporting processes. This option displays the out-of-the-box relationships between the selected entity and the other entities in the selected source. Complete the following steps to select the relationship.
- Click the entity.
- In the entity, click Relationship.
- Click the Link against the required relationship.
Adding custom relationship
You can create custom relationships using this option. Custom relationships offer flexibility, control, and adaptability in establishing data connections, allowing you to address your business needs, accommodate complex data structures, and optimize data analysis processes. Complete the following steps to add a custom relationship.
- Click and draw a line between two entities.
- Click join type and select the required join type.
- Enter an expression in Expression.
- Click Add Join.
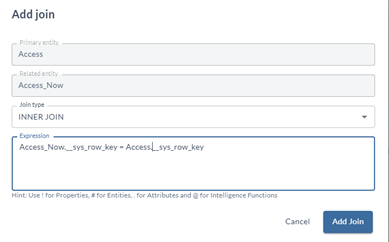
Join type
The join type refers to the method used to combine rows from two or more tables in a relational database based on a related column between them. The join types determine how the database engine matches rows from different tables and includes them in the result set. You can use any of the following types to create a relationship based on your requirements:
- Inner join: This type of join returns only the rows from both tables that have matching values in the specified columns. It combines rows from two tables where the join condition is met.
- Left outer join: This join returns all the rows from the left table (the table mentioned first in the SQL query) and the matching rows from the right table. If there are no matching rows in the right table, NULL values are returned.
- Right outer join: It returns all the rows from the right table and the matching rows from the left table. If there are no matching rows in the left table, NULL values are returned.
- Full outer join: This join returns all rows from both tables, regardless of whether there is a match or not. If there is no match, NULL values are returned for the columns from the table that lack a matching row.
- Cross join: This type of join returns the Cartesian product of the two tables, meaning it combines each row of the first table with every row of the second table. It does not require a join condition.
Example: Consider the Employees and Departments tables. The Employees table contains information about each employee, such as their ID, name, department ID, and salary. The Department's table contains information about each department, such as its ID and name. Now, let's say you want to join these two tables to get a result set that contains each employee's ID and the department name.
You can achieve this by using the following SQL query with an inner join:
#Employees.Department_ID = #Departments.Name
You can type # to select an entity.
The Inner Join specifies that only the rows with matching values in both tables will be included in the result. You get the following table as a result:
| ID | Department |
|---|---|
| 101 | HR |
| 102 | Marketing |
| 103 | Finance |
Adding filter
This feature enables you to create a filter. The filter feature enhances the dataset view in data exploration capabilities, empowering users to extract meaningful insights from the dataset more efficiently. Complete the following steps to add a filter.
- Click the Filter tab.
- On the Filter tab, type the filter condition.
- Click Save.
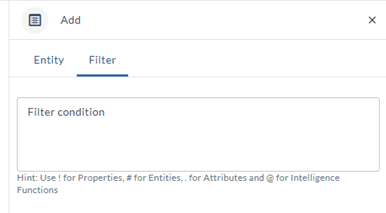
Example: consider a Students table with columns for StudentID, Name, and Age. Let's say you want to filter out students who are older than 18 years old..
Here's how you can write a filter condition for this scenario: " Students.Age > 18"
You can type # to select an entity.
The result of this query would include only the students who are older than 18 years old.
Saving custom Dataset
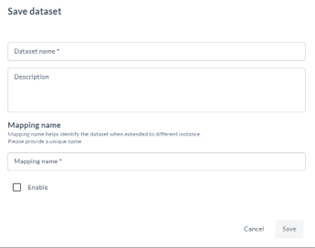
The Save Custom Dataset feature enables you to save customized datasets with specific configurations, filters, or transformations applied. By saving a custom dataset, you can easily access and reuse your tailored data views for ongoing analysis or reporting tasks. Complete the following steps to save a dataset:
- To enable the preview dataset feature, click Save or Save and continue. Selecting Save and continue enables you to preview the dataset without closing the dataset creation page.
- In Save dataset, type the dataset name and description.
The Dataset name must not contain any blank spaces
- Type the mapping name.
- Click Save. You get a Dataset XYZ was successfully created message once the dataset is saved.
The dataset is created, and it is in a draft state.
