Progressive Delivery Using Release and Argo Rollouts
Before You Begin
This how-to involves working with a variety of tools and technologies such as Digital.ai Release, Argo Rollouts, GitHub, Digital.ai Release templates as code (.xlr files), Amazon EKS, kubectl, and so on. You can perform this task by simply following the instructions. However, being familiar with these tools and technologies can help you considerably when you try this out in your test environment.
To know more about Amazon EKS and Argo Rollouts, see:
What's the objective?
The objective is to illustrate:
- how you can carry out Blue-Green and Canary deployments of an application (the Guestbook application in this how-to) to an Amazon EKS cluster using Digital.ai Release and Argo Rollouts.
- the release management and deployment capabilities of Digital.ai Release and Argo Rollouts respectively.
Digital.ai Release integrates with Argo Rollouts and supports the following roll out strategies:
- Blue-Green
- Canary
Once you have this setup in place, all you would be doing is starting a new release—Canary or Blue-Green—whenever you have a new image to deploy.
Though the Digital.ai Release's Argo Rollout plugin supports all popular cloud platforms such as Amazon, GCP, Azure, and so on, this how-to is based on Amazon EKS for illustrative purposes.
What do you need?
You need the following to set up a Canary/Blue-Green deployment pipeline:
-
Digital.ai Release—acts as the deployment orchestrator. You need Digital.ai Release 22.3.x or later with the following plugins installed:
-
A Kubernetes cluster—Amazon EKS in this how-to—with Argo Rollouts installed.
-
A Linux host with Kubectl and Kubectl plugin for Argo Rollouts installed.
What do you have?
This how-to has been built with an example GitHub how-to repository that hosts the following:
- Digital.ai Release templates:
- Argo_Rollouts_Initial_BlueGreen_Rollout_Setup.xlr
- Argo Rollouts_ BlueGreen Deployment.xlr
- Argo_Rollouts_BlueGreen_Rollout_Teardown.xlr
- Argo_Rollouts_Initial_Canary_Rollout_Setup.xlr
- Argo_Rollouts_ Canary Deployment.xlr
- Argo_Rollouts_Canary_Rollout_Teardown.xlr
- Kubernetes deployment manifest files:
- guestbook-bluegreen-rollout.yaml
- guestbook-bluegreen-service.yaml
- guestbook-canary-rollout.yaml
- guestbook-canary-service.yaml
- redis.yaml
This how-to illustrates how you can deploy the Guestbook application following the Blue-Green and Canary deployment strategies.
The Argo Rollouts templates in the GitHub how-to repository support progressive delivery (Blue-Green and Canary) natively with Kubernetes and Argo Rollouts—no service mesh (such as Linkerd) is required.
How does it work?
Here's a high-level overview of what you would do to set this up and what happens when you start a new Blue-Green or Canary deployment of an image.
At the end of this exercise you would have:
- forked the xebialabs-community/howto GitHub repository and cloned the same to your Digital.ai Release server.
- installed and configured Digital.ai Release 22.2.0 (or later).
- installed the xlr-argo-rollouts-integration and xlr-kubernetes-plugin plugins.
- created and configured an Amazon EKS cluster.
- installed Argo Rollouts on the Amazon EKS cluster.
- installed and configured a Linux host with Kubectl and Kubectl plugin for Argo Rollouts.
- set up connections between the DIgital.ai Release and Kubectl host.
- set up connections between the DIgital.ai Release and Argo Rollouts.
- created Release global variables and imported the Release templates.
Once you have the setup in place, you must start a new release to set up the environment for Blue-Green and Canary deployments using the following templates.
- Argo_Rollouts_Initial_BlueGreen_Rollout_Setup.xlr—Use this template to:
- Create a namespace—guestbook-bluegreen.
- Create two services—guestbook-bluegreen-active and guestbook-bluegreen-preview.
- Create a rollout—guestbook-bluegreen-rollout—using the Blue-Green strategy with a replica set of two pods with the image guestbook:blue.
- Create a redis pod and a redis service.
- Argo_Rollouts_Initial_Canary_Rollout_Setup.xlr—Use this template to:
- Create a namespace—guestbook-canary.
- Create two services—guestbook-stable and guestbook-canary.
- Create a rollout—guestbook-canary-rollout—using the Canary strategy with a replica set of five pods with the image guestbook:blue.
- Create a redis pod and a redis service.
Once the initial setup is complete, all it takes to deploy a new image of the Guestbook application is to start a new release with one of the following templates.
- Argo Rollouts_ BlueGreen Deployment.xlr—Use this template to:
- Check which version of the application is live at the moment and set a new image for deployment.
- Test and promote or abort the new image for a Blue-Green rollout.
- Roll out or abort the new image of the Guestbook application depending on whether you promoted or aborted the rollout.
- Send notifications.
- Argo_Rollouts_ Canary Deployment.xlr—Use this template to:
- Check which version of the application is live at the moment and set a new image for deployment.
- Test and promote or abort the new image for a Canary rollout.
- Roll out or abort the new image of the Guestbook application depending on whether you promoted or aborted the rollout.
- Send notifications.
Once you have had a trial run of the procedure you can use the following Release templates to remove all the namespaces, services and rollouts so that you can free up your cloud resources or start all over again from the scratch if you want.
- Argo_Rollouts_BlueGreen_Rollout_Teardown.xlr—removes the namespace, service, rollout and so on for Blue-Green
- Argo_Rollouts_Canary_Rollout_Teardown.xlr—removes namespace, service, rollout and so on for Canary
Here's a detailed step-by-step.
Step 1—Create an Amazon EKS Cluster
For illustrative purposes, this topic deals with Amazon EKS. You can have your Kubernetes cluster in other cloud platforms such as GCP or Azure too.
-
Log on to your AWS account and gather the
AWSAccessKeyIdandAWSSecretKey.Create an access key if you do not have one already. For more information, see Managing access keys.
It is recommended to download and save the AWS access key file immediately after creating the access key as you cannot retrieve your Secret Access Key later.
-
Create an Amazon EKS Cluster. For more information, see Creating an Amazon EKS cluster.
While there are innumerable configurations possible for your EKS cluster, this topic assumes the EKS cluster is made up of a cluster with three nodes of instance type
t2.medium -
Gather the following information about your Amazon EKS cluster and keep them handy.
- Your Amazon account's
AWSAccessKeyIdandAWSSecretKey - The AWS region code (for example,
eu-west-2) that hosts the EKS cluster - The EKS cluster's name
- The API server endpoint URL
- The Certificate Authority (CA) cert
- Your Amazon account's
Step 2-Install Argo Rollouts In Your Cluster
Step 3—Install the AWS-LB Controller in the Amazon EKS Cluster
See Installing the AWS Load Balancer Controller.
Step 4—Set up the Kubectl Linux host
-
Log on to the Linux host.
-
Install Kubectl and the Kubectl plugin for Argo Rollouts.
See:
-
Connect the Kubectl host to the Amazon EKS cluster. See Update kubeconfig.
Step 5—Set up the Digital.ai Release Server and Fork the how-to GitHub Repository
-
Log on to your Digital.ai Release server (Linux) as a root user.
-
Install Digital.ai Release.
Tip: If you want to install Release using Docker images:
- Install Docker and Docker Compose
- See Install Release.
-
Start your Digital.ai Release server and log on.
-
Install the following Release plugins.
- xlr-argo-rollouts-integration—see xlr-argo-rollouts-integration
- xlr-kubernetes-plugin—see Kubernetes Plugin
-
Fork the xebialabs-community/howto GitHub repository and clone the forked repository. Suppose you clone the repository to the your home directory (for example,
/home/john).
Step 6—Set up Connections
Log on to the Digital.ai Release application and set up connections to the Kubectl host and Kubectl Argo Rollouts.
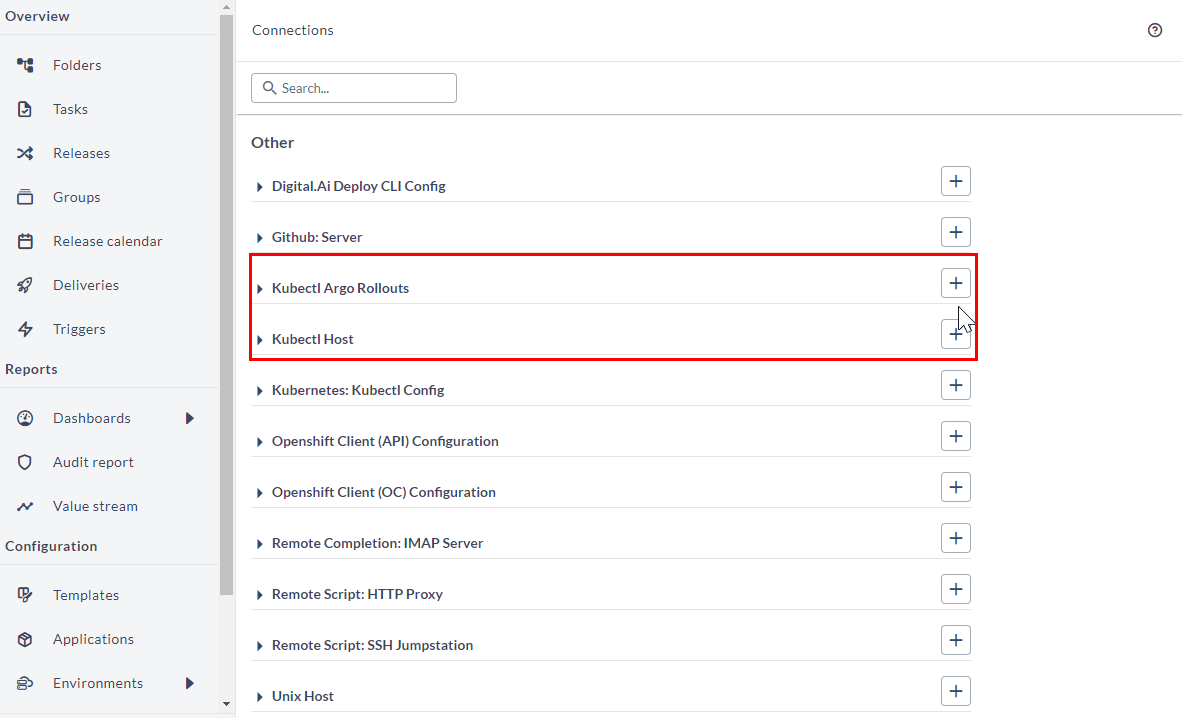
Step 6.1—Set up Connection to the Kubectl Host
-
Click Connections from the left navigation pane.
-
Click the + icon next to Kubectl Host.
-
Type the values for the following fields:
- Title
- Address (IP address of the Kubectl host)
- Port
- Username
- Password or Private Key File (depending on what you use)
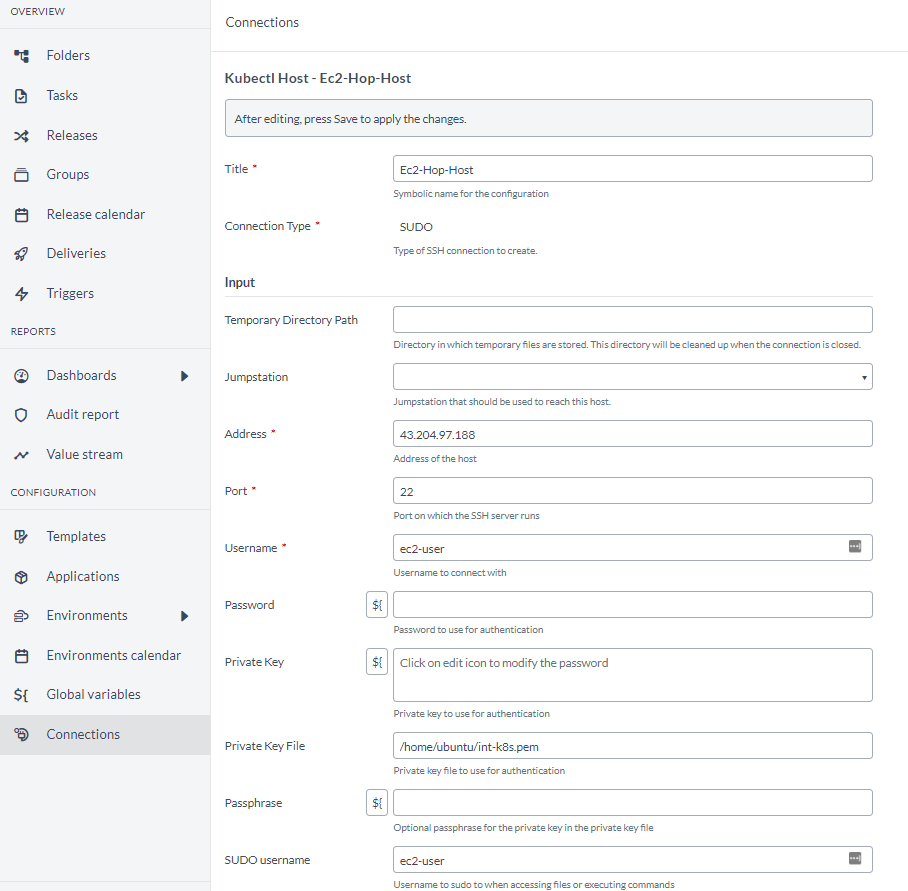
-
Click Test.
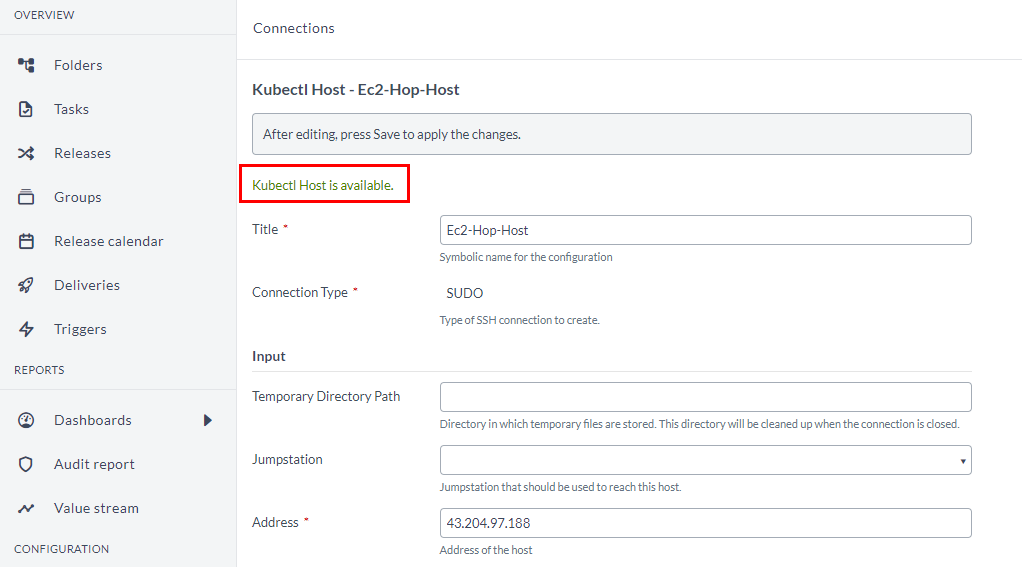
-
Click Save.
Step 6.2—Set up Connection to the Kubectl Argo Rollouts
-
Click Connections from the left navigation pane.
-
Click the + icon next to Kubectl Argo Rollouts.
-
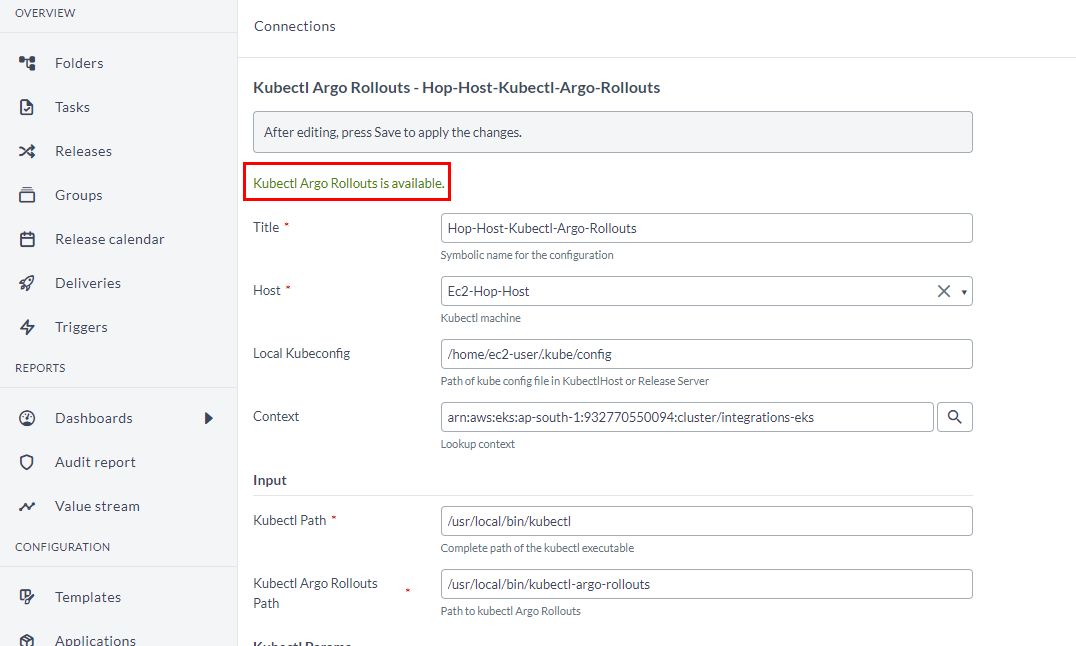
Type the values for the following fields:
- Title
- Host
- Local Kubeconfig
- Context
- Kubectl Path
- Kubectl Argo Rollouts Path
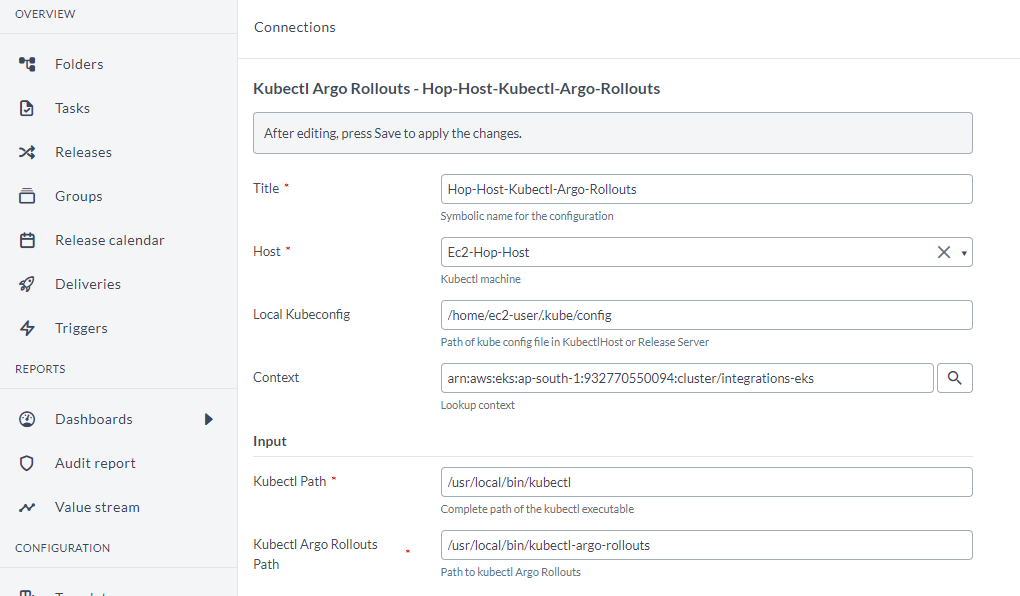
-
Click Test.
-
Click Save.
Step 7—Create Release Global Variables
- Click Global Variables from the left navigation pane.
- Click New global variable and create the following global variables.
| Variable Name | Value | Type |
|---|---|---|
| ${global.blue-green.container-name} | guestbook-container | Text |
| ${global.blue-green.current-image} | xldevdocker/guestbook:green | Text |
| ${global.blue-green.rollout-name} | guestbook-bluegreen-rollout | Text |
| ${global.canary.container-name} | guestbook-container | Text |
| ${global.canary.current-image} | xldevdocker/guestbook:blue | Text |
| ${global.canary.rollout-name} | guestbook-canary-rollout | Text |
Step 8—Import the Release Templates
-
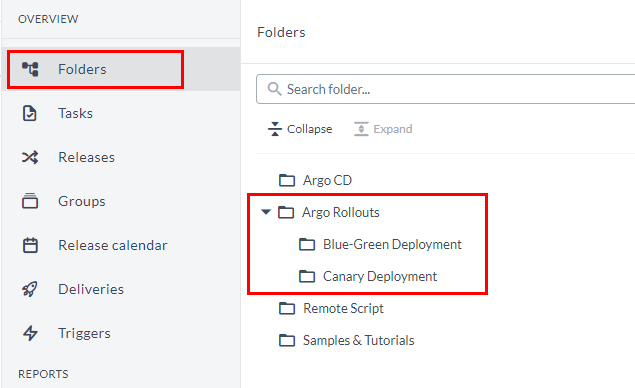
Click Folders > Add Folder and create the folders you need.
-
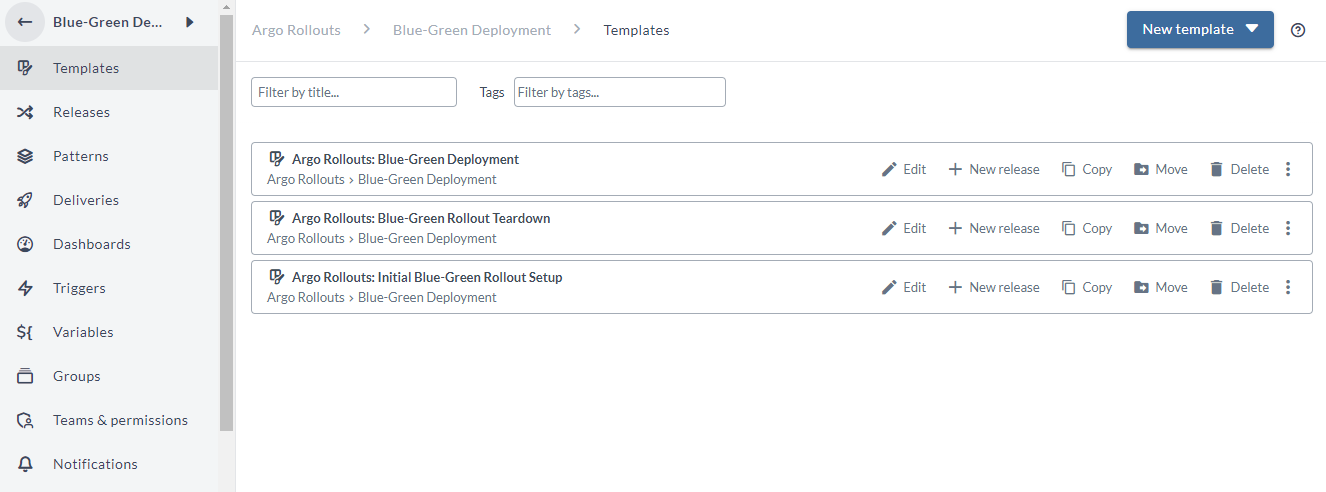
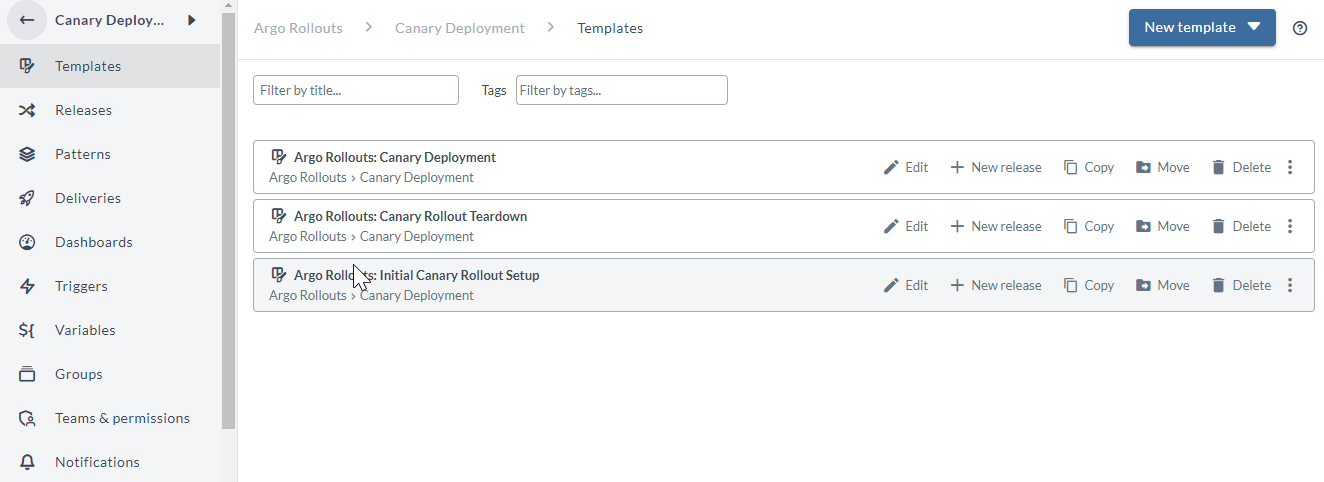
Import the Release templates from the xebialabs-community/howto GitHub repository that you forked. See Import a Release Template for more information.
Templates for Blue-Green deployments
Templates for Canary deployments
-
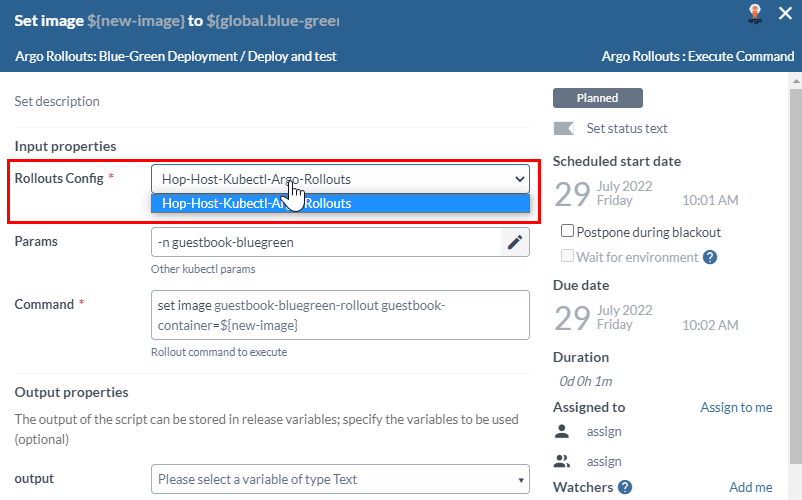
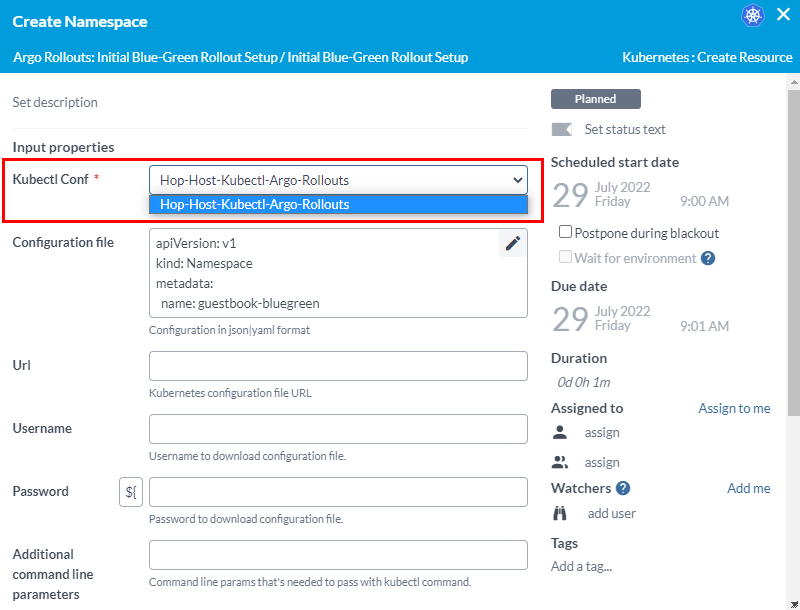
After importing the templates, open the tasks in these templates and select the value for the Kubectl Conf and Rollouts Config fields as required.
Step 9—Set up the Dashboard for Blue-Green and Canary Deployments
-
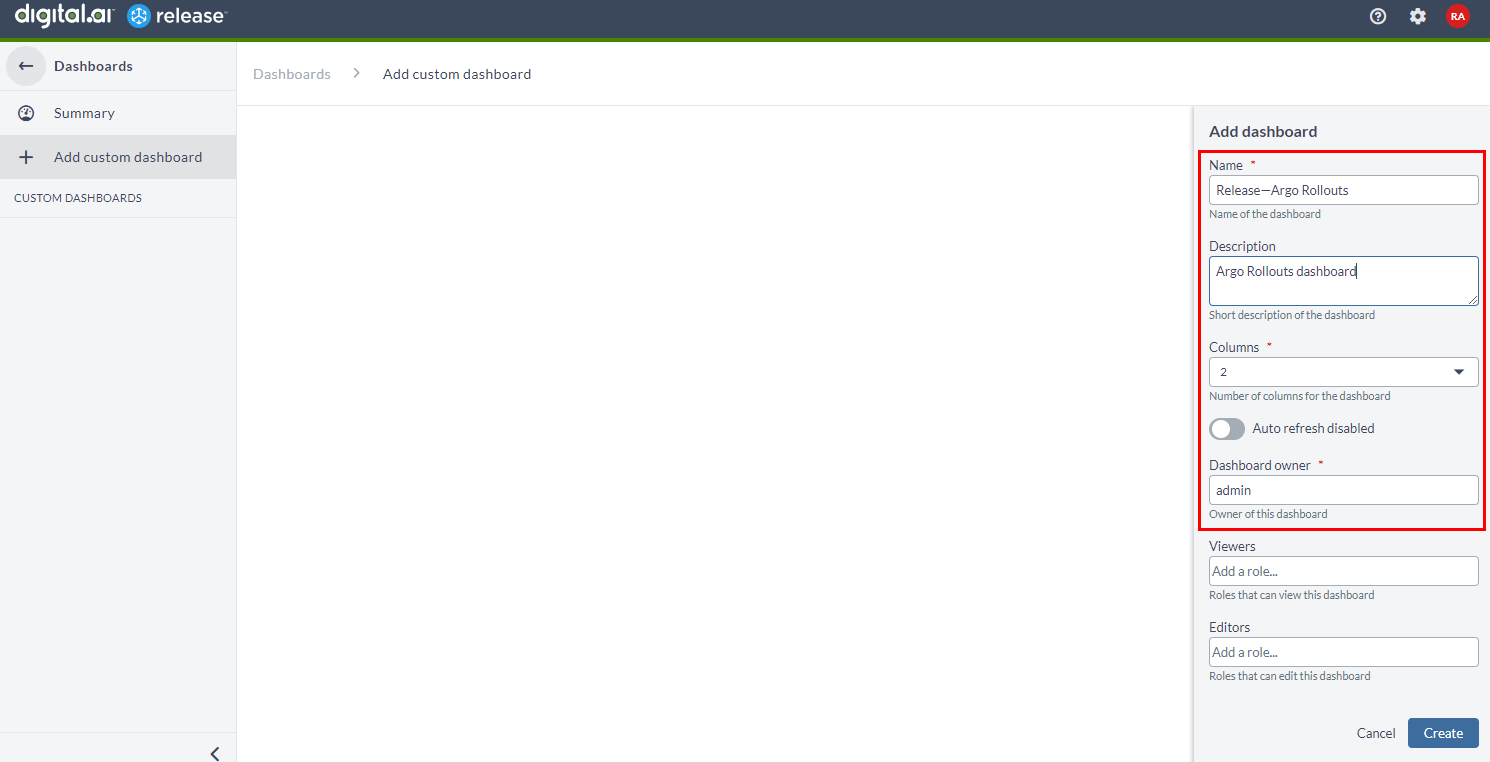
Click Dashboards > Add custom dashboard from the left navigation pane.
-
Type the name, description and so on for the dashboard.
-
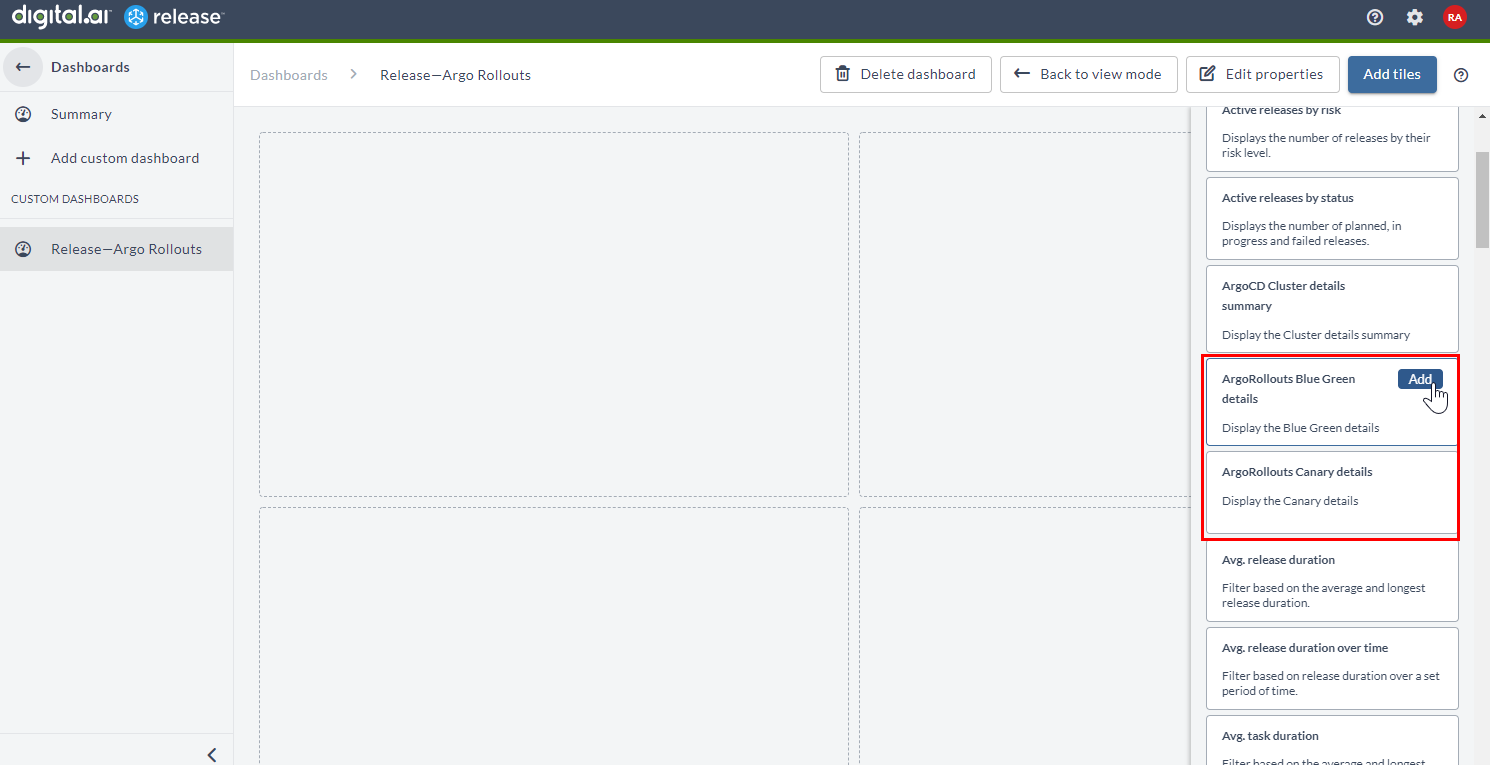
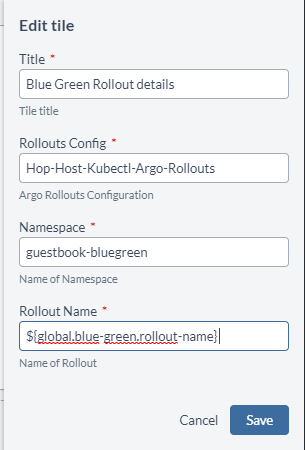
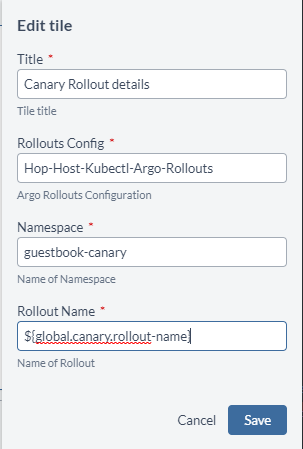
Click Add tiles and add ArgoRollouts Blue Green details and ArgoRollouts Canary details.
-
Configure the tiles as shown in the following illustration and save the tiles.
Blue Green tile
Canary tile
-
Click Back to view mode to view the dashboard.
Step 10—Blue-Green Strategy—Initial Roll Out of the Guestbook Application
The following tasks are part of the Argo Rollouts: Initial Blue-Green Rollout Setup template.
- Create a namespace—guestbook-bluegreen.
- Create two services—guestbook-bluegreen-active and guestbook-bluegreen-preview.
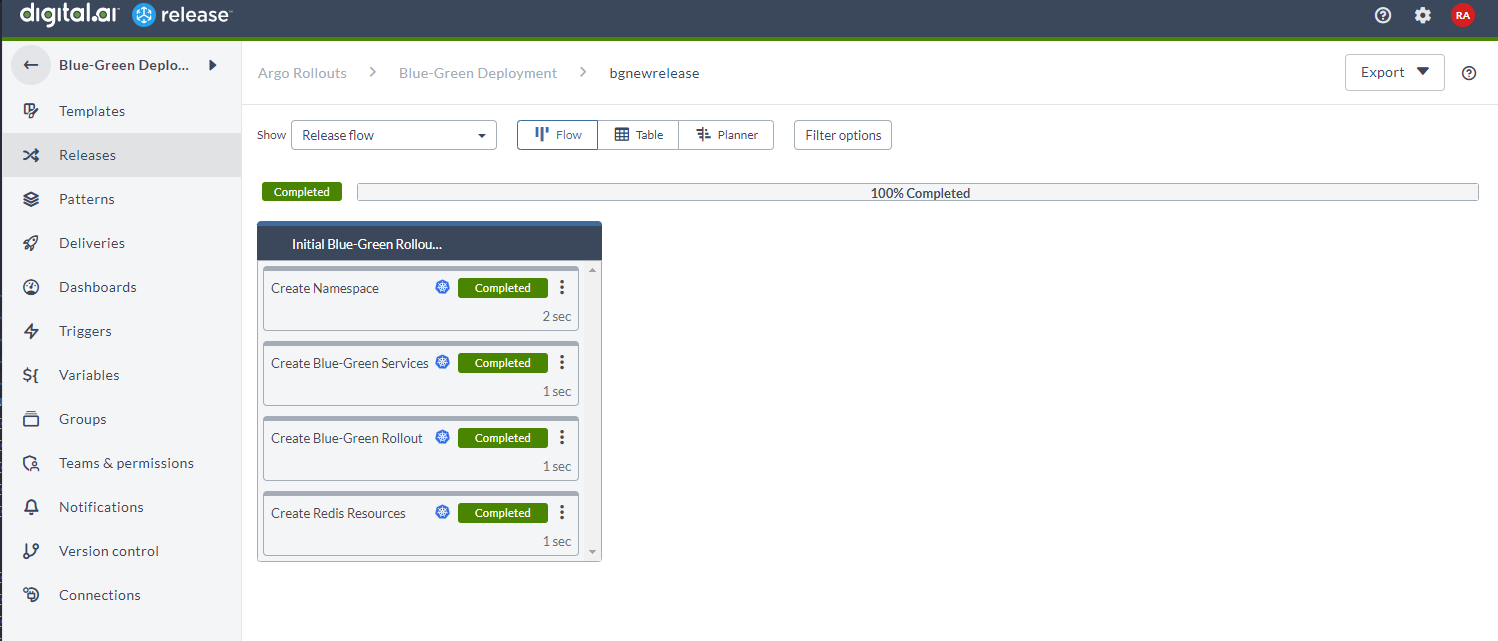
- Create a rollout—guestbook-bluegreen-rollout—using the Blue-Green strategy with a replica set of two pods with the image guestbook:blue.
- Create a redis pod and a redis service.
-
Go to the Folders > Blue-Green Deployment folder.
-
Select the Argo Rollouts: Initial Blue-Green Rollout Setup template.
-
Click New Release.
-
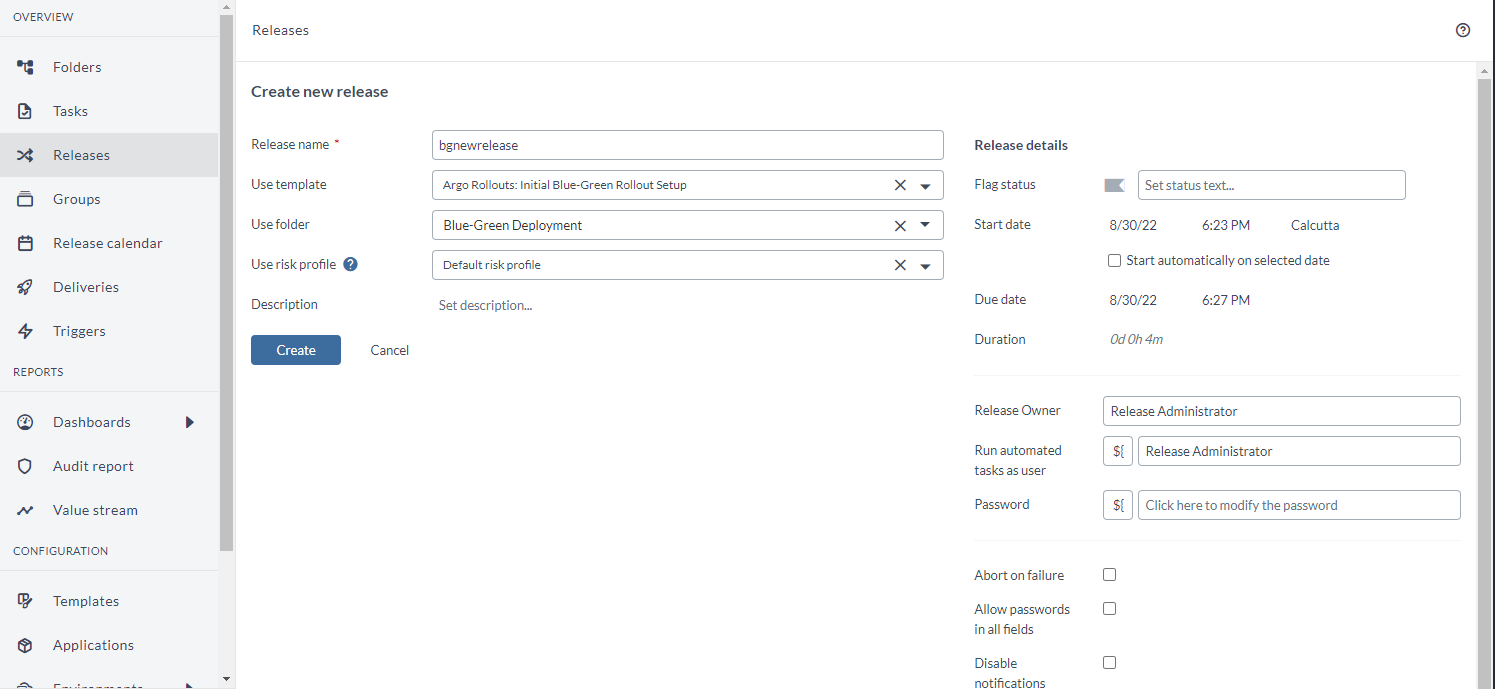
Type a name for the new release, select a user for the Run automated tasks as user field and type the password.
-
Click Create.
-
Click Start release and click Start from the dialog box and have the initial rollout completed.
-
Go to the dashboard and verify the initial rollout with two pods.
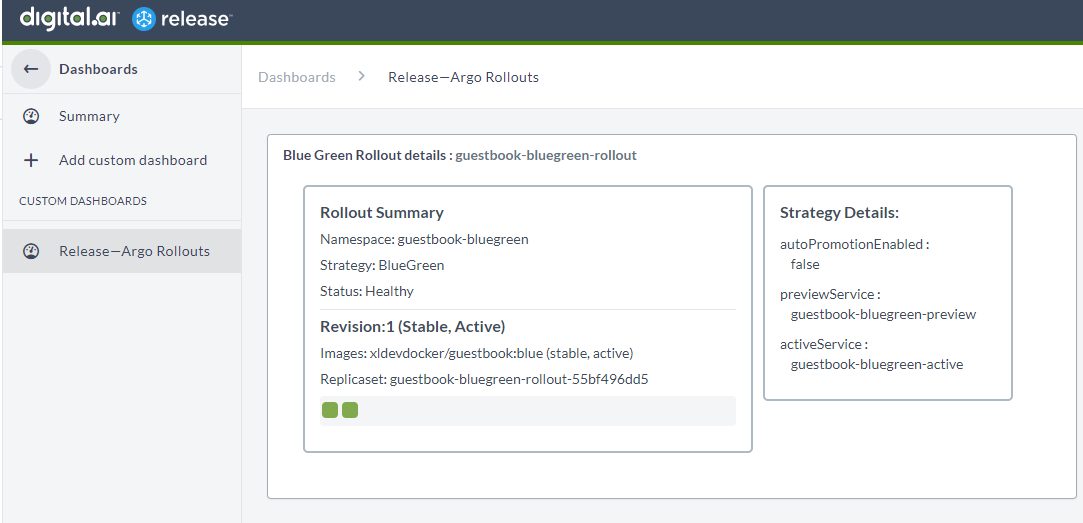
-
You can also go to the url
to view the deployed Guest Book application (in blue).
Step 10.1—Roll out New Versions of the Guestbook Application Using the Blue-Green Strategy
The following tasks are part of the Argo Rollouts: Blue-Green Deployment template.
- Check which version of the application is live at the moment and set a new image for deployment.
- Test and promote or abort the new image for a Blue-Green rollout.
- Roll out or abort the new image of the Guestbook application depending on whether you promoted or aborted the rollout.
- Send notifications.
-
Go to the Folders > Blue-Green Deployment folder.
-
Select the Argo Rollouts: Blue-Green Deployment template.
-
Click New Release.
-
Type a name for the new release, select a user for the Run automated tasks as user field and type the password.
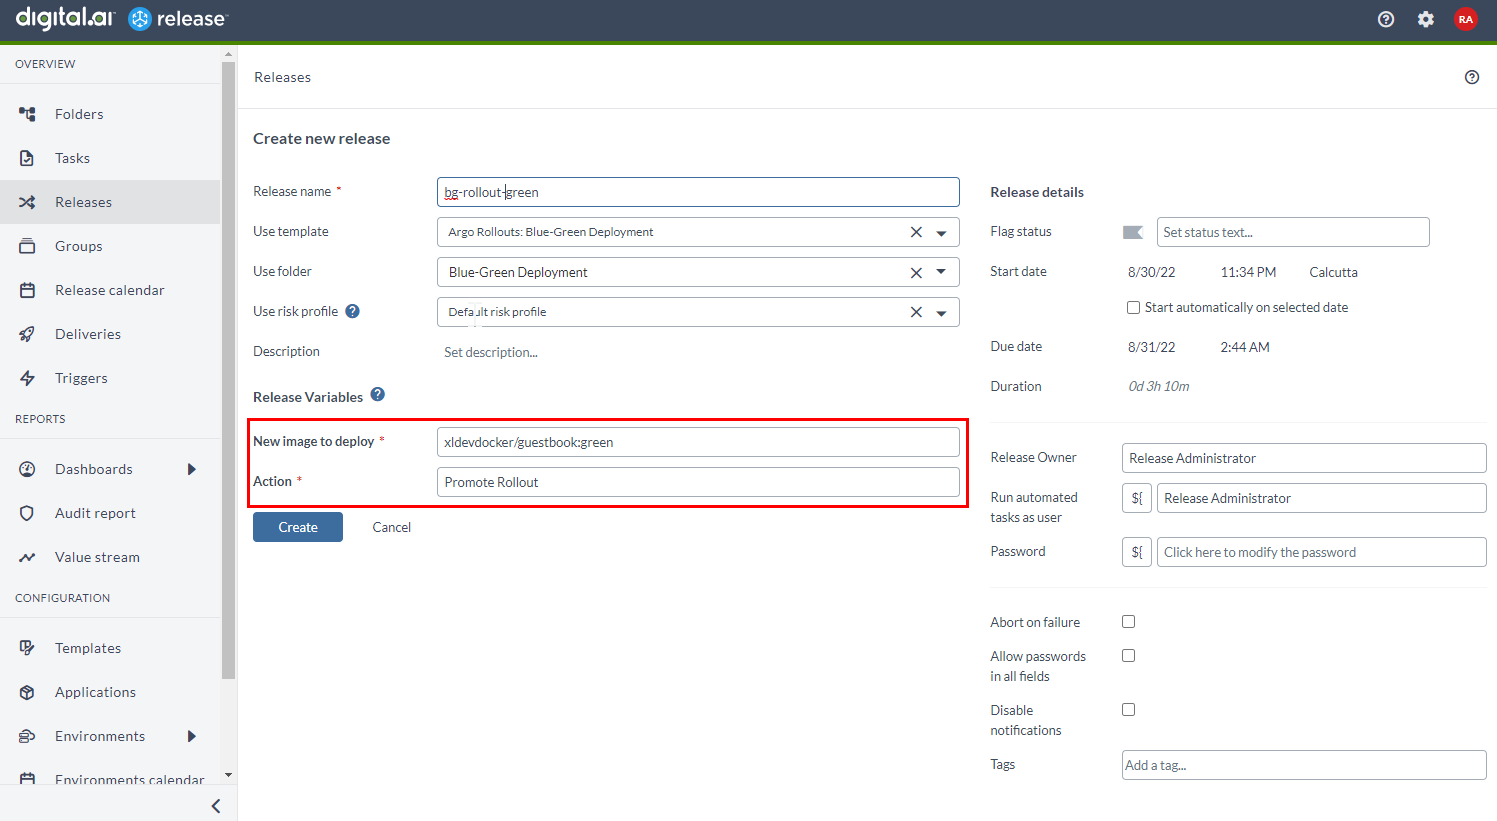
-
Type the new image's tag in the New image to deploy field.
-
Select Promote Rollout or Abort Rollout from the Action drop-down list.
-
Click Create.
-
Click Start release and click Start from the dialog box.
-
Click the Confirm new image manual task, assign it to yourself and complete the task.
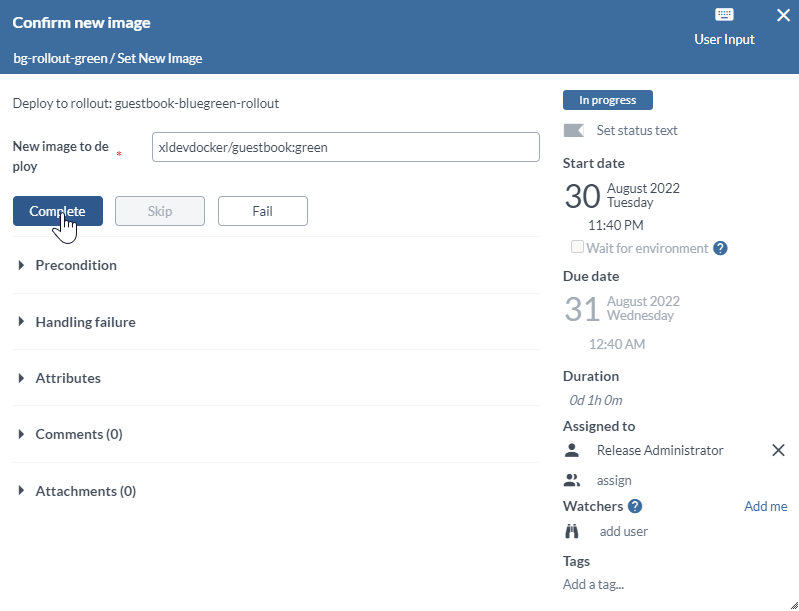
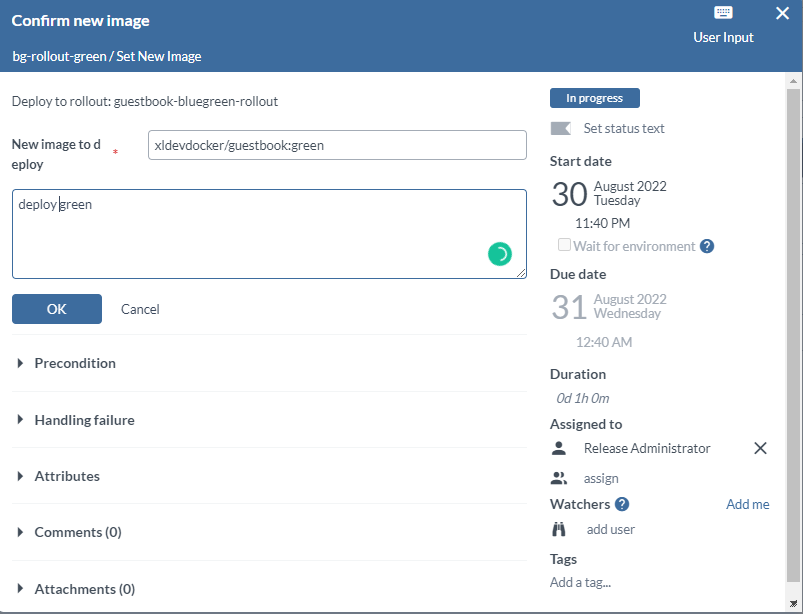
-
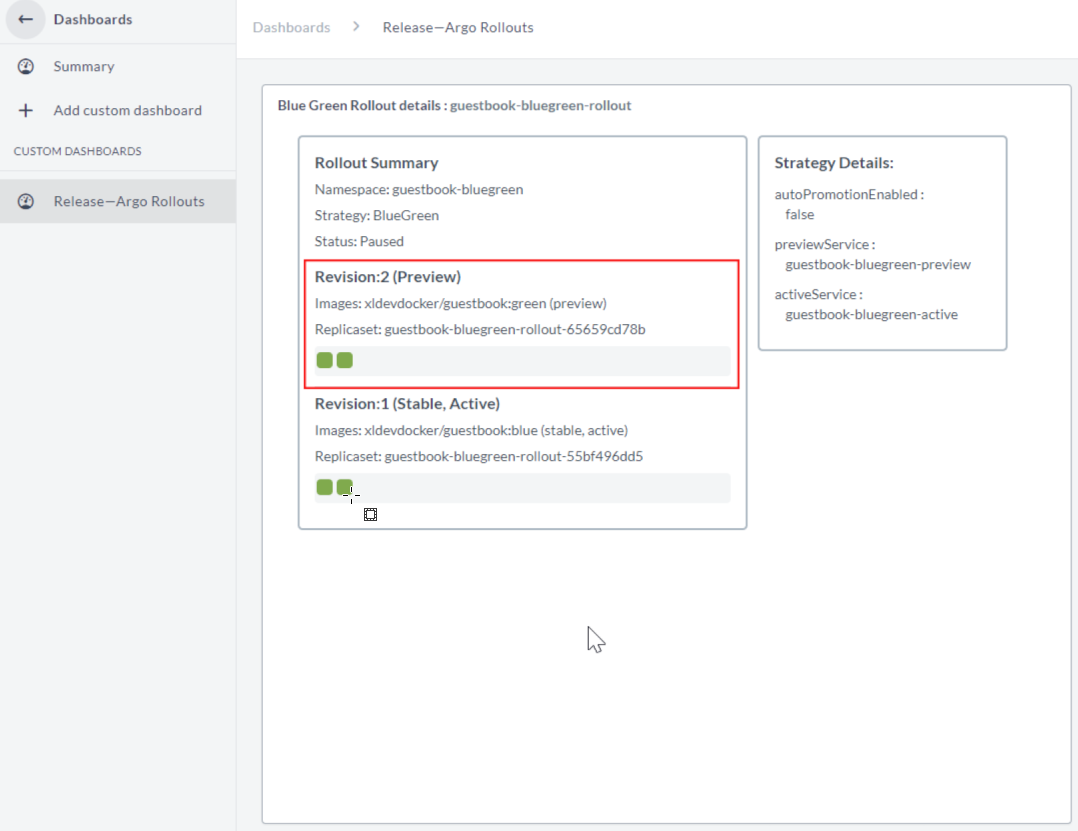
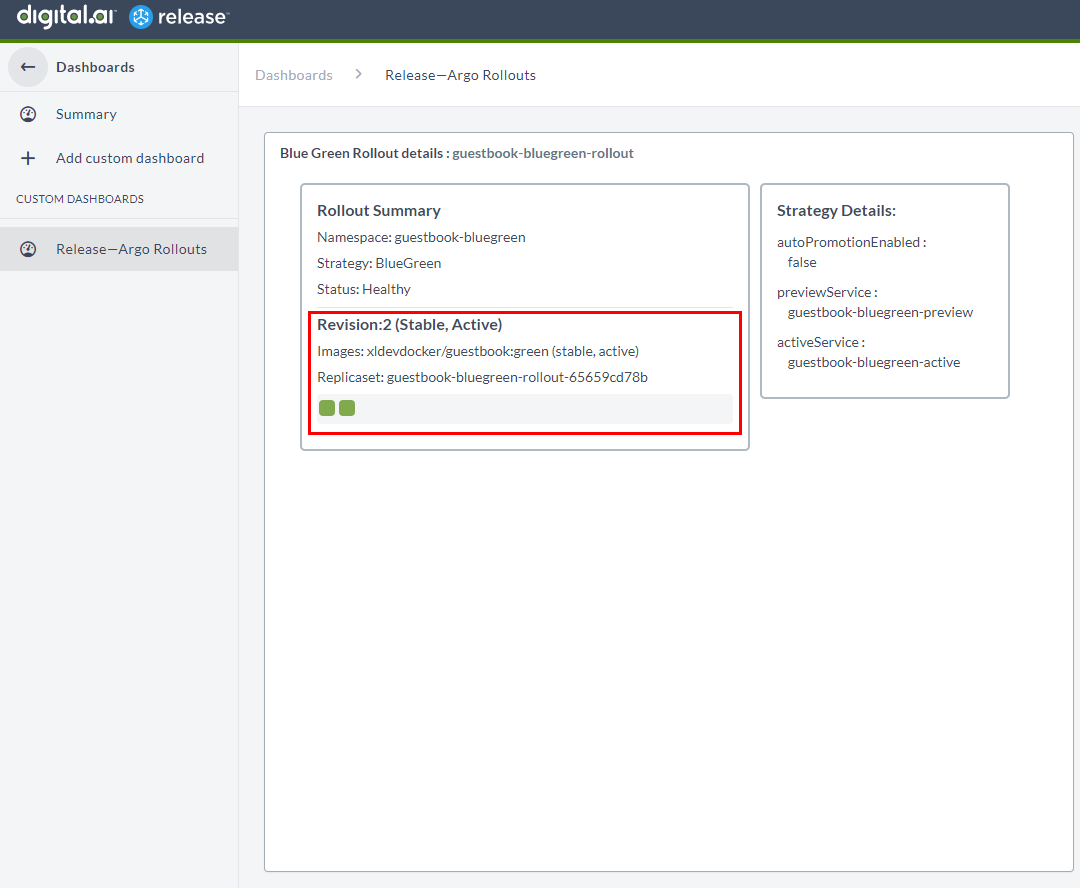
Once you confirm the new image, and once the Set Image task succeeds, you can view the dashboard to know that the new image xldevdocker/guestbook:green has been rolled out as Revision 2 for you to preview.
-
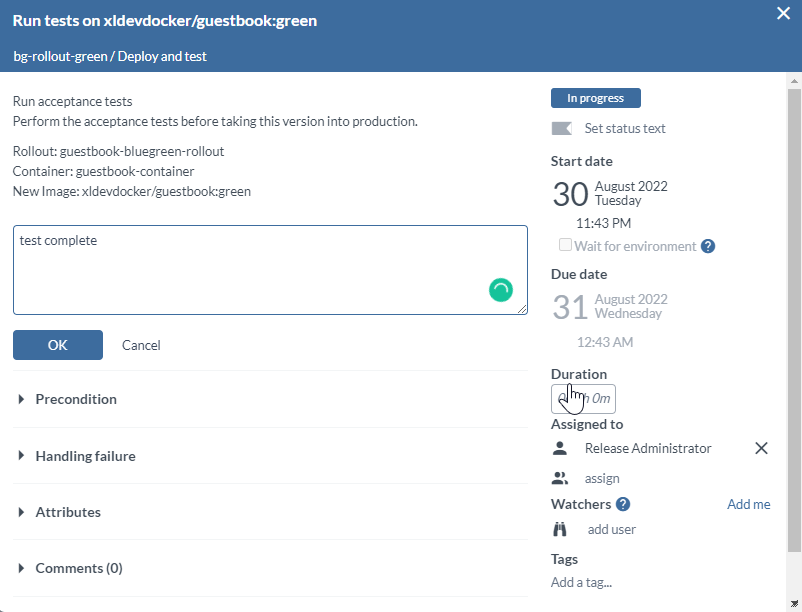
Assign the Run tests on xldevdocker/guestbook:green manual task to yourself and complete it.
-
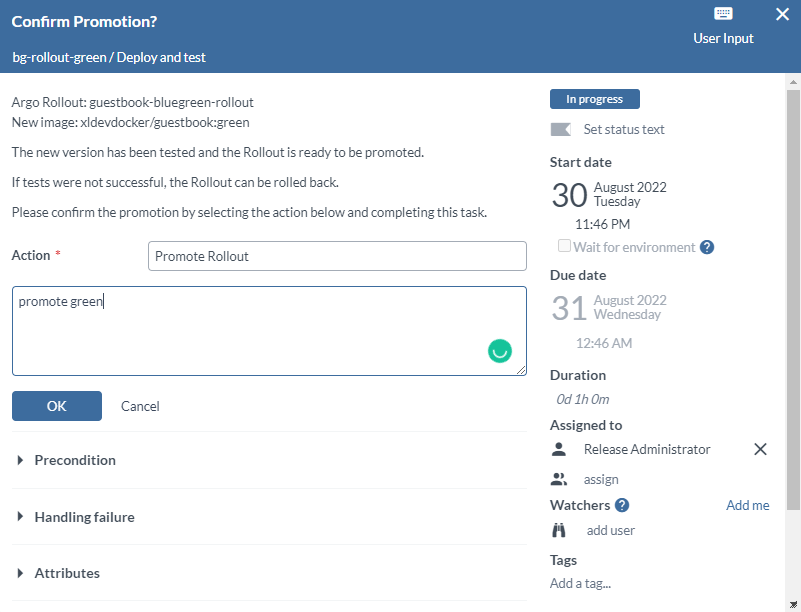
Assign the Confirm Promotion? manual task to yourself and either promote or abort the rollout.
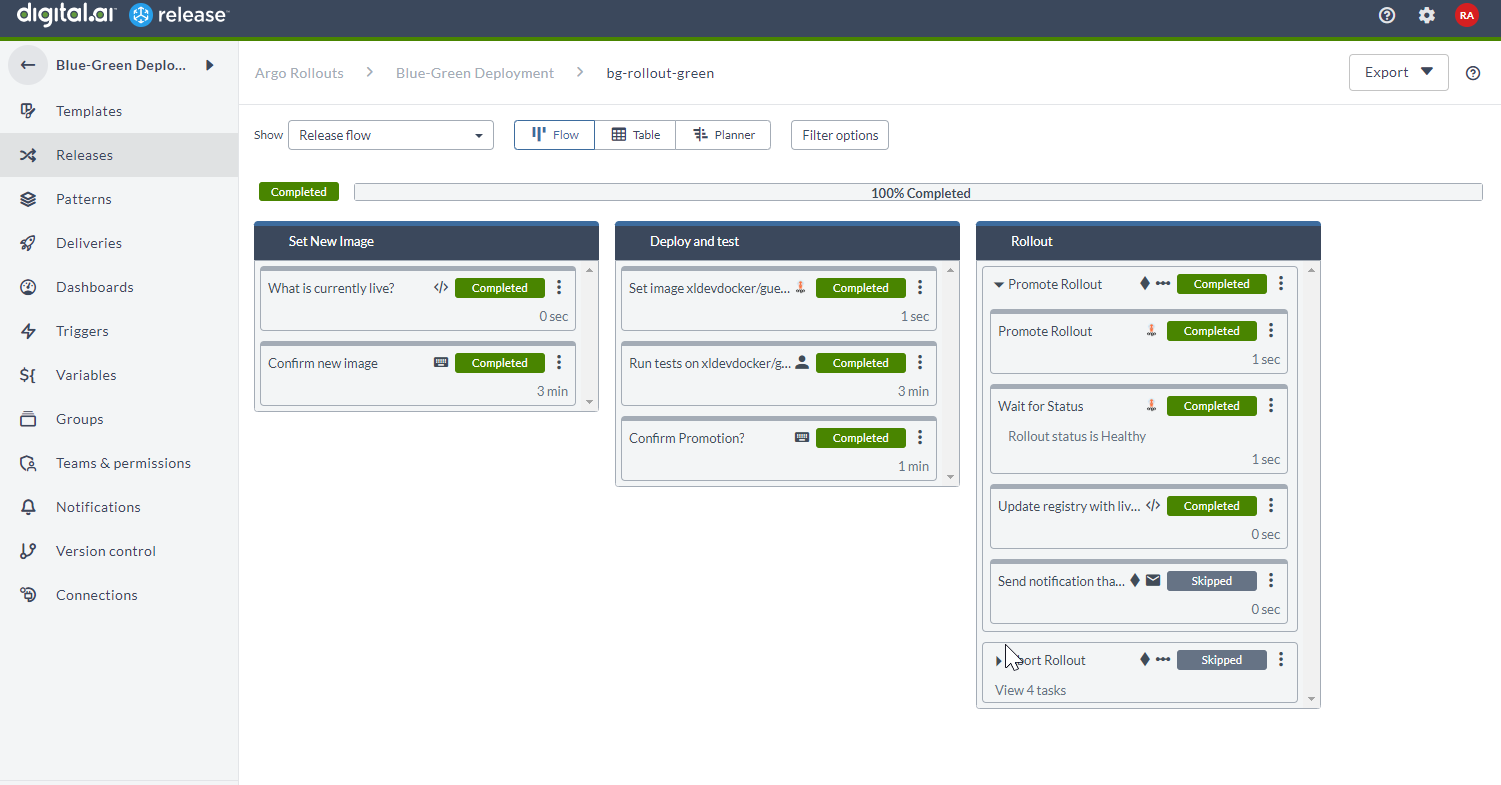
Wait for the rollout to complete.
-
Go to the dashboard and verify the new rollout (Revision:2) with two pods running as Stable, Active.
-
You can also go to the url
to view the deployed Guest Book application (in green).
Step 11—Canary Strategy—Initial Roll Out of the Guestbook Application
The following tasks are part of the Argo Rollouts: Initial Canary Rollout Setup release template.
- Create a namespace—guestbook-canary.
- Create two services—guestbook-stable and guestbook-canary.
- Create a rollout—guestbook-canary-rollout—using the Canary strategy with a replica set of five pods with the image guestbook:blue.
- Create a redis pod and a redis service.
-
Go to the Folders > Canary Deployment folder.
-
Select the Argo Rollouts: Initial Canary Rollout Setup template.
-
Click New Release.
-
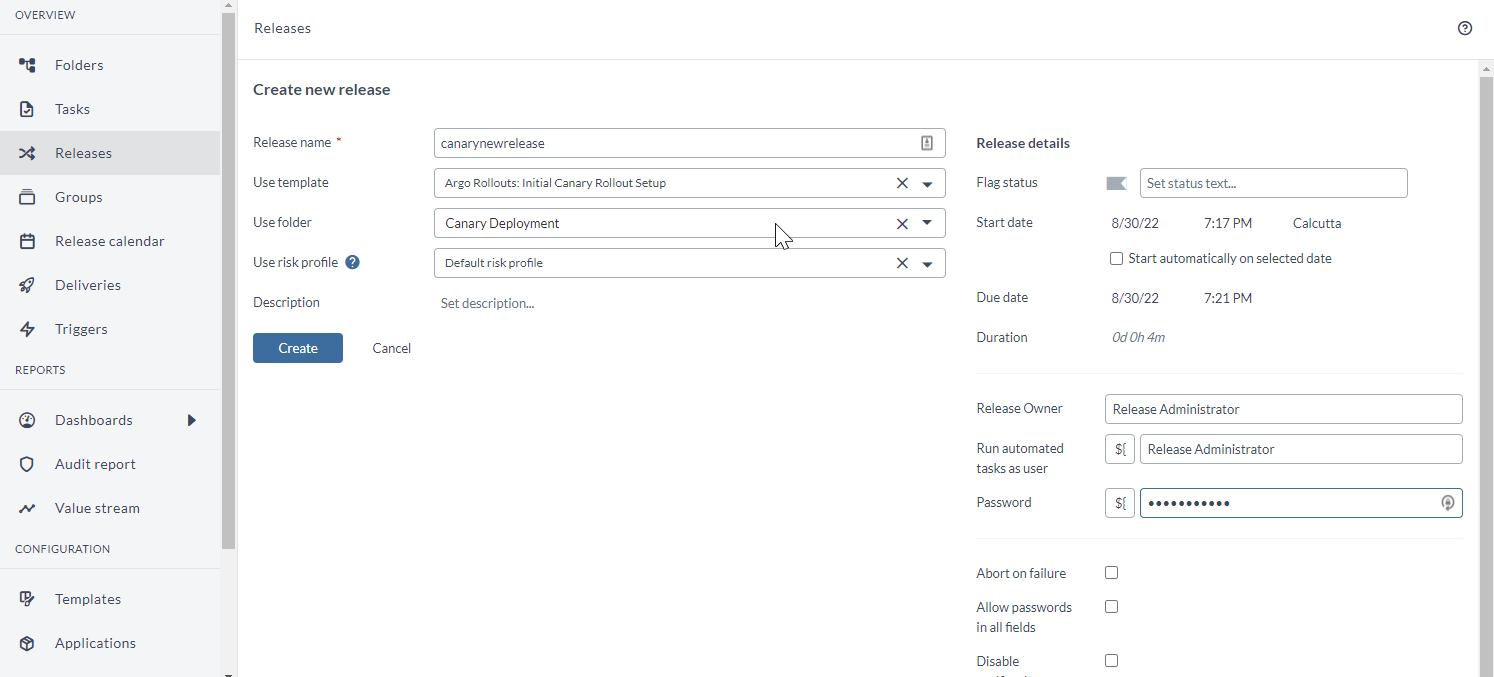
Type a name for the new release, select a user for the Run automated tasks as user field and type the password.
-
Click Create.
-
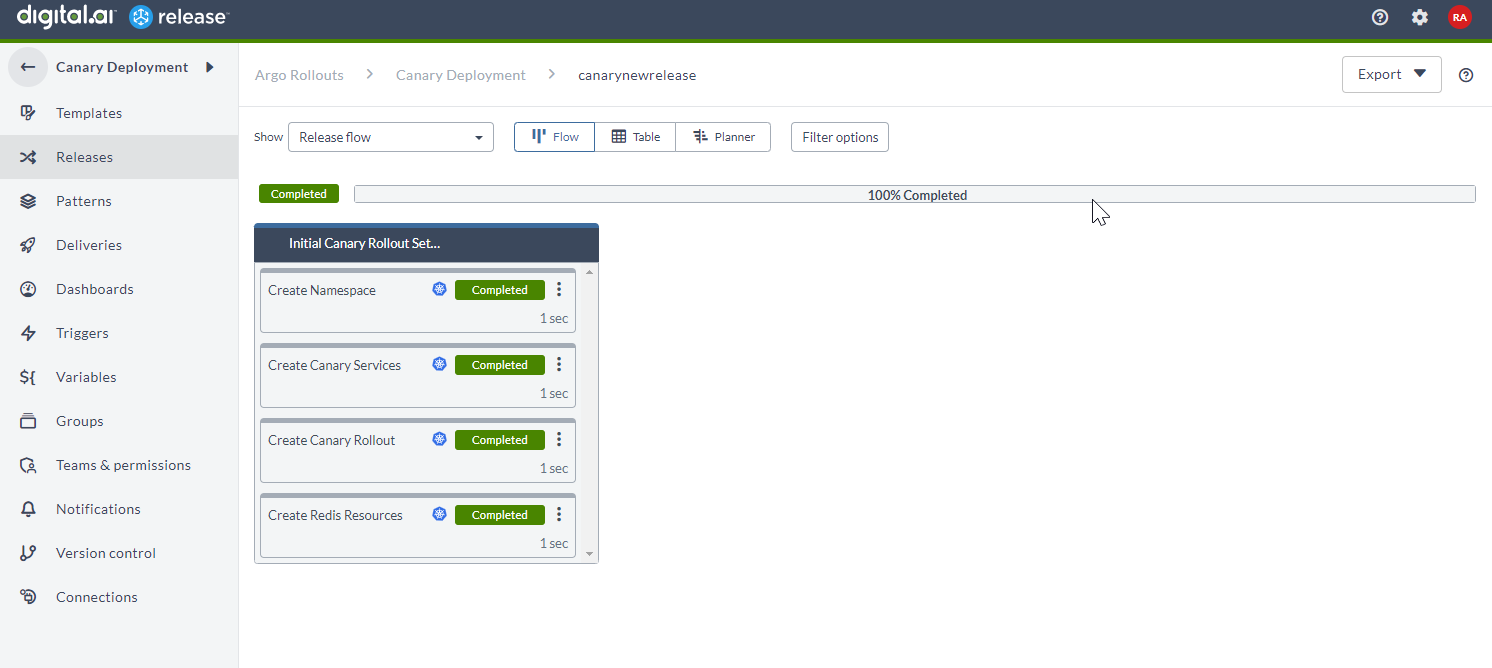
Click Start release and click Start from the dialog box and have the initial setup completed.
-
Go to the dashboard and verify the initial rollout with five pods.

-
You can also go to the url
to view the deployed Guest Book application (in blue).
Step 11.1—Roll out New Versions of the Guestbook Application Using the Canary Strategy
The following tasks are part of the Argo Rollouts: Canary Deployment template.
- Check which version of the application is live at the moment and set a new image for deployment.
- Test and promote or abort the new image for a Canary rollout.
- Roll out or abort the new image of the Guestbook application depending on whether you promoted or aborted the rollout.
- Send notifications.
-
Go to the Folders > Canary Deployment folder.
-
Select the Argo Rollouts: Canary Deployment template.
-
Click New Release.
-
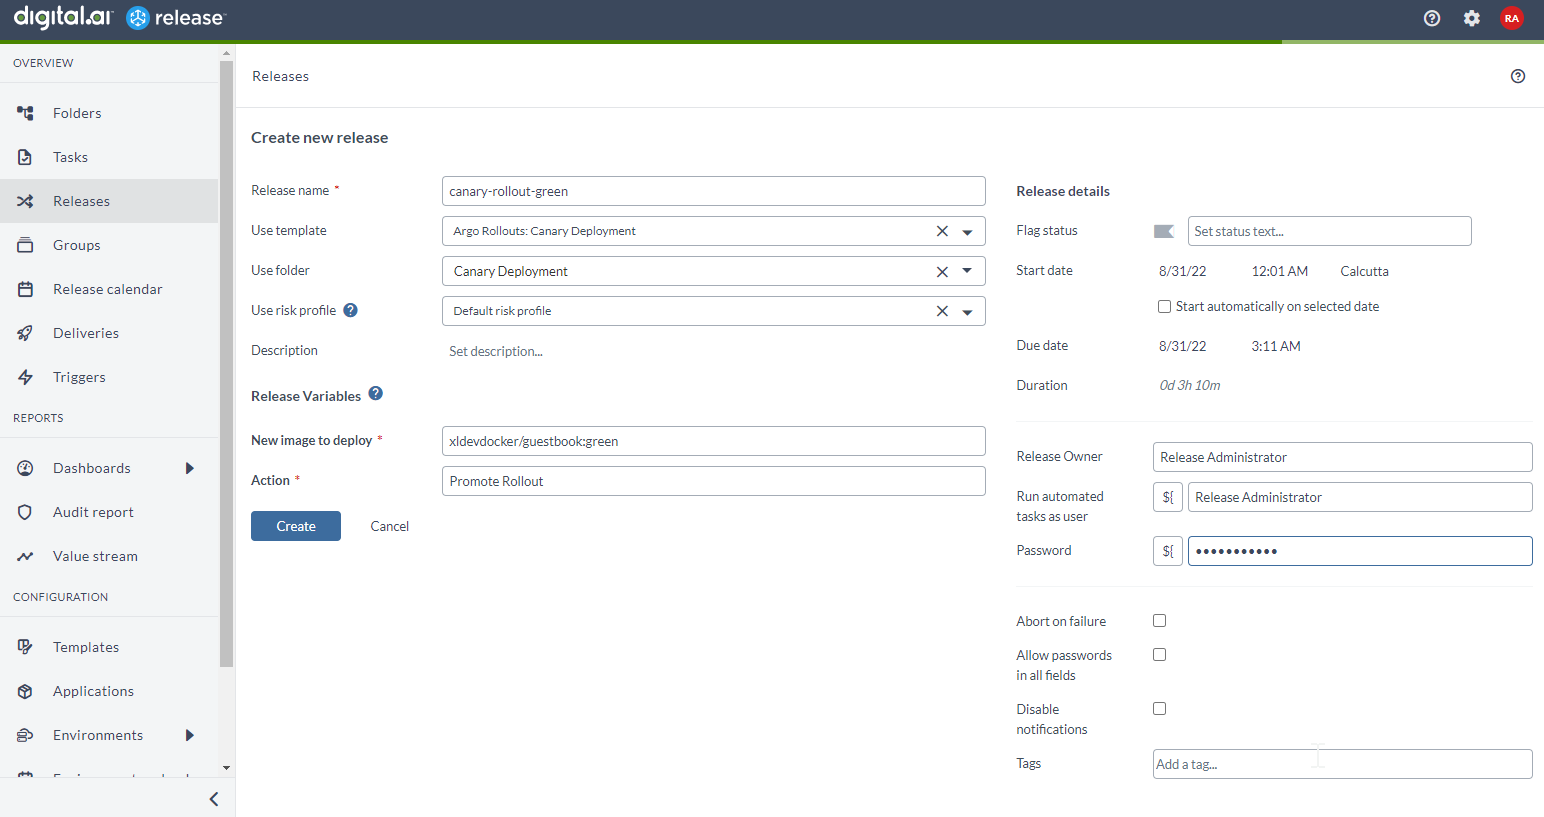
Type a name for the new release, select a user for the Run automated tasks as user field and type the password.
-
Type the new image's tag in the New image to deploy field.
-
Select Promote Rollout or Abort Rollout from the Action drop-down list.
-
Click Create.
-
Click Start release and click Start from the dialog box.
-
Click the Confirm new image manual task, assign it to yourself and complete the task.
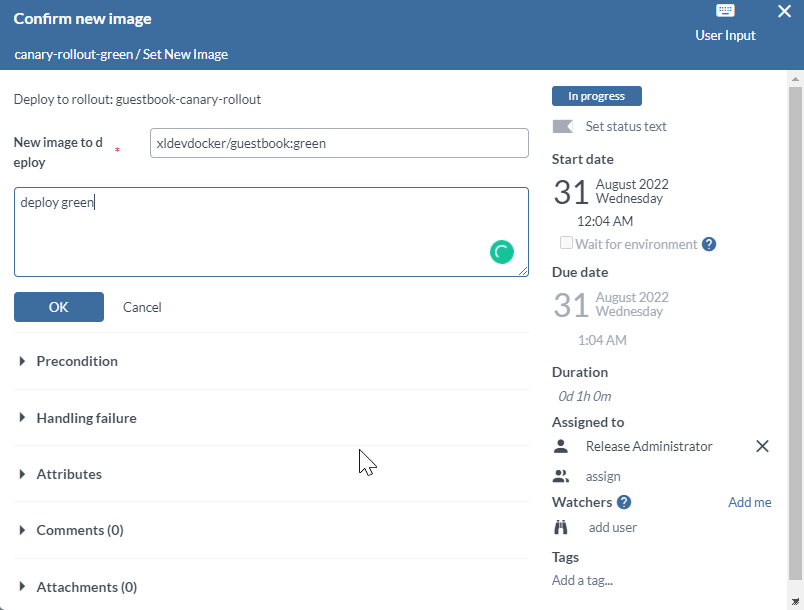
-
Once you confirm the new image, and once the Set Image task succeeds, you can view the dashboard to know that the new image xldevdocker/guestbook:green has been rolled out (to 20% weight and paused) as Revision 2.
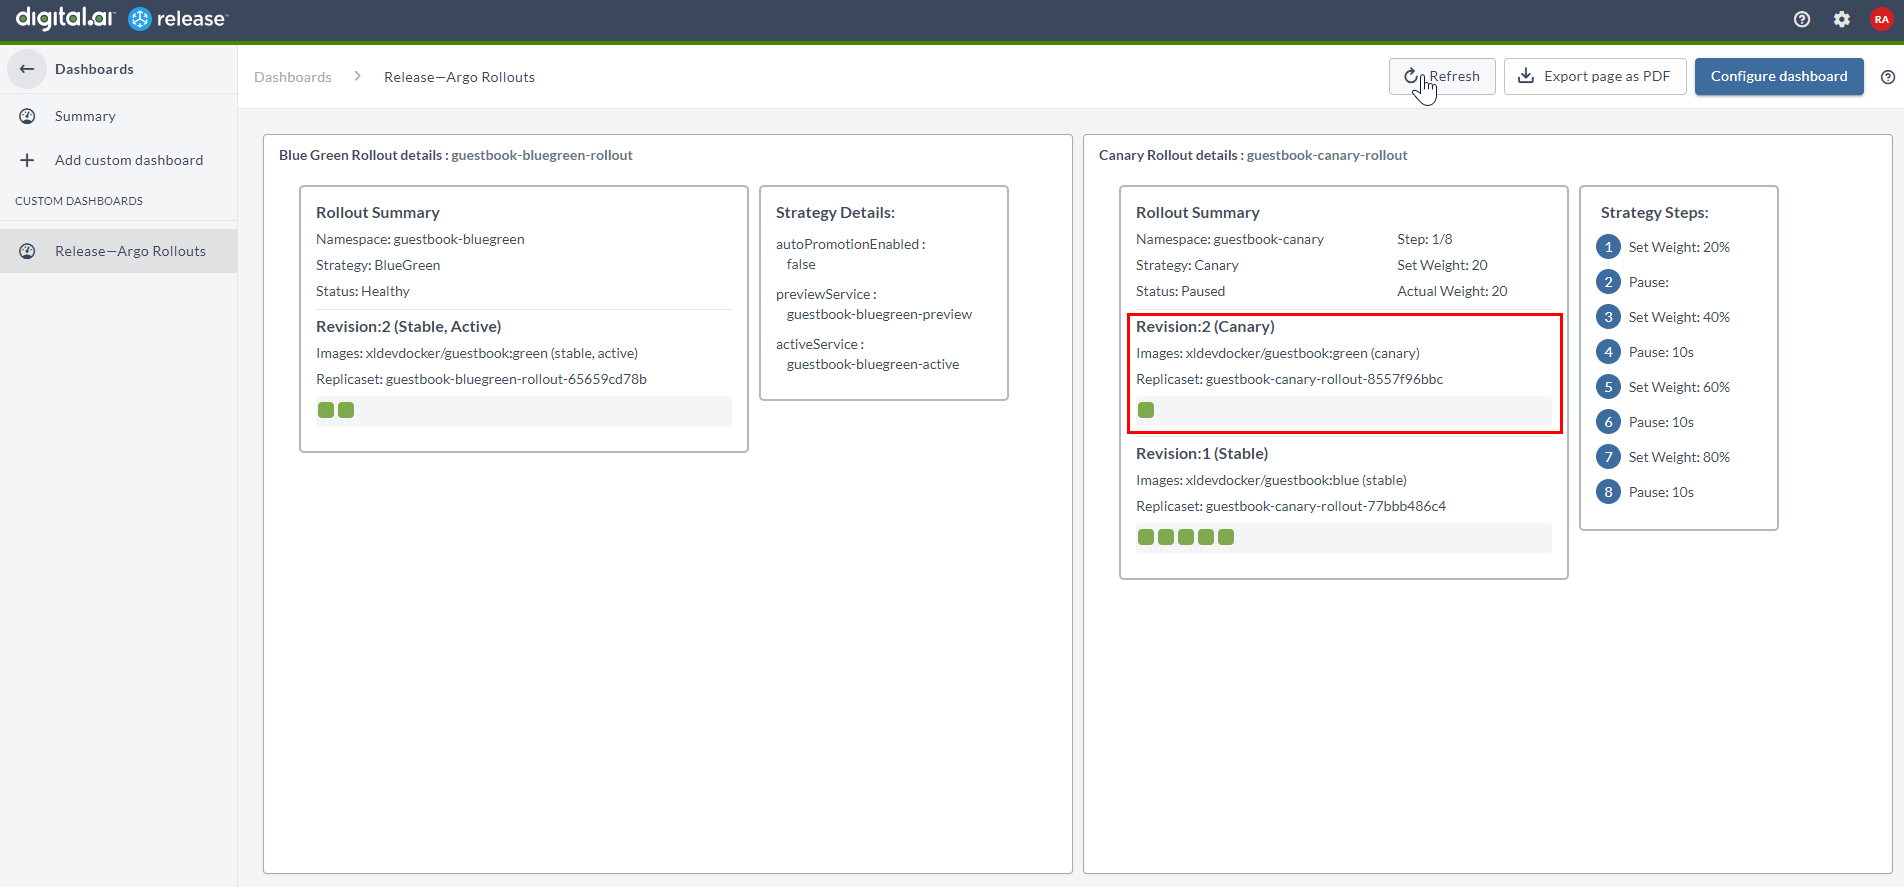
-
Assign the Run tests on xldevdocker/guestbook:green manual task to yourself and complete it.
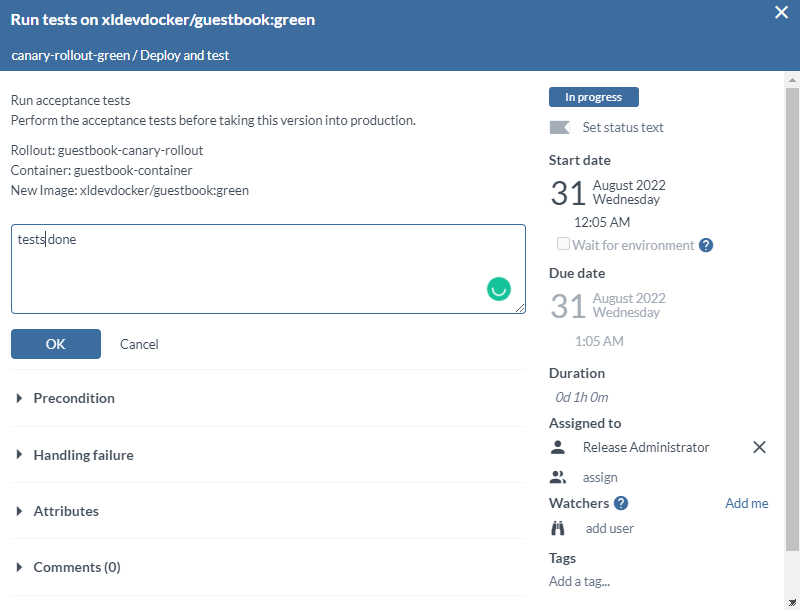
-
Assign the Confirm Promotion? manual task to yourself and either promote or abort the rollout.
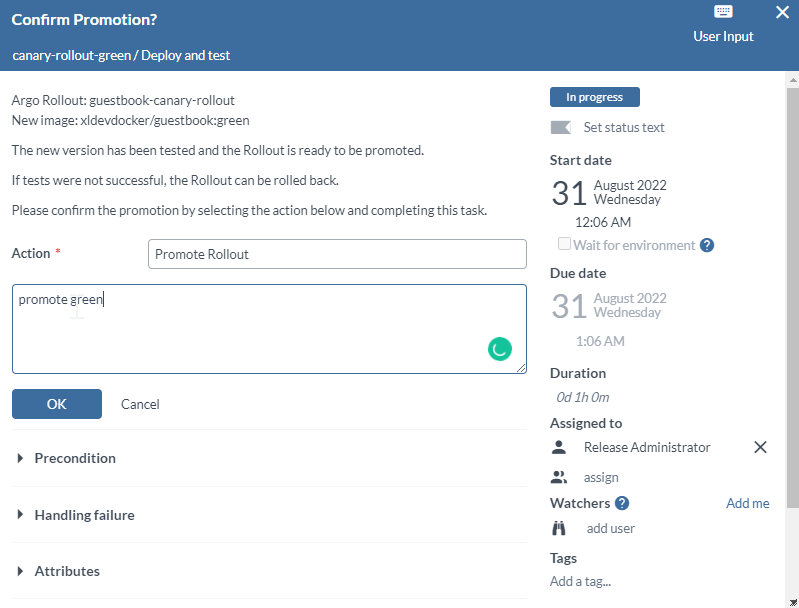
Wait for the rollout to complete.
-
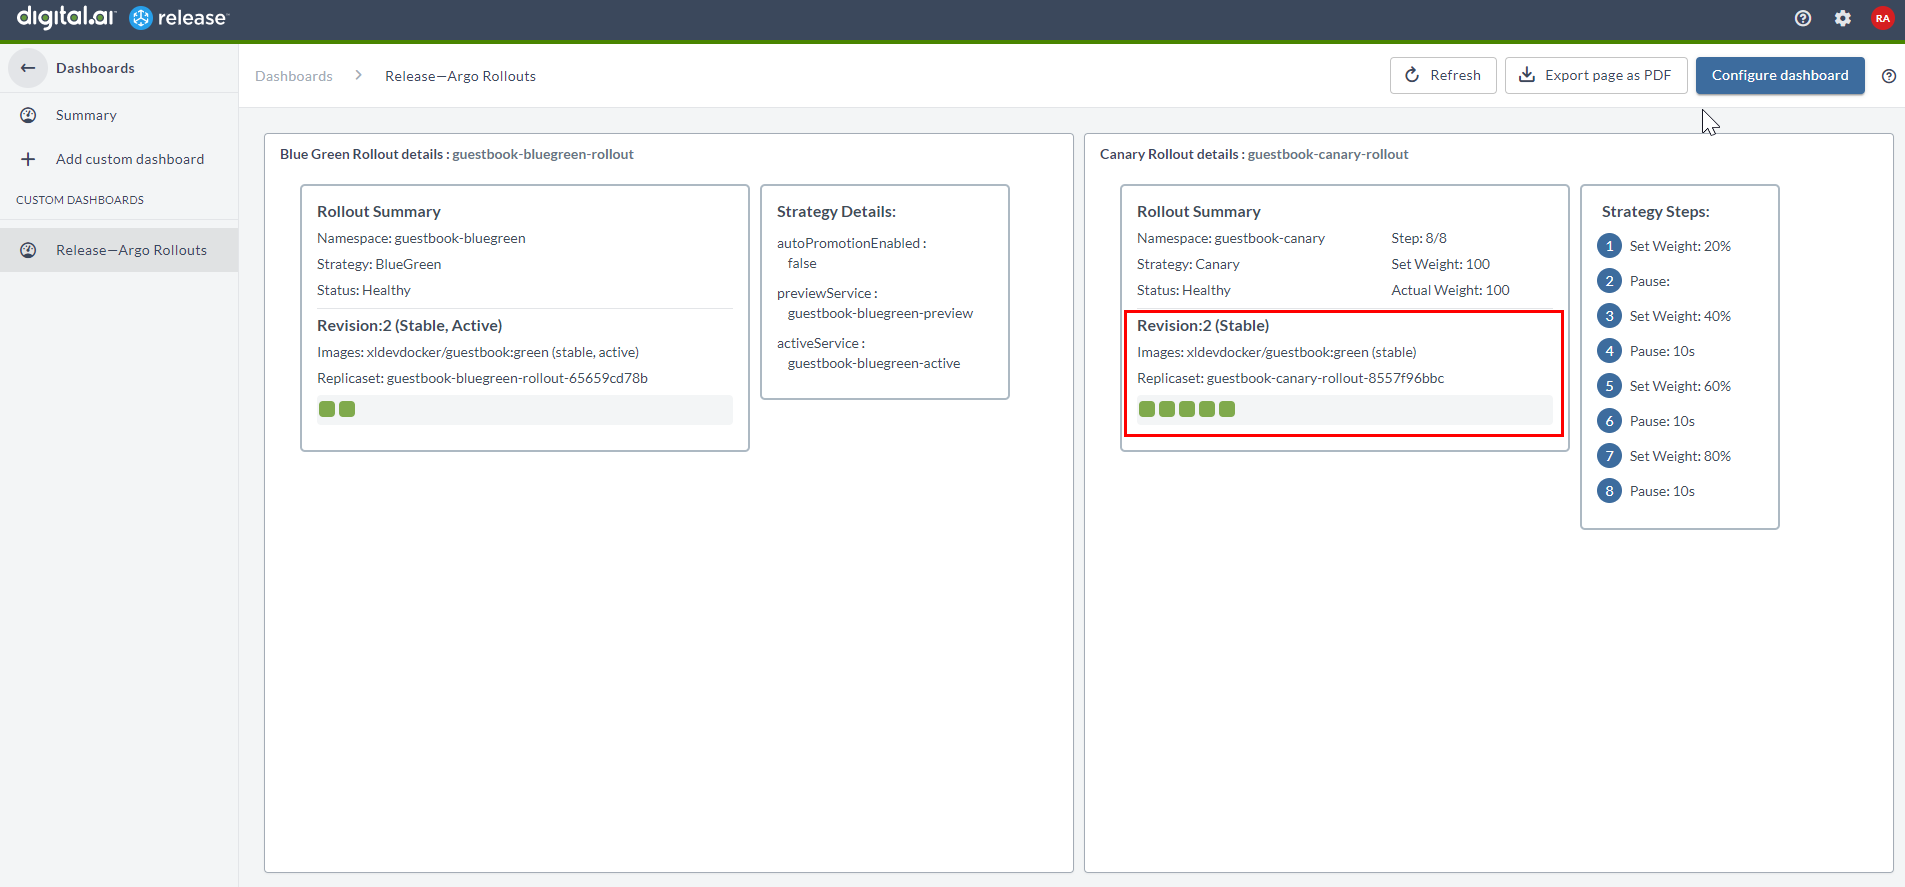
Go to the dashboard and verify the new rollout (Revision:2, Stable) with five pods.
-
You can also go to the url
to view the deployed Guest Book application (in green).