Run the Docker containers with Docker Compose
This topic guides you to run the Docker Containers with Docker Compose for both Digital.ai Release and Digital.ai Deploy.
- To run the Docker image with Digital.ai Release, see Docker images for Release
- To run the Docker image with Digital.ai Deploy, see Docker images for Deploy
Version-specific Docker images for Digital.ai Release and Digital.ai Deploy are published to Docker Hub:
Run the containers using the docker-compose.yaml file
To start both Digital.ai Deploy and Digital.ai Release with a persistent setup:
-
Download the Docker Compose file using the following command:
$ curl https://raw.githubusercontent.com/xebialabs/xl-docker-images/master/docker-compose-example/docker-compose.yaml > docker-compose.yaml
-
Open the
docker-compose.yamlfile and change the ADMIN_PASSWORD for both servers to a secure password. -
Run the file with Docker Compose:
$ docker-compose up -d
-
Access Release at
http://localhost:5516/and Deploy athttp://localhost:4516/.
You can now remove the passwords from the docker-compose.yaml file.
You must provide a valid license before you can log in. Browse to the above URLs and paste the licenses for the appropriate product. If you do not have a license yet, apply for an Release trial license or an Deploy trial license on the XebiaLabs web site.
Set up Digital.ai Release and Digital.ai Deploy using Docker Compose
If you want to use Digital.ai Deploy and Digital.ai Release together, both servers need to be able identify each other. When you start a single instance of a Docker container, the network is not configured to allow the two servers to identify each other. To link the instances of the two servers, you can use Docker Compose. This also allows you to start both containers at the same time and move all command line options into a file.
-
Create a file called
docker-compose.yamland copy the following contents inside:xld: image: xebialabs/xl-deploy:25.1.0 container_name: xld ports:
- "4516:4516"
xlr: image: xebialabs/xl-release:25.1.0 container_name: xlr ports:
- "5516:5516" links:
- xld
-
If you want to enable caching and configure an external cache server like Infinispan, add the following sections to the
docker-compose.yamlfile: Note: We have used Infinispan as the example for this section.
-
image: name of the Docker image of caching provider
-
networks: Name of the network that contains all container services.
-
ports: Port number for the caching server.
-
environment: User name and password for the caching server.
infinispan: image: infinispan/server networks: xld-network ports: "11222:11222" environment: USER: admin PASS: admin Download the necessary JAR files and the cache provider property files and add this information to mount them on to the master and worker nodes:
volumes:
- $PWD/xl-deploy-server/conf/infinispan-hotrod.properties: /op/xebialabs/xl-deploy-server/conf/infinispan-hotrod.properties
- $PWD/xl-deploy-server/conf/hotfix/lib: /op/xebialabs/xl-deploy-server/conf/hotfix/lib:z
-
Start both containers with this single command:
$ docker-compose up -d
-
Both containers will start and the password can be viewed using these commands:
$ docker logs xlr $ docker logs xld
-
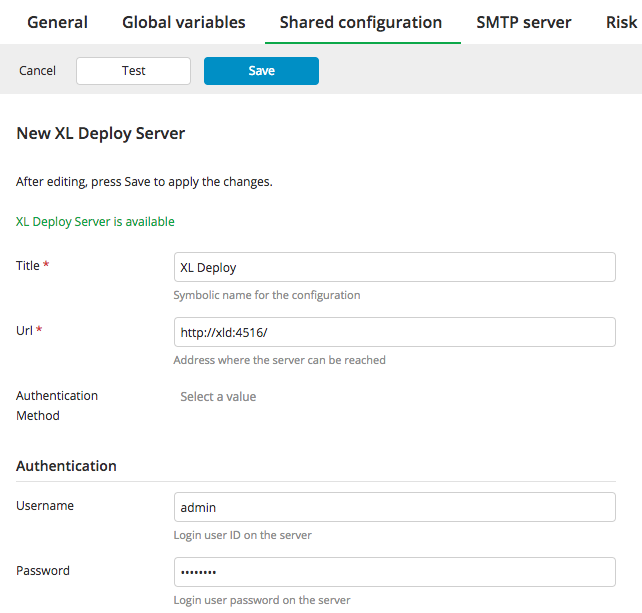
Log in to Digital.ai Release with the admin password. You can configure the Digital.ai Deploy server under Settings > Shared Configuration. Use the following settings:

You can run Deploy or Release containers individually by modifying the docker-compose.yaml file to contain only the code specific for each product.