Manage Release environments and applications in YAML
You can specify and maintain applications and environments in YAML, enabling you to manage these aspects of your Release configuration "as code". In the XL CLI, two flags allow you to manage applications and environments when using xl generate:
-a --applicationsAdd to the generated file all applications in the system-e --environmentsAdd to the generated file all environments
These flags will generate YAML files which can be applied to applications or environments in your Release servers. They also allow you to define dashboard filters and task attributes (facets).
The following example will allow you to use the XL CLI to create new applications and environments in Release.
Note: The instructions in this topic use the default installation of Release. If you already have custom configurations, you can adapt the instructions for your setup.
Create YAML for applications and environments
Let's create a file export.yaml which will add the following new elements:
- An environment named
Environment1and an application namedApplication1, with two labels, greenLabel1and blueLabel2. - A folder named
Testfolderand a template namedTemplate1. - A
Current applicationsdashboard tile in theTemplate1template with the following filters: a. Application matchesApplication1b. Environment matchesEnvironment1. - A
Preparationphase in theTemplate1template with aPlanningtask, with aDeploymentattribute where Application isApplication1, Version is1, and Environment isEnvironment1.
apiVersion: xl-release/v1
kind: Environments
spec:
  labels:
  - name: Label1
    color: '#08b153'
  - name: Label2
    color: '#0099cc'
  environments:
  - name: Environment1
    description: Test environment 1
    stage: Acceptance
    labels:
    - Label1
    - Label2
---
apiVersion: xl-release/v1
kind: Applications
spec:
- name: Application1
  environments:
  - Environment1
---
apiVersion: xl-release/v1
kind: Templates
spec:
- directory: Testfolder
  children:
    - name: Template1
      type: xlrelease.Release
---
apiVersion: xl-release/v1
kind: Templates
metadata:
    home: Testfolder
spec:
- template: Template1
  phases:
  - phase: Preparation
    tasks:
    - name: Planning
      type: xlrelease.Task
      facets:
      - type: udm.DeploymentTaskFacet
        version: "1"
        application: Application1
        environment: Environment1
- type: xlrelease.Dashboard
  owner: admin
  tiles:
  - name: Current applications
    type: deployment.CurrentApplicationsTile
    row: 0
    col: 0
    filters:
    - type: xlrelease.ApplicationFilter
      application: Application1
    - type: xlrelease.EnvironmentFilter
      environment: Environment1
    - type: xlrelease.DateFilter
  parentTemplate: Template1
Now apply it:
xl apply -f export.yaml -v
Log in to check the results in the UI.
Modify the YAML
Now let's change the YAML to add the following new elements:
- A third label
Newlabel1. - Change
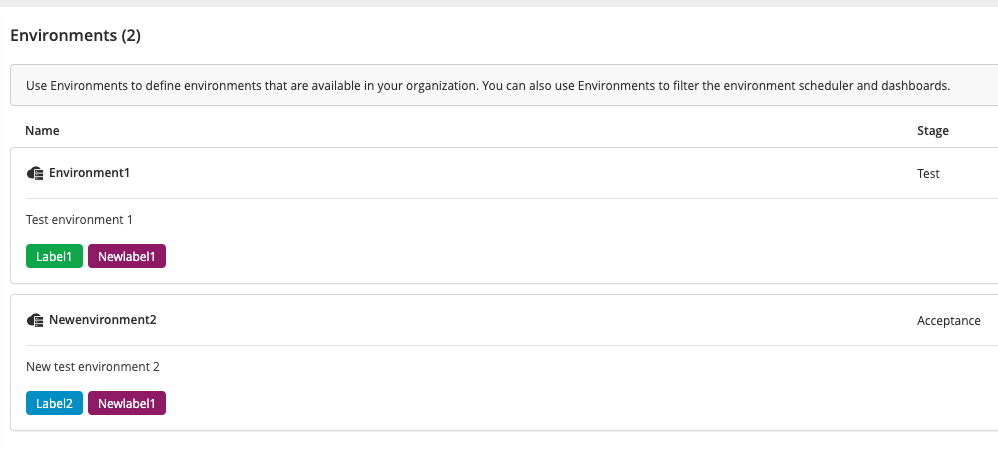
Environment1so that it containsNewlabel1and is used in theTeststage. - An environment
Newenvironment2which usesLabel2andNewlabel1. - An application
Newapplication2which usesNewenvironment2. - Modify the Planning task attribute so that it uses
Newapplication2andNewenvironment2. - Modify the Current applications tile so that the filters use
Newapplication2andNewenvironment2
Replace the contents of export.yaml with this specification:
apiVersion: xl-release/v1
kind: Environments
spec:
  labels:
  - name: Newlabel1
    color: '#991C71'
  environments:
  - name: Environment1
    description: Test environment 1
    stage: Test
    labels:
    - Label1
    - Newlabel1
  - name: Newenvironment2
    description: New test environment 2
    stage: Acceptance
    labels:
    - Label2
    - Newlabel1
---
apiVersion: xl-release/v1
kind: Applications
spec:
- name: Application1
  environments:
  - Environment1
- name: Newapplication2
  environments:
  - Newenvironment2
---
apiVersion: xl-release/v1
kind: Templates
metadata:
    home: Testfolder
spec:
- template: Template1
  phases:
  - phase: Preparation
    tasks:
    - name: Planning
      type: xlrelease.Task
      facets:
      - type: udm.DeploymentTaskFacet
        version: "1"
        application: Newapplication2
        environment: Newenvironment2
- type: xlrelease.Dashboard
  owner: admin
  tiles:
  - name: Current applications
    type: deployment.CurrentApplicationsTile
    row: 0
    col: 0
    filters:
    - type: xlrelease.ApplicationFilter
      application: Newapplication2
    - type: xlrelease.EnvironmentFilter
      environment: Newenvironment2
    - type: xlrelease.DateFilter
  parentTemplate: Template1
Now apply the YAML:
xl apply -f export.yaml -v
Log into Release. You will see that your environments and applications have been changed to match the new specifications.

You will also see that the Current Applications dashboard tile and the Wait for dependencies task are now associated with the new environment and application.