KeyCloak Installation and Configuration for Deploy on Amazon EKS
Introduction
KeyCloak is an identity and access management solution that can be used with the Digital.ai Deploy and Digital.ai Release products. KeyCloak characteristics that may not be present in your current identity server include:
- secure solutions for Multi-Factor Authentication (MFA), One-Time Passwords in both HOTP (Hash-based) and TOTP (Time-based) variants.
- advanced user and rights management services such as system access processes, password rules, and creation of role-based access controls (RBAC) that provide greater flexibility and simpler ways of specifying complex user permissions.
- KeyCloak is open-source software that implements standard protocols (e.g., OIDC 1.0 and OAuth 2.0) with a higher level of security.
For additional details about KeyCloak, please see the KeyCloak Server Administration Guide.
After completing installation and integration of KeyCloak, you will be able to connect KeyCloak with Digital.ai Deploy, allowing users authenticated by KeyCloak to log in to Deploy.
Note: In this how-to, KeyCloak is not deployed in an AWS Elastic Kubernetes Service (EKS) cluster using Operator. KeyCloak may be installed manually inside or outside of AWS EKS.
Overview of Steps and Prerequisites
Installation and configuration of KeyCloak is documented below. Specific steps describe how to:
- use Operator to deploy Digital.ai Deploy Docker images to Amazon EKS
- install KeyCloak manually
- integrate KeyCloak with OpenID Connect (OIDC) and Deploy
- verify that you successfully added KeyCloak to your Deploy environment
Prerequisites for successfully comepleting those steps:
- Deploy running in AWS EKS as instructed in the Operator document
- Credentials to connect to the identity provider
- Credentials for the users who will use KeyCloak to gain access to Digital.ai Deploy
Use Operator to Install Deploy in Amazon's Elastic Kubernetes Service (AWS EKS)
Operator is a customer Kubernetes Controller that allows you to package, deploy, and manage the Digital.ai Docker image on various platforms (On-Premises, AWS, Azure, OpenShift). Kubernetes Operators help simplify complex deployments by automating tasks that otherwise would require manual intervention or some form of automation. For more thorough introduction to Operator, please see Introduction to Kubernetes Operator.
Use Operator to deploy the Docker image, containing Deploy, to AWS EKS.
Prerequisites that must be satisfied before using Operator are:
- Installation of Docker version 17.03 or later, Docker server running
- Installation of the kubectl command-line tool
- Access to an AWS Kubernetes cluster (version 1.17 or later), with the accessKey and accessSecret available
- Configuration of the Kubernetes cluster
To add Deploy to your pre-existing AWS EKS cluster, please follow all the steps below.
Step 1: Create a folder for installation tasks
Create a folder on your workstation from where you will execute the installation tasks, for example, DeployInstallation.
Step 2: Download the Operator ZIP file
Download the Operator ZIP file from the dist repository by navigating your browser to:
https://dist.xebialabs.com/customer/operator/deploy/deploy-operator-aws-eks-22.0.0.zip
Step 3: Update the AWS EKS cluster information
To deploy the Deploy application on the Kubernetes cluster, update the Infrastructure file parameters (infrastructure.yaml) in the folder where you extracted the ZIP file with the parameters corresponding to the AWS EKS Kubernetes Cluster Configuration (kubeconfig) file as described in the table. You can find the Kubernetes cluster information in the default location ~/.kube/config. Ensure the location of the kubeconfig configuration file is your home directory.
Specific values that must be copied from the ~/.kube/config file (see figure 1) to the infrastructure.yaml
file (see figure 2) are as follows:
apiVersion: v1
clusters:
- cluster:
    certificate-authority-data: LS0tLS1CRUdJTiBDRVJUSUZJQ0FURS0tLS0tCk1JSUM1ekNDQWMrZ0F3SUJBZ0lCQURBTkJna3Foa2lHOXcwQkFRc0ZBREFWTVJNd0VRWURWUVFERXdwcmRXSmwKY201bGRHVnpNQjRYRFRJeU1ERXdPREl5TkRFek5sb1hEVE15TURFd05qSXlOREV6Tmxvd0ZURVRNQkVHQTFVRQpBeE1LYTNWaVpYSnVaWFJsY3pDQ0FTSXdEUVlKS29aSWh2Y05BUUVCQlFBRGdnRVBBRENDQVFvQ2dnRUJBTUlBCm5nVnhabFN3SmFZMThoY0FrejlqMWpWRkFmZHQ2TVgxOHZZck1sR2NsaWplRU13d2hWcTYrUmRUbFVDTmZWUG0KQlRwRXlhM1Z1UnFBVDUwS1FKMTkyV09wN1JtVnVIUFB3Yk1VaUhMNzM0UmdvTDJSM1BhbUQzR1JHQ3lURnZ1bwo5enFjcHVYR0hvK0Mrenhray9QS29wQnE3RHFHTXo2UTZWeVkwVTF2RG10WXhqdktVZkRHcm40V1dzN1hBNHQ4CnZIWXhrTXpTZlVUY3BpajRVblBQMkV6VGMwdHdwRkNURDloRnJjdkJ6Zyt3SnpzTThiWVpkcXBDajhDZExFU2EKdCtDd0VwalRvRm03eTdiNGM4SGxpTGowOTVvc0F3TmZaeUxuYWxwYVdDeTZieDc3aTcwaUlKaVJ3WEZBM3ZYeApWeHlQKzN3LzFPeGRzd21WNjlFQ0F3RUFBYU5DTUVBd0RnWURWUjBQQVFIL0JBUURBZ0trTUE4R0ExVWRFd0VCCi93UUZNQU1CQWY4d0hRWURWUjBPQkJZRUZIZVdtUSszZVl4SURjMzk5QXNXMittNWhKQWhNQTBHQ1NxR1NJYjMKRFFFQkN3VUFBNElCQVFCNitCSUZMQVdFdGRlT0xPV2hJdjVrNFM0MmNFaHorRlJ5Yk9KQSsyWmxLMWM3eDhzKwo0ZU5LbzQ4ZjU2QkdGWk12RWJhZk9xcUlFTlMyTjF5YzVMamQySWxkcU1jTmVaZVR3bGx2dVd3cXFkWWp3SGNuCmp1dDV4a2xRUzN2azVRekpMR2hjbjVXbElkbGVLSUNmbURhRTZ4SnJjeUdKM004clNrbGdjNEZWYktkT2pNREkKZDNmMUVtRE5nVkFRQy9pTDhjTEhvLzlBdGkzVXJ2K0N5d0tHNXYrUmljZVdTVjZhellybXB5LzI5LzkxcjZ4dwovK2xwTFI3KzZvMUl2UVVHQ3cxcFBOSzl0cjloL2hxcmlWK29mbWlmZXFQb0k5Sm1ZblBPbHZBbHk1ckVQRlAxCms0UmFPd1lZS3F3R2Mxa1JHTHlVcFFXRzRDajNoQklOY21RTAotLS0tLUVORCBDRVJUSUZJQ0FURS0tLS0tCg==
    server: **https://43199B751054CC18BEB9DED348204A4D.gr7.us-east-1.eks.amazonaws.com**
  name: eks-cluster-2.us-east-1.eksctl.io
contexts:
- context:
    cluster: eks-cluster-2.us-east-1.eksctl.io
    user: eks@eks-cluster-2.us-east-1.eksctl.io
  name: eks@eks-cluster-2.us-east-1.eksctl.io
current-context: eks@eks-cluster-2.us-east-1.eksctl.io
kind: Config
preferences: \{\}
users:
- name: eks@eks-cluster-2.us-east-1.eksctl.io
  user:
    exec:
      apiVersion: client.authentication.k8s.io/v1alpha1
      args:
      - eks
      - get-token
      - --cluster-name
      - **eks-cluster-2**
      - --region
      - **us-east-1**
      command: aws
      env:
      - name: AWS_STS_REGIONAL_ENDPOINTS
        value: regional
      provideClusterInfo: false
Figure 1. ~/.kube/config file
apiVersion: xl-deploy/v1
kind: Infrastructure
spec:
  - name: k8s-infra
    type: core.Directory
    children:
    - name: xld
      type: k8s.Master
      apiServerURL: **< Update using server info from the kubeconfig file >**
      skipTLS: true
      debug: true
      caCert: |-
        <certificate-authority-data in base64 decoded>
        -----BEGIN CERTIFICATE-----

        -----END CERTIFICATE-----
      isEKS: true
      useGlobal: true
      regionName: < Update using  region info from the kubeconfig file
      clusterName: <Update using cluster-name field from the kubeconfig file>
      accessKey: <Update the AWS accessKey details >
      accessSecret: <Update the AWS accessSecret details >
      children:
        - name: default
          type: k8s.Namespace
          namespaceName: default
Figure 2. DeployInstallation/deploy-operator-aws-eks/digitalai-deploy/infrastructure.yaml
- Copy the value of the 'server' field in
~/.kube/configto the 'apiServerURL' field in the infrastructure.yaml file. - Copy the value of the 'region' field in
~/.kube/configto the 'regionName' field in the infrastructure.yaml file. - Copy the value of the 'cluster-name' field in
~/.kube/configto the 'clusterName' field
in the infrastructure.yaml file. - Update the 'accessKey' and 'accessSecret' fields in the infrastructure.yaml file with the accessKey and accessSecret values. Those values can be found in the AWS IAM information.
Note: The deployment will not proceed further if the infrastructure.yaml is updated with incorrect details.
| Infrastructure File Parameters | AWS EKS Kubernetes Cluster Configuration File Parameters | Parameter Value |
|---|---|---|
| apiServerURL | server | Enter the server parameter value. |
| caCert | certificate-authority-data | Before updating the parameter value, decode the certificate-authority-data in the Kubernetes cluster configuration file to base64 format. |
| regionName | Region | Enter the Region parameter value. |
| clusterName | cluster-name | Enter the cluster-name parameter value. |
| accessKey | NA | This parameter defines the access key that allows the Identity and Access (IAM) user to access the AWS using CLI. Note: This value can be found in the AWS IAM information. |
| accessSecret | NA | This parameter defines the secret password that the IAM user must enter to access the AWS. Note: This value can be found in the AWS IAM information. |
Step 4: Update the default Custom Resource Definitions
First, prepare information to update the default Custom Resource Definitions:
- Run the following command to get the storage class list:
kubectl get sc
- Run the keytool command below to generate the
RepositoryKeystore:
keytool -genseckey \{-alias alias\} \{-keyalg keyalg\} \{-keysize keysize\} [-keypass keypass] \{-storetype storetype\} \{-keystore keystore\} [-storepass storepass]
Example
keytool -genseckey -alias deployit-passsword-key -keyalg aes -keysize 128 -keypass deployit -keystore /tmp/repository-keystore.jceks -storetype jceks -storepass test123
- Decode the Deploy license and the repository keystore files to the base64 format:
- To decode the xldLicense into base64 format, run:
cat <xl-deploy.lic> | base64 -w 0
- To decode RepositoryKeystore to base64 format, run:
cat <repository-keystore.jceks> | base64 -w 0
Note: The above commands are for Linux-based systems. For Windows, there is no built-in command to directly perform Base64 encoding and decoding. However, you can use the built-in command certutil -encode/-decode to indirectly perform Base64 encoding and decoding.
-
Edit the
daideploy_crfile in the/digitalai-deploy/kubernetespath of the extracted zip file. -
Update all (mandatory) parameters as described in the following table:
Note: For deployments on test environments, you can use most of the parameters with their default values in the
daideploy_cr.yamlfile.Parameter Description K8sSetup.Platform For an AWS EKS cluster this value must be 'AWSEKS' haproxy-ingress.controller.service.type The Kubernetes Service type for haproxy. Or nginx-ingress.controller.service.type: The Kubernetes Service type for nginx. The default value is NodePort. For an AWS EKS cluster this value must be 'LoadBalancer' ingress.hosts DNS name for accessing UI of Digital.ai Deploy. The DNS name should be configured in the AWS Route 53 console hosted zones (please see AWS EKS). xldLicense Insert the base64 format of the license file for Digital.ai Deploy. RepositoryKeystore Insert the base64 format of the repository keystore file for Digital.ai Deploy. KeystorePassphrase The passphrase for the RepositoryKeystore. Note: the example creation of the RepositoryKeystore above used the KeystorePassphrase of "test123". postgresql.persistence.storageClass The AWS storage Class must be defined for 'PostgreSQL' rabbitmq.persistence.storageClass The AWS storage class must be defined for 'Rabbitmq' Persistence.StorageClass The AWS storage class must be defined for 'Deploy' Note: For deployments on production environments, you must configure all the parameters required for your AWS EKS production setup, in the
daideploy_cr.yamlfile. The table in the next point lists these parameters and their default values, which can be overridden as per your setup requirements and workload. You must override the default parameters, and specify the parameter values with those from the custom resource file. The following table describes the parameters and their default values.Note: For storage class creation reference, please see Elastic File System for AWS Elastic Kubernetes Service (EKS) cluster.
-
Update the default parameters as described in the following table:
Note: The following table describes the default parameters in the Digital.ai
daideploy_cr.yamlfile. If you want to use your own database and messaging queue, refer Using Existing DB and Using Existing MQ topics, and update thedaideploy_cr.yamlfile. For information on how to configure SSL/TLS with Digital.ai Deploy, see Configuring SSL/TLS.Note: The domain name
digitalai_in_AWS_EKS.comused below stands for the domain name for the Digital.ai Deploy running in AWS EKS.Parameter Description Default K8sSetup.Platform Platform on which to install the chart. Allowed values are PlainK8s and AWSEKS AWSEKS XldMasterCount Number of master replicas 3 XldWorkerCount Number of worker replicas 3 ImageRepository Image name Truncated ImageTag Image tag 10.1 ImagePullPolicy Image pull policy, Defaults to 'Always' if image tag is 'latest',set to 'IfNotPresent' Always ImagePullSecret Specify docker-registry secret names. Secrets must be manually created in the namespace nil haproxy-ingress.install Install haproxy subchart. If you have haproxy already installed, set 'install' to 'false' true haproxy-ingress.controller.kind Type of deployment, DaemonSet or Deployment Deployment haproxy-ingress.controller.service.type Kubernetes Service type for haproxy. It can be changed to LoadBalancer or NodePort LoadBalancer nginx-ingress-controller.install Install nginx subchart to false, as we are using haproxy as a ingress controller false (for HAProxy) nginx-ingress.controller.install Install nginx subchart. If you have nginx already installed, set 'install' to 'false' true nginx-ingress.controller.image.pullSecrets pullSecrets name for nginx ingress controller myRegistryKeySecretName nginx-ingress.controller.replicaCount Number of replica 1 nginx-ingress.controller.service.type Kubernetes Service type for nginx. It can be changed to LoadBalancer or NodePort NodePort haproxy-ingress.install Install haproxy subchart to false as we are using nginx as a ingress controller false (for NGINX) ingress.Enabled Exposes HTTP and HTTPS routes from outside the cluster to services within the cluster true ingress.annotations Annotations for ingress controller ingress.kubernetes.io/ssl-redirect: "false"kubernetes.io/ingress.class: haproxyingress.kubernetes.io/rewrite-target: /ingress.kubernetes.io/affinity: cookieingress.kubernetes.io/session-cookie-name: JSESSIONIDingress.kubernetes.io/session-cookie-strategy: prefixingress.kubernetes.io/config-backend: ingress.path You can route an Ingress to different Services based on the path /xl-deploy/ ingress.hosts DNS name for accessing ui of Digital.ai Deploy digitalai_in_AWS_EKS.comingress.tls.secretName Secret file which holds the tls private key and certificate example-secretsName ingress.tls.hosts DNS name for accessing ui of Digital.ai Deploy using tls digitalai_in_AWS_EKS.comAdminPassword Admin password for xl-deploy If user does not provide password, random 10 character alphanumeric string will be generated xldLicense Decode xl-deploy.lic files content to base64 nil RepositoryKeystore Decode keystore.jks files content to base64 nil KeystorePassphrase Passphrase for keystore.jks file nil resources CPU/Memory resource requests/limits. User can change the parameter accordingly nil postgresql.install postgresql chart with single instance. Install postgresql chart. If you have an existing database deployment, set 'install' to 'false'. true postgresql.postgresqlUsername PostgreSQL user (creates a non-admin user when postgresqlUsername is not postgres) postgres postgresql.postgresqlPassword PostgreSQL user password random 10 character alphanumeric string postgresql.postgresqlExtendedConf.listenAddresses Specifies the TCP/IP address(es) on which the server is to listen for connections from client applications '*' postgresql.postgresqlExtendedConf.maxConnections Maximum total connections 500 postgresql.initdbScriptsSecret Secret with initdb scripts that contain sensitive information (Note: can be used with initdbScriptsConfigMap or initdbScripts). The value is evaluated as a template. postgresql-init-sql-xld postgresql.service.port PostgreSQL port 5432 postgresql.persistence.enabled Enable persistence using PVC true postgresql.persistence.size PVC Storage Request for PostgreSQL volume 50Gi postgresql.persistence.existingClaim Provide an existing PersistentVolumeClaim, the value is evaluated as a template. nil postgresql.resources.requests CPU/Memory resource requests requests: memory: 1Gi memory: cpu: 250m postgresql.resources.limits Limits limits: memory: 2Gi, limits: cpu: 1 postgresql.nodeSelector Node labels for pod assignment {} postgresql.affinity Affinity labels for pod assignment {} postgresql.tolerations Toleration labels for pod assignment [] UseExistingDB.Enabled If you want to use an existing database, change 'postgresql.install' to 'false'. false UseExistingDB.XL_DB_URL Database URL for xl-deploy nil UseExistingDB.XL_DB_USERNAME Database User for xl-deploy nil UseExistingDB.XL_DB_PASSWORD Database Password for xl-deploy nil rabbitmq-ha.install Install rabbitmq chart. If you have an existing message queue deployment, set 'install' to 'false'. true rabbitmq-ha.rabbitmqUsername RabbitMQ application username guest rabbitmq-ha.rabbitmqPassword RabbitMQ application password random 24 character long alphanumeric string rabbitmq-ha.rabbitmqErlangCookie Erlang cookie DEPLOYRABBITMQCLUSTER rabbitmq-ha.rabbitmqMemoryHighWatermark Memory high watermark 500MB rabbitmq-ha.rabbitmqNodePort Node port 5672 rabbitmq-ha.extraPlugins Additional plugins to add to the default configmap rabbitmq_shovel,rabbitmq_shovel_management,rabbitmq_federation,rabbitmq_federation_management,rabbitmq_jms_topic_exchange,rabbitmq_management, rabbitmq-ha.replicaCount Number of replica 3 rabbitmq-ha.rbac.create If true, create & use RBAC resources true rabbitmq-ha.service.type Type of service to create ClusterIP rabbitmq-ha.persistentVolume.enabled If true, persistent volume claims are created false rabbitmq-ha.persistentVolume.size Persistent volume size 20Gi rabbitmq-ha.persistentVolume.annotations Persistent volume annotations {} rabbitmq-ha.persistentVolume.resources Persistent Volume resources {} rabbitmq-ha.persistentVolume.requests CPU/Memory resource requests requests: memory: 250Mi memory: cpu: 100m rabbitmq-ha.persistentVolume.limits Limits limits: memory: 550Mi, limits: cpu: 200m rabbitmq-ha.definitions.policies HA policies to add to definitions.json {"name": "ha-all","pattern": ".*","vhost": "/","definition": {"ha-mode": "all","ha-sync-mode": "automatic","ha-sync-batch-size": 1}} rabbitmq-ha.definitions.globalParameters Pre-configured global parameters {"name": "cluster_name","value": ""} rabbitmq-ha.prometheus.operator.enabled Enabling Prometheus Operator false UseExistingMQ.Enabled If you want to use an existing Message Queue, change 'rabbitmq-ha.install' to 'false' false UseExistingMQ.XLD_TASK_QUEUE_USERNAME Username for xl-deploy task queue nil UseExistingMQ.XLD_TASK_QUEUE_PASSWORD Password for xl-deploy task queue nil UseExistingMQ.XLD_TASK_QUEUE_URL URL for xl-deploy task queue nil UseExistingMQ.XLD_TASK_QUEUE_DRIVER_CLASS_NAME Driver Class Name for xl-deploy task queue nil HealthProbes Would you like a HealthProbes to be enabled true HealthProbesLivenessTimeout Delay before liveness probe is initiated 90 HealthProbesReadinessTimeout Delay before readiness probe is initiated 90 HealthProbeFailureThreshold Minimum consecutive failures for the probe to be considered failed after having succeeded 12 HealthPeriodScans How often to perform the probe 10 nodeSelector Node labels for pod assignment {} tolerations Toleration labels for pod assignment [] affinity Affinity labels for pod assignment {} Persistence.Enabled Enable persistence using PVC true Persistence.StorageClass PVC Storage Class for volume nil Persistence.Annotations Annotations for the PVC {} Persistence.AccessMode PVC Access Mode for volume ReadWriteOnce Persistence.XldExportPvcSize XLD Master PVC Storage Request for volume. For production grade setup, size must be changed 10Gi Persistence. XldWorkPvcSize XLD Worker PVC Storage Request for volume. For production grade setup, size must be changed 5Gi satellite.Enabled Enable the satellite support to use it with Deploy false
Step 5: Download and set up the XL CLI
- Download the XL-CLI binaries. Packages of the XL-CLI binaries are available
for Apple Darwin, Linux, and Microsoft Windows.
Visit
https://dist.xebialabs.com/public/xl-cli/to view available versions (if there is a version newer than 10.3.6, then substitute it for the "10.3.6" in the followingwgetcommands. Select the download below that matches your operating system:
wget https://dist.xebialabs.com/public/xl-cli/10.3.6/darwin-amd64/xl
wget https://dist.xebialabs.com/public/xl-cli/10.3.6/linux-amd64/xl
wget https://dist.xebialabs.com/public/xl-cli/10.3.6/windows-amd64/xl.exe
- Enable
executepermissions.
chmod +x xl
- Copy the XL binary in a directory that is on your
PATH.
echo $path
Example
cp xl /usr/local/bin
- Verify the release version.
xl version
Step 6: Set up the Digital.ai Deploy Container instance
- Run the following command to download and start the Digital.ai Deploy instance:
docker run -d -e "ADMIN_PASSWORD=admin" -e "ACCEPT_EULA=Y" -p 4516:4516 --name xld xebialabs/xl-deploy:22.0
- To access the Deploy interface, go to:'http://
<_host-IP-address_>:4516/'
Install KeyCloak
Install KeyCloak manually by following these instructions:
- Run this command to create a keycloak container in kubernetes:
kubectl create -f https://raw.githubusercontent.com/keycloak/keycloak-quickstarts/latest/kubernetes-examples/keycloak.yaml
- After keycloak creation, add the keycloak external IP address to the AWS Route 53 console hosted zone to access the keycloak UI by hostname. Please see AWS EKS for details.
Configuring OpenID Connect (OIDC) Authentication with KeyCloak
Follow these instructions to configure Keycloak as an Identity provider for OpenId Connect (OIDC), enabling users who are properly configured in KeyCloak to log into Deploy, and protect REST APIs using Bearer Token Authorization.
Set up a realm
First, we will create a new realm. On the top left, navigate to Master, open the drop down menu, and click Add realm.
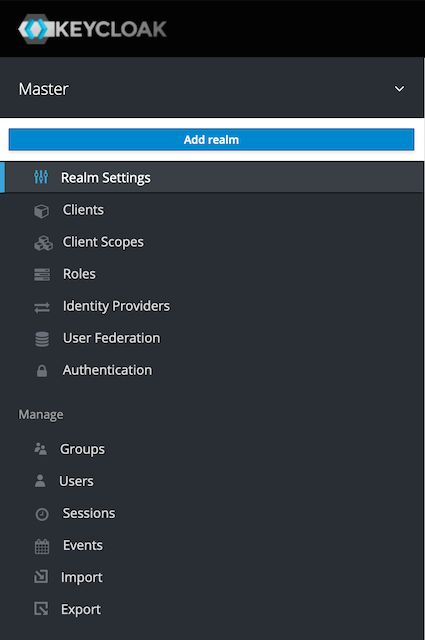
Add a new digitalai-platform realm as shown below.


Add roles
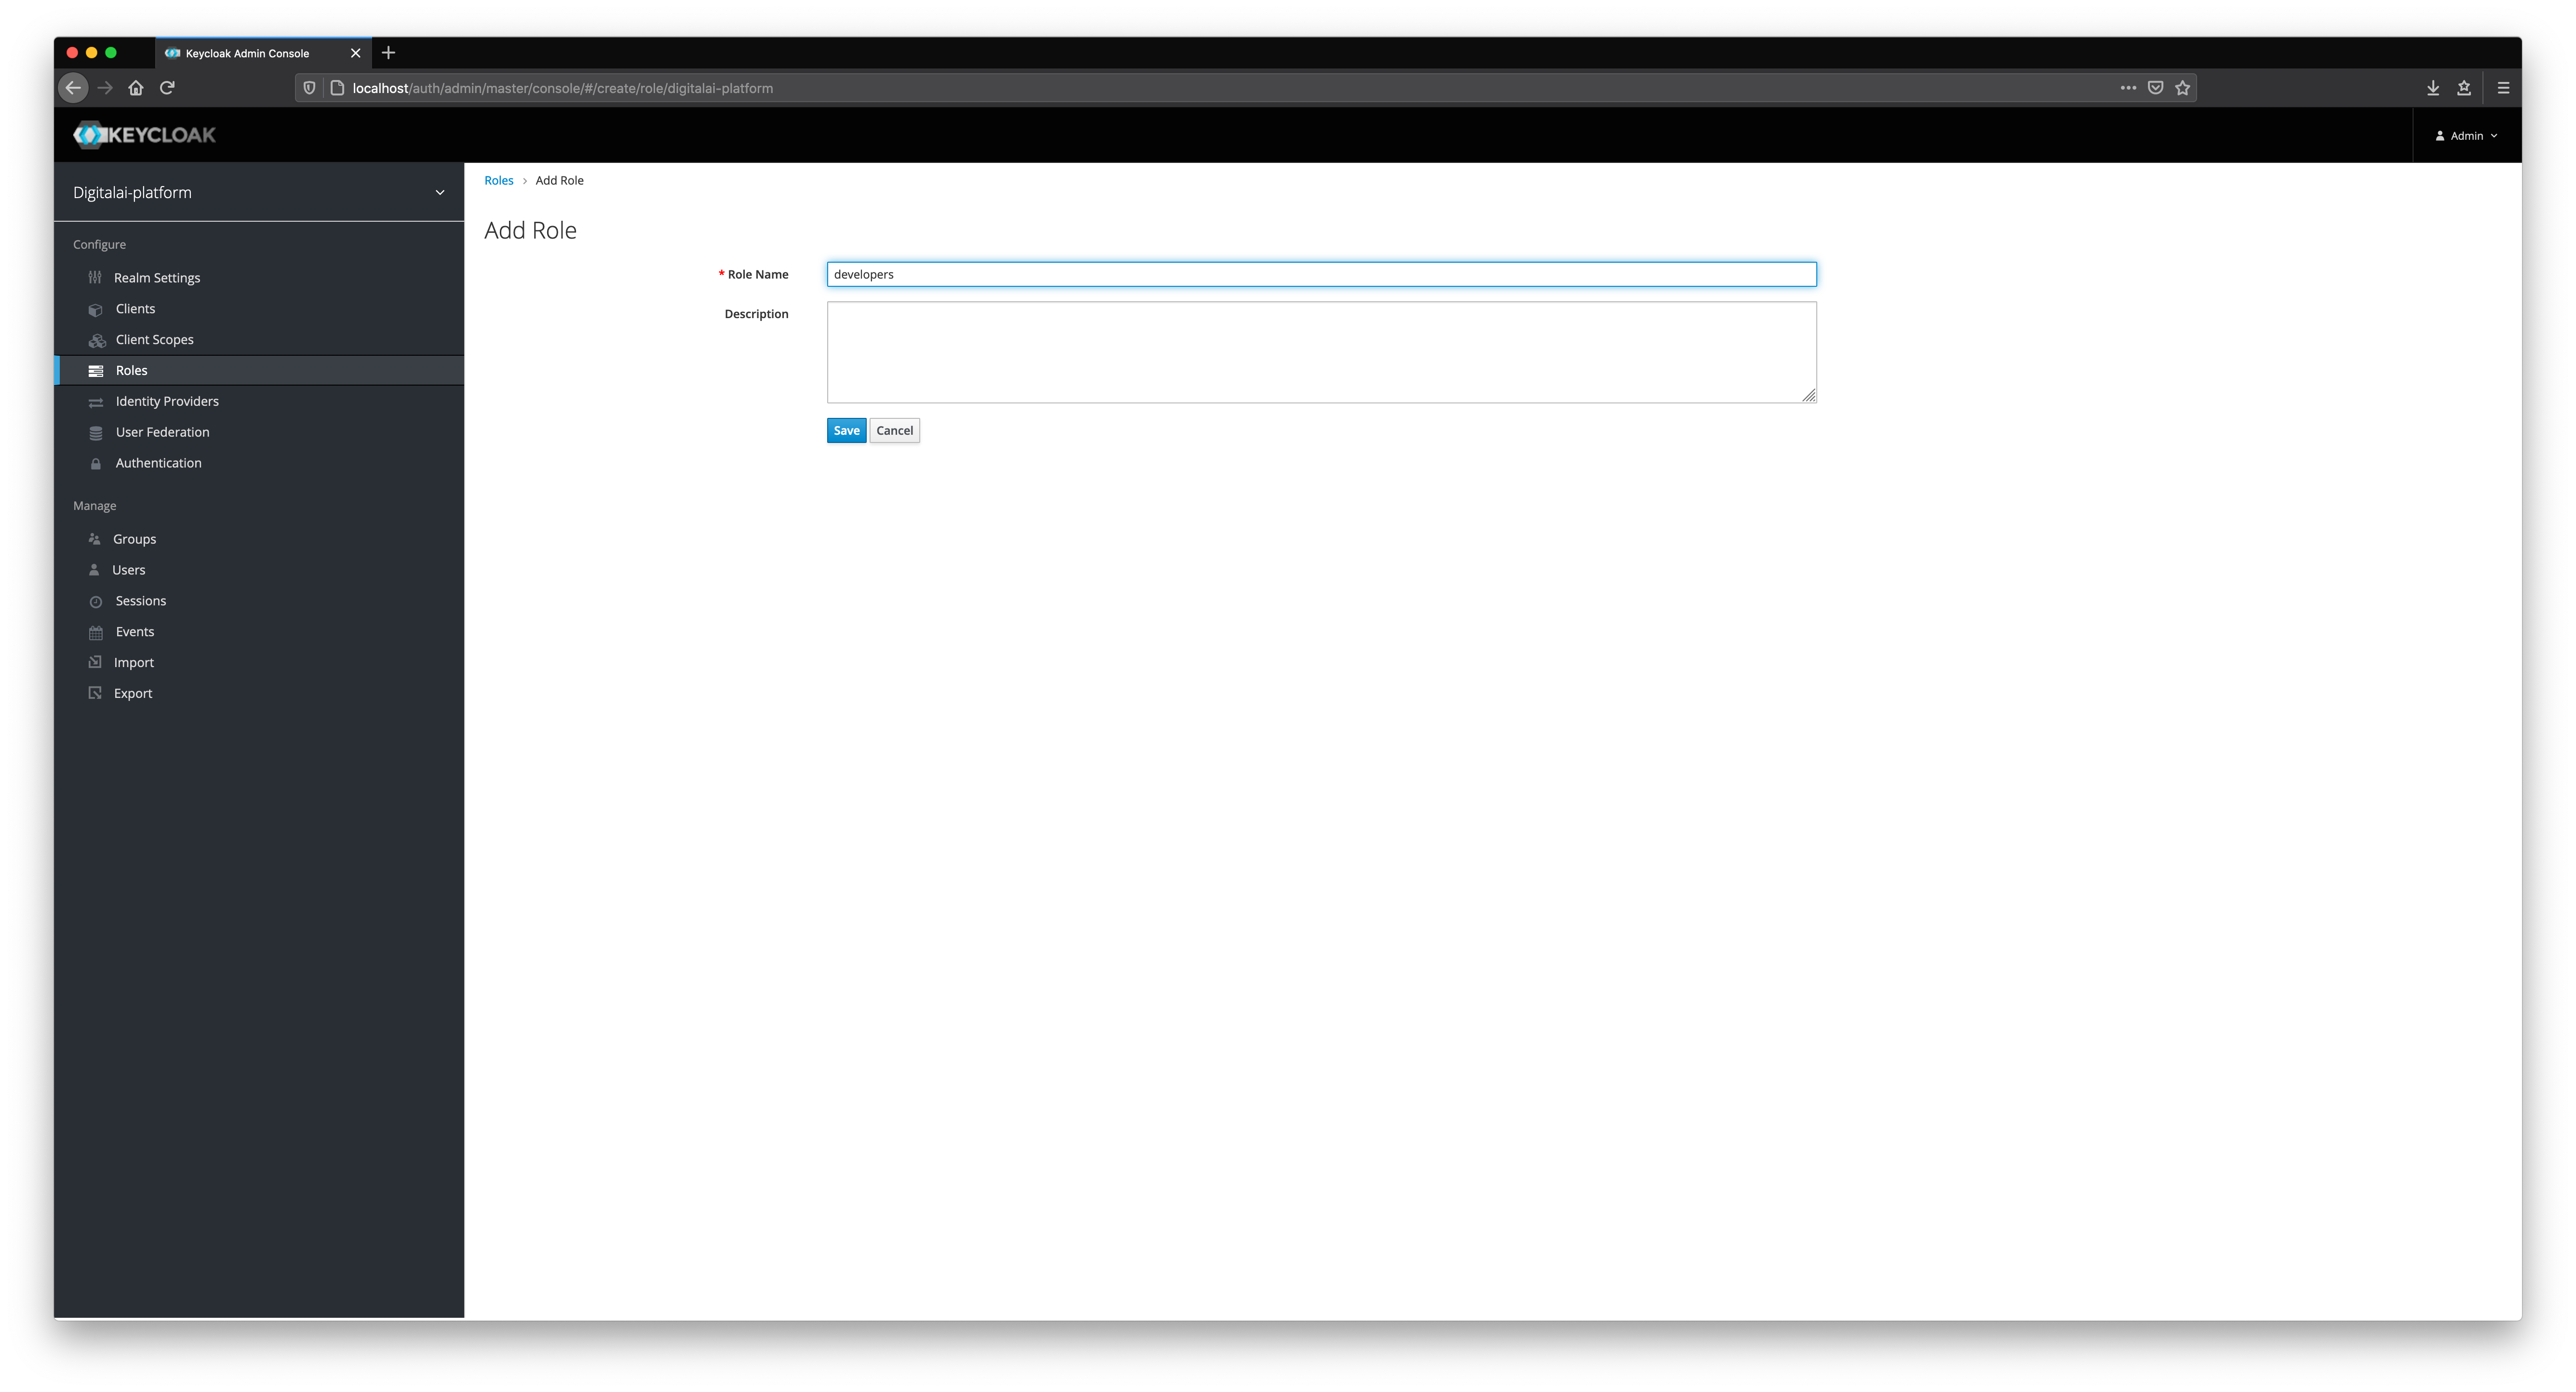
We will add different roles in Keycloak as shown below.

Add users
We will now add new users in Keycloak. Fill in all fields, such as Username, Email, First Name, and Last Name.
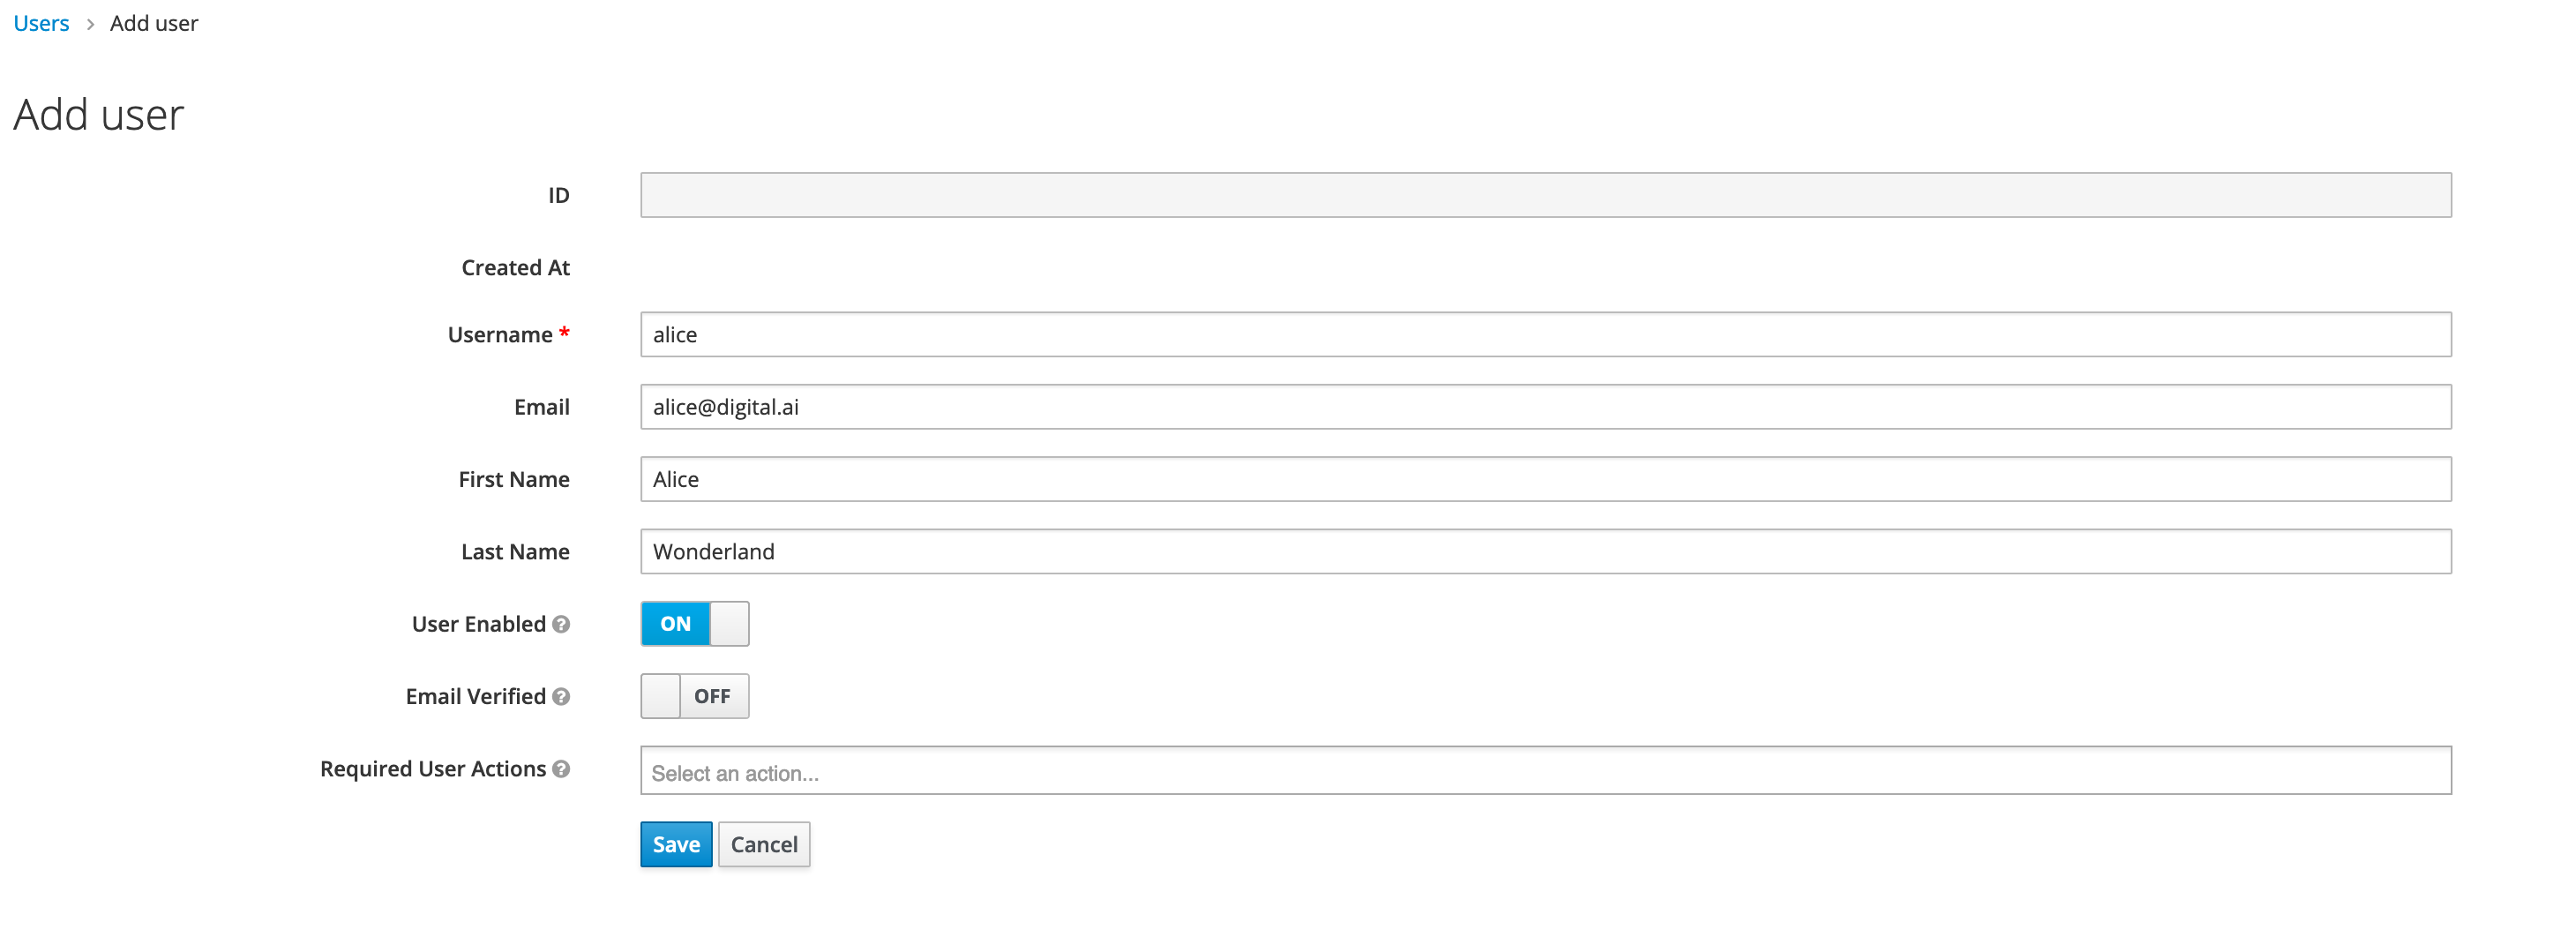
Select appropriate role mappings for a user.


Set up a client
The next step is to create a client in our realm, as shown below.
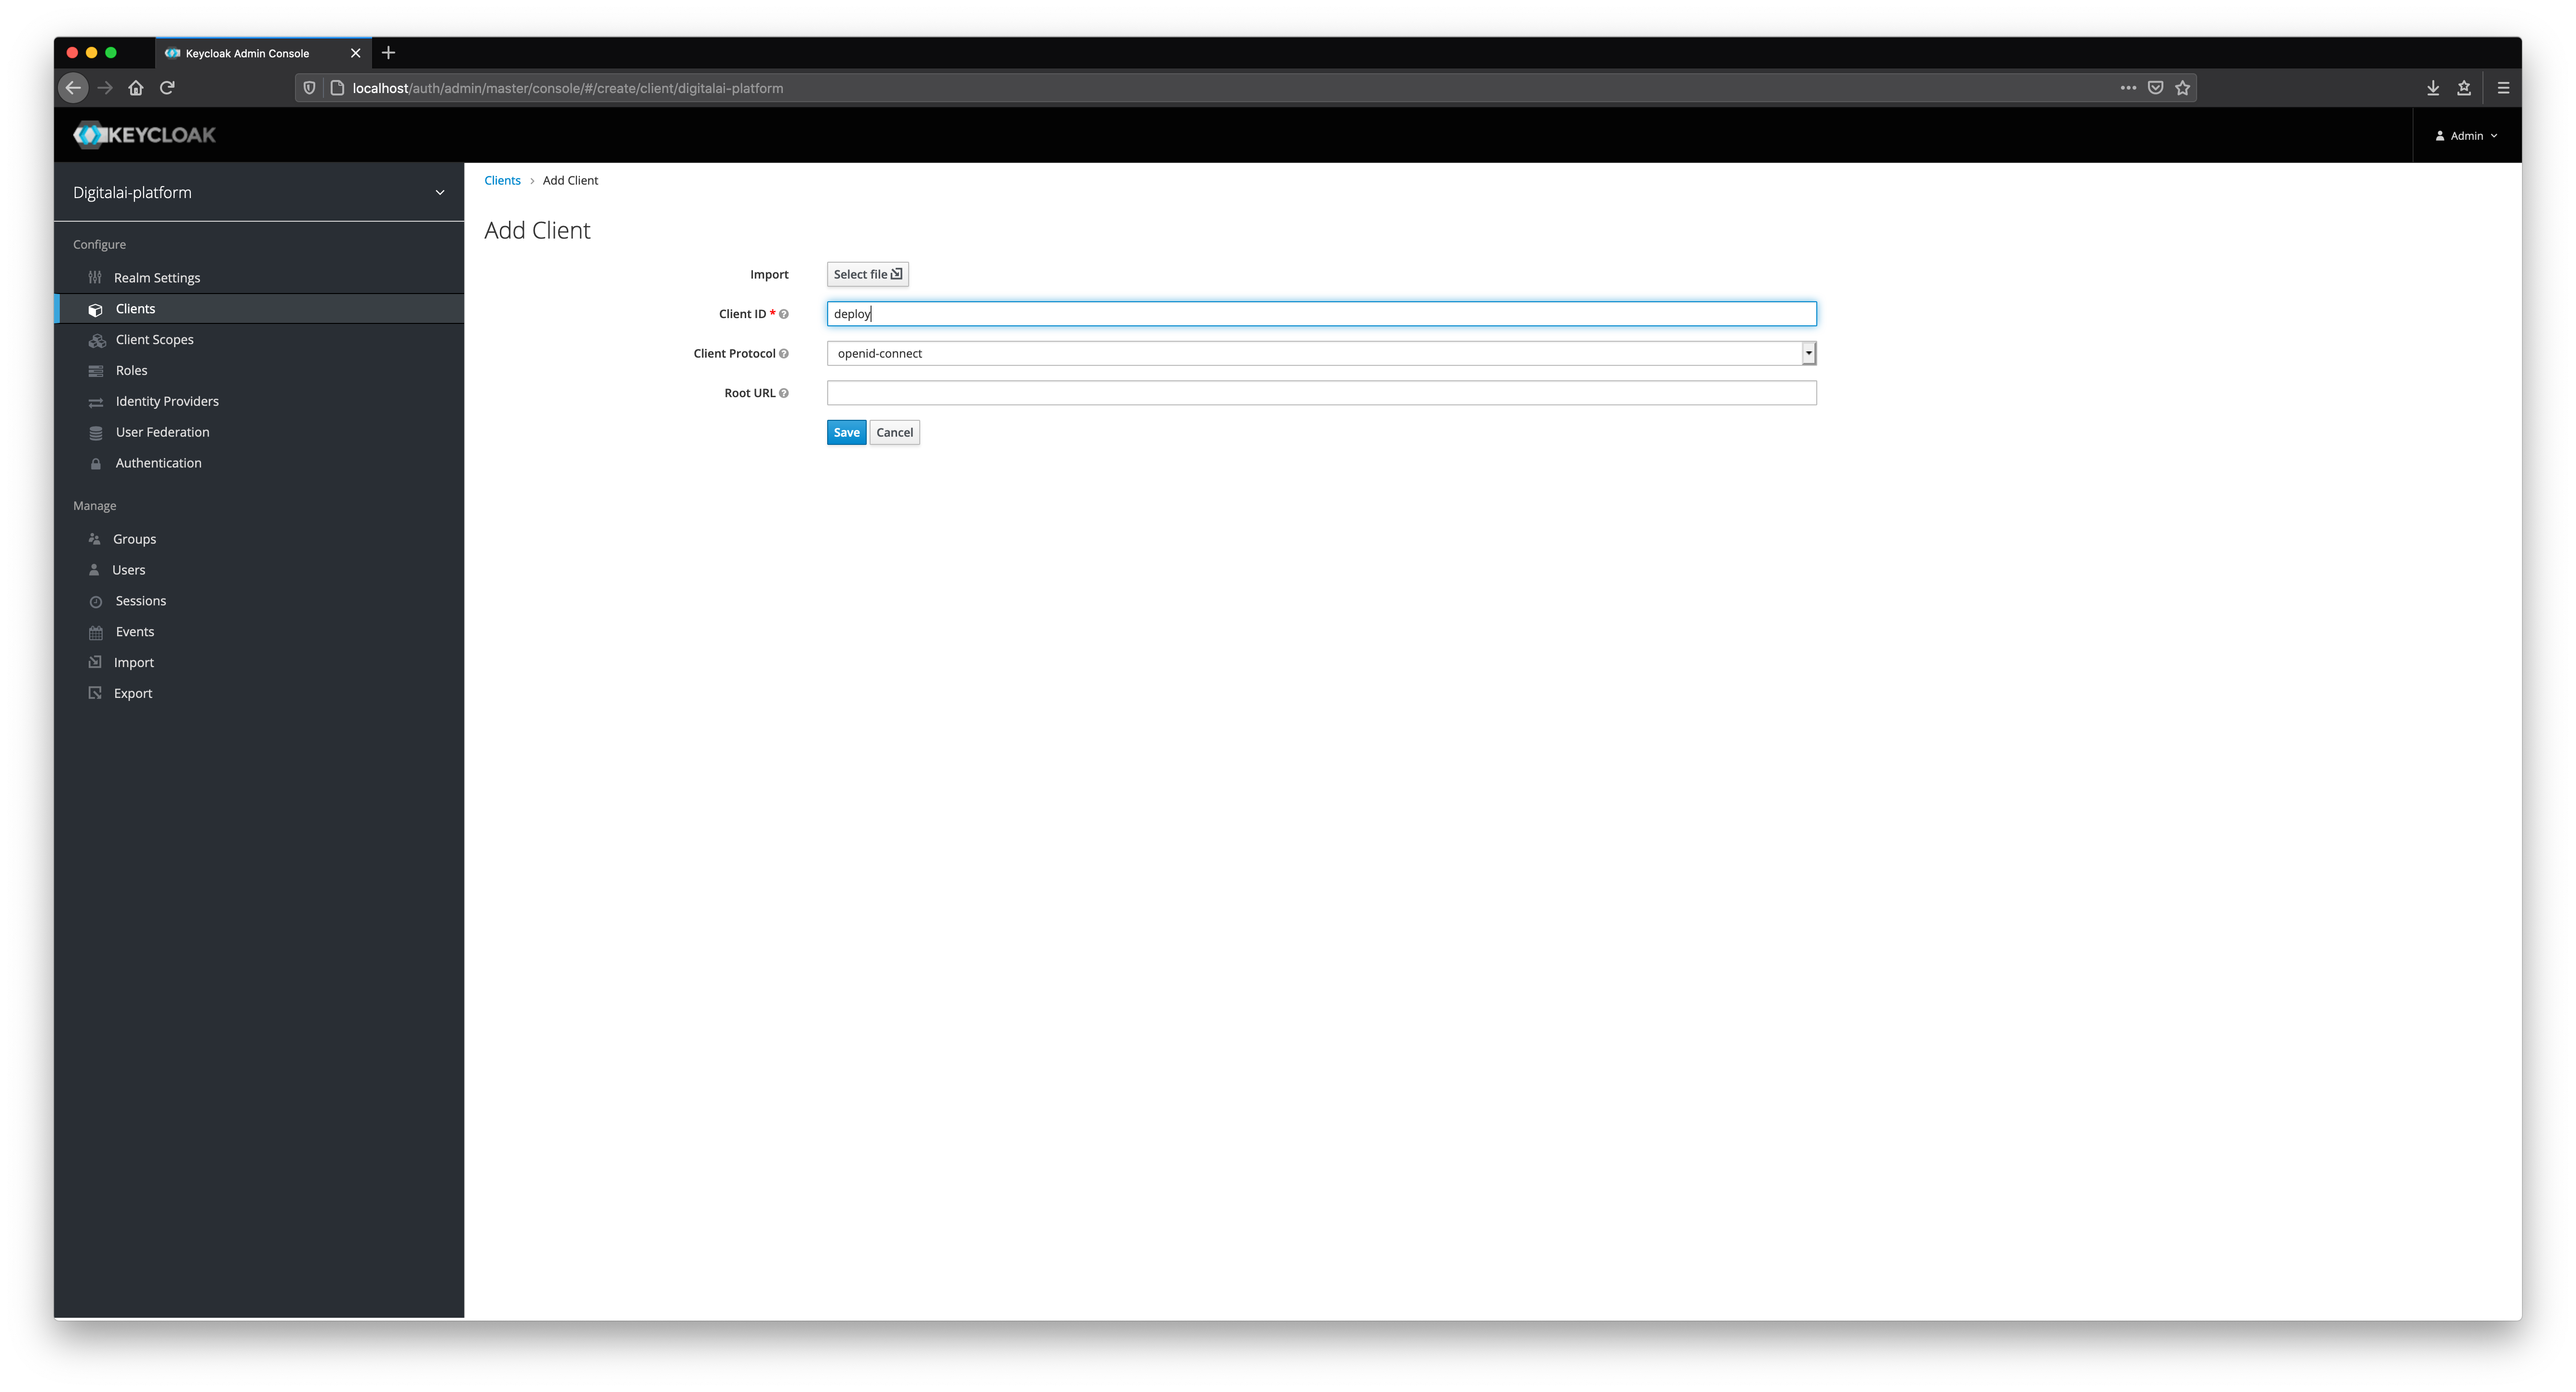
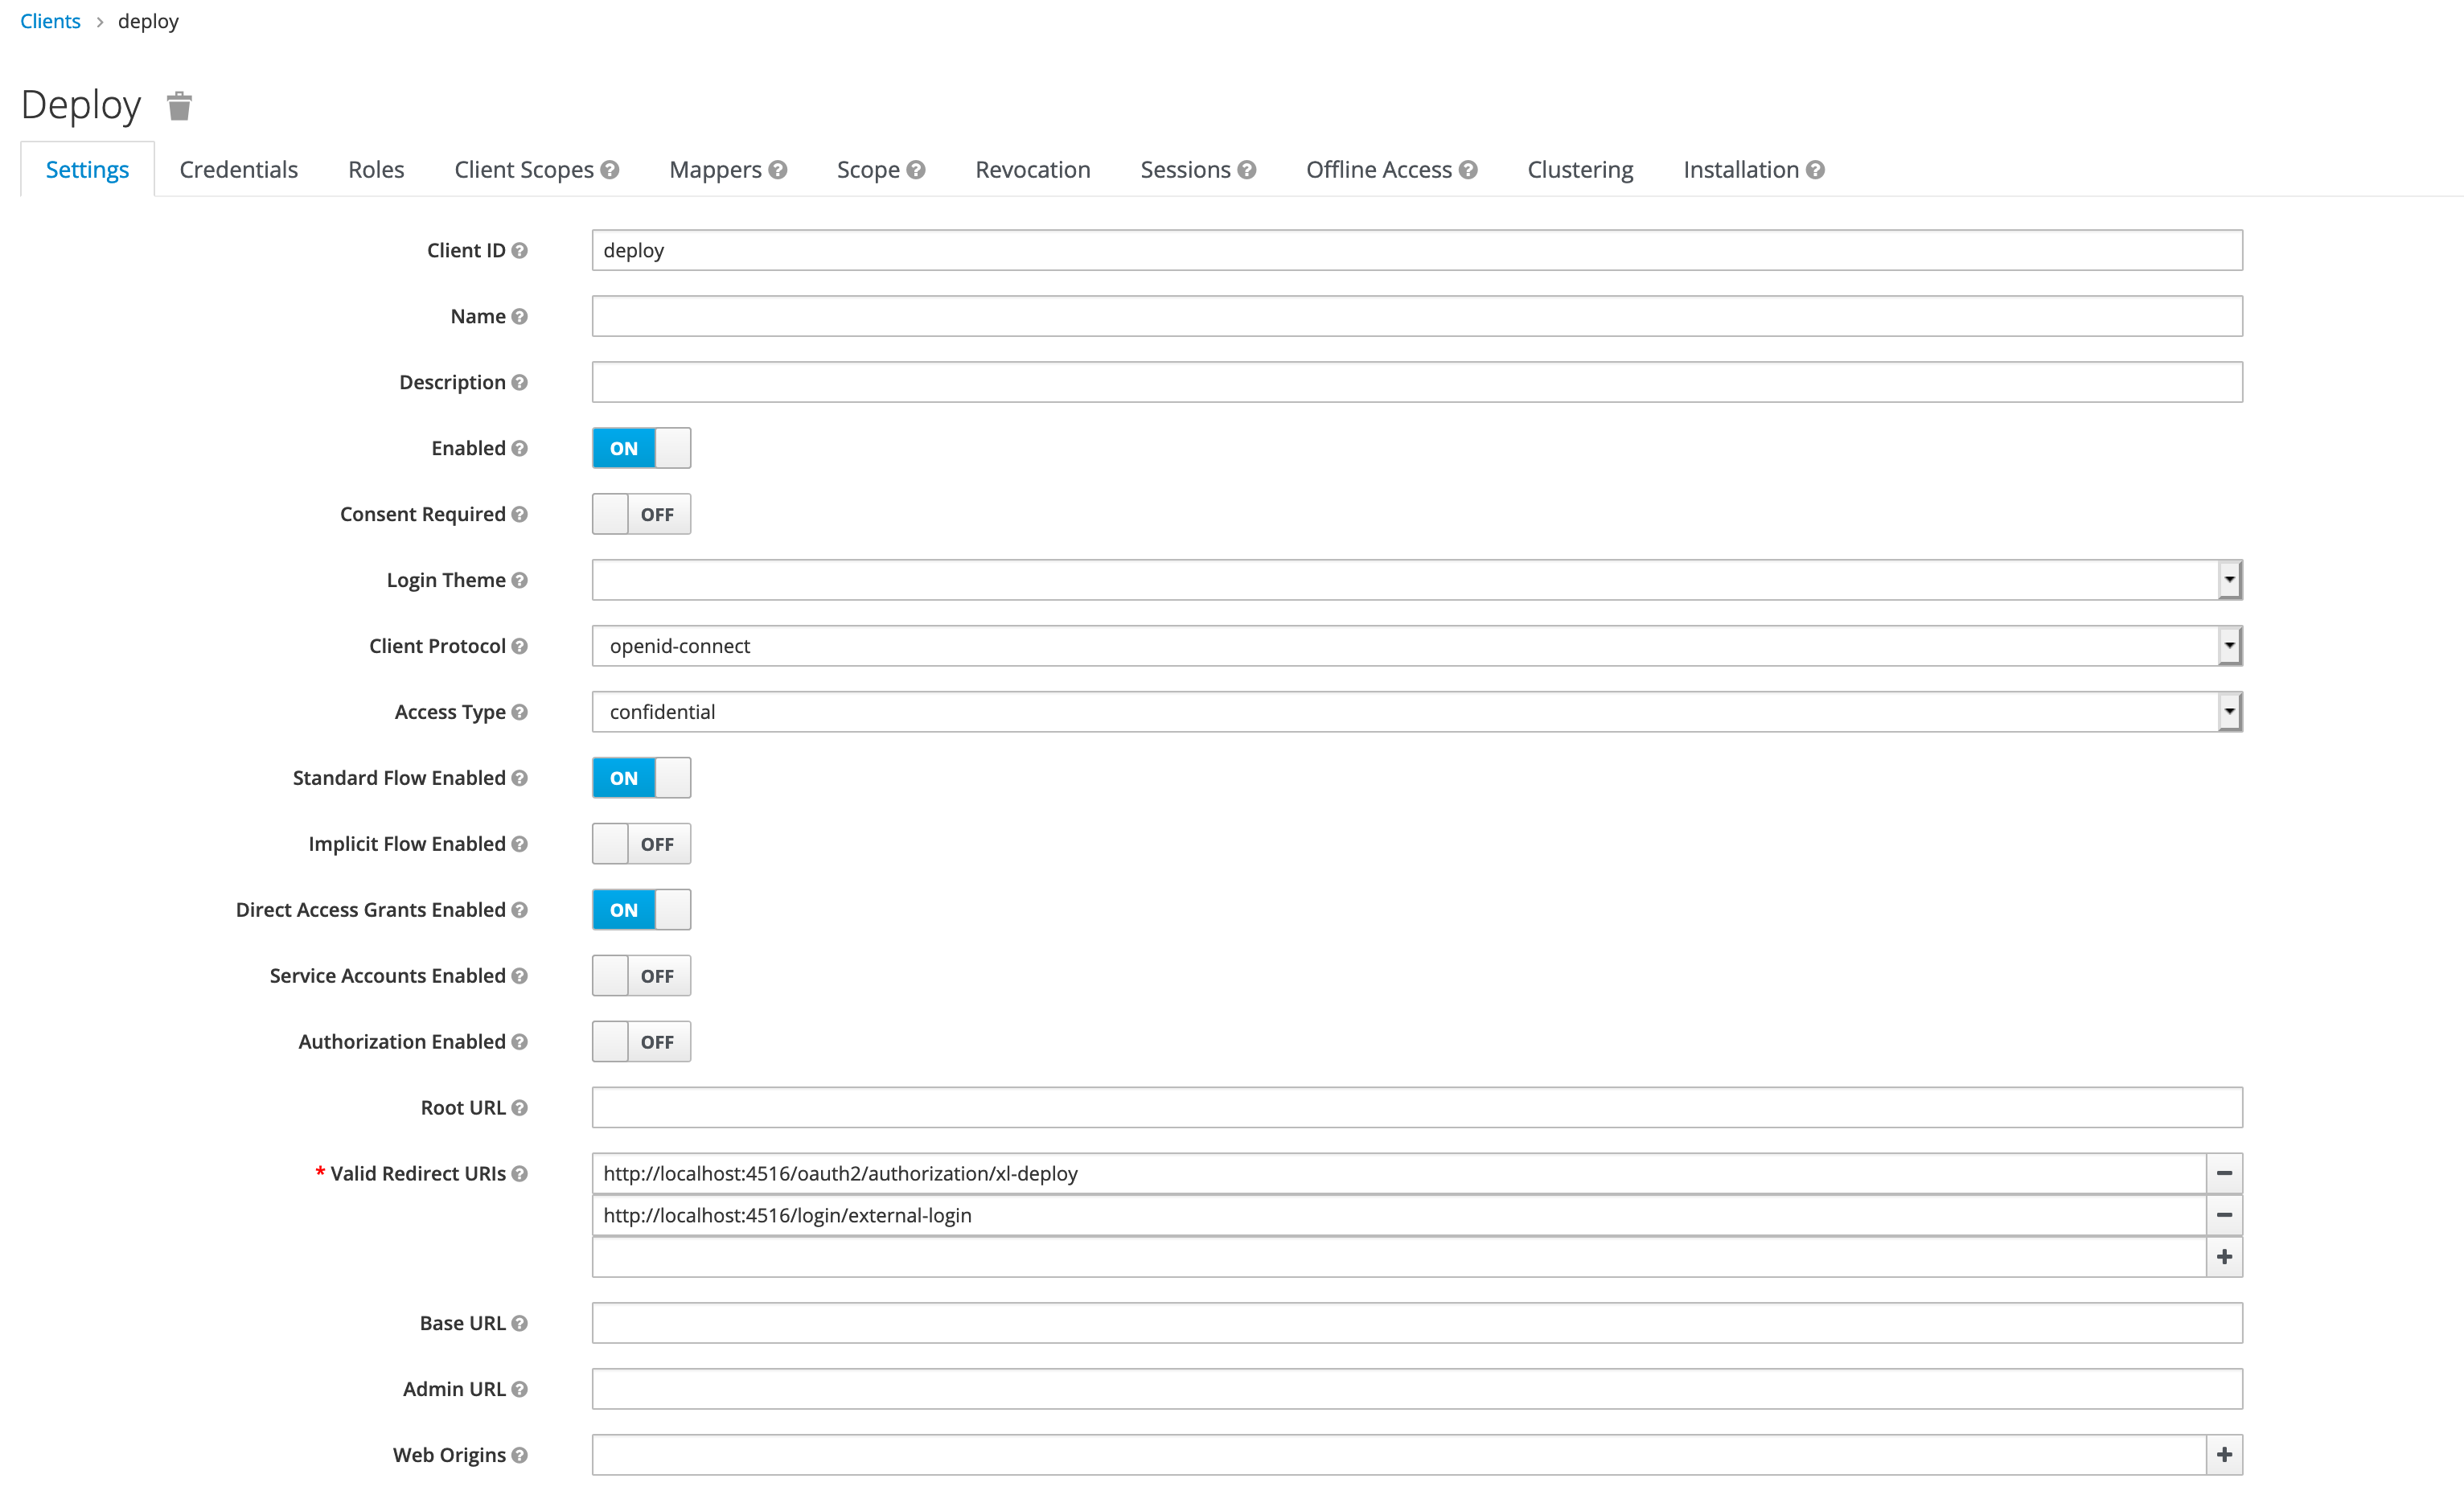
Fill in all of the mandatory fields in the client form. Pay attention to Direct Grant Flow and set its value to direct grant. Change Access Type to confidential.

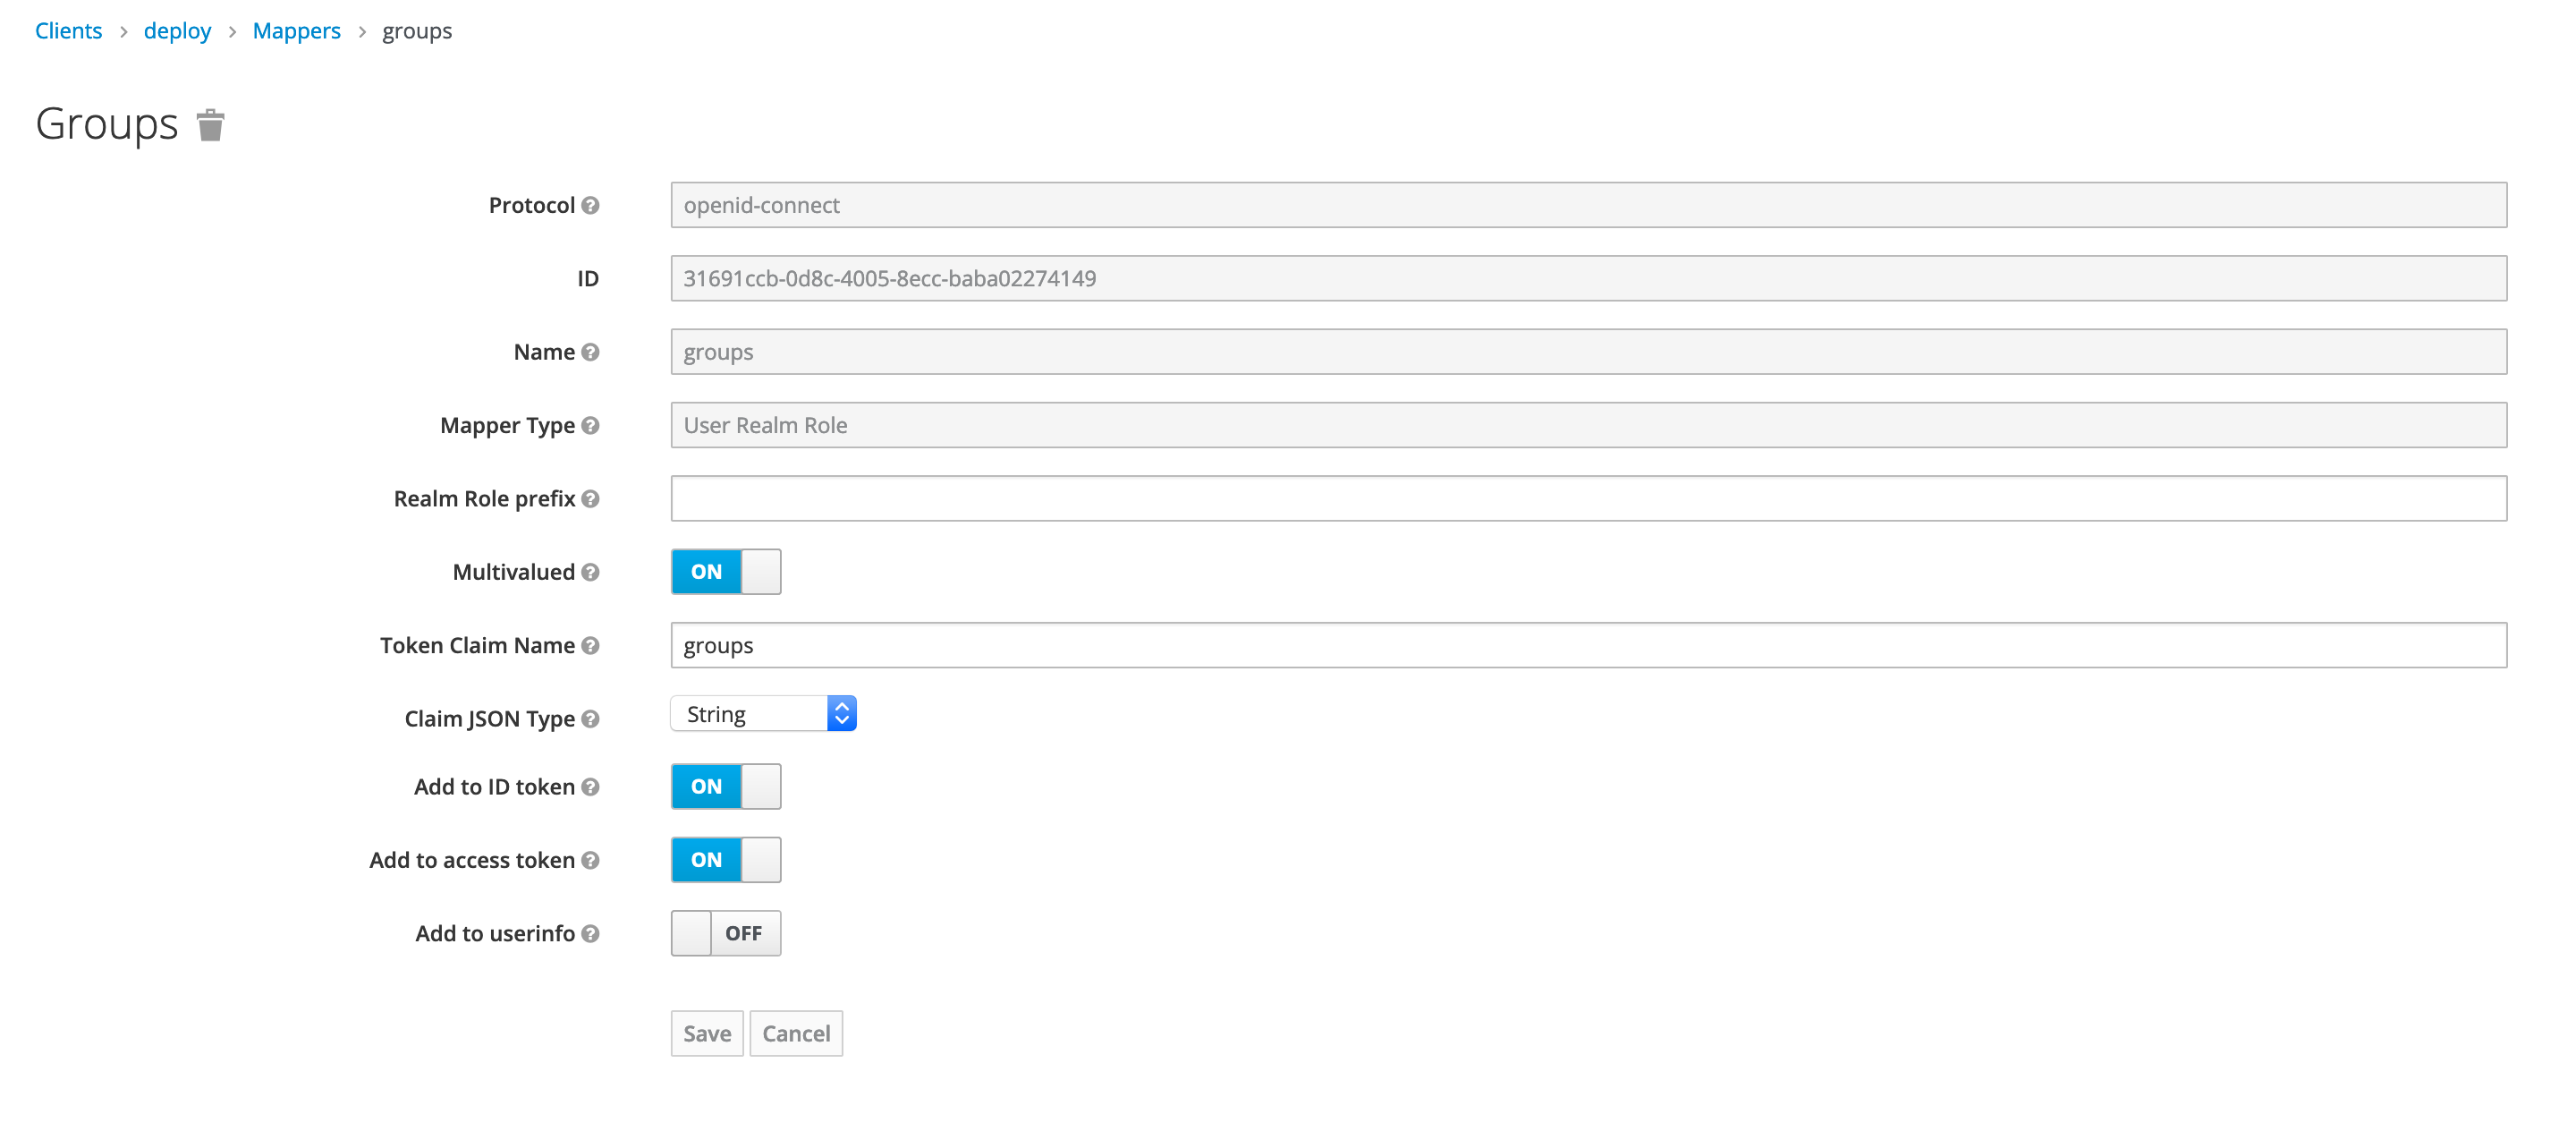
Select builtin mappers for newly created client.

Make sure that username and groups mapping are present in both id token and access token.
Using Keycloak in Kubernetes Operator-based Deployment
You must set the oidc.enabled to True, and configure the value for the OIDC parameters in the cr.yaml file as described in the following table:
Note: If KeyCloak's verison is 17.0.0 or greater, then remove the auth in all URLs of OIDC configuration.
Note: Set the external property to "true" (external=true), which allows oidc to be configured to external keycloak.
Note: The path-based routing will not work if you use OIDC authentication. To enable path-based routing, you must modify the ingress specification in the cr.yaml file as follows:
- Set
ingress.nginx.ingress.kubernetes.io/rewrite-target: /$2to / - Set
ingress.path: /xl-deploy(/|$)(.*)to /
For more information about Kubernetes Operator, see Kubernetes Operator.
Step 7: Activate the deployment process
Go to the root of the extracted file and run the following command:
xl apply -v -f digital-ai.yaml
Step 8: Verify the deployment status
-
Check the deployment job completion using XL CLI.
The deployment job starts the execution of various tasks as defined in thedigital-ai.yamlfile in a sequential manner. If you encounter an execution error while running the scripts, the system displays error messages. The average time to complete the job is around 10 minutes.Note: The running time depends on the environment.

To troubleshoot runtime errors, see Troubleshooting Operator Based Installer.
Step 9: Verify if the deployment was successful
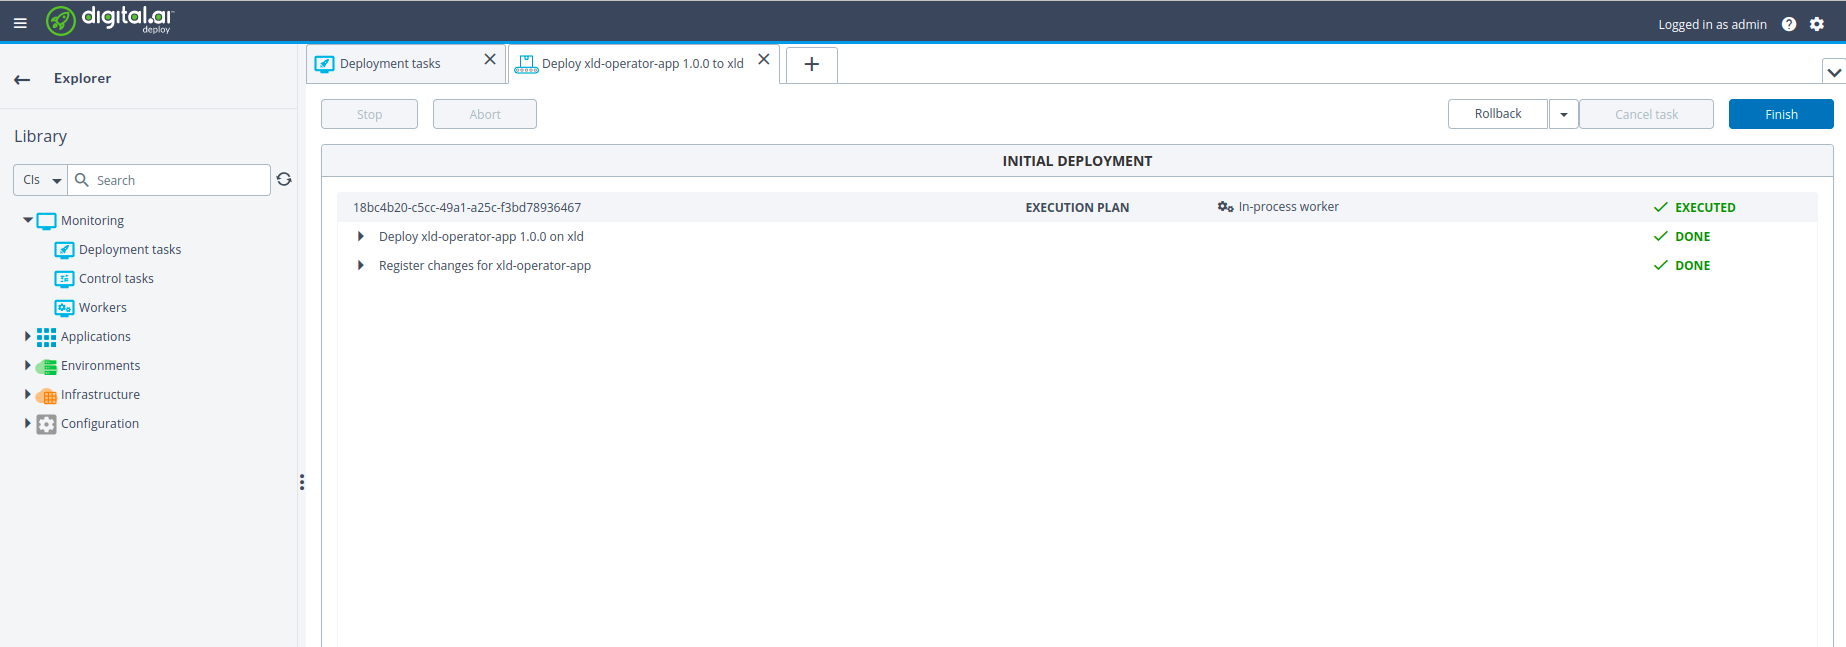
To verify the deployment succeeded, do one of the following:
-
Open the Deploy application, go to the Explorer tab, and from Library, click Monitoring > Deployment tasks
-
Run the following commands in a terminal or command prompt:

Add the dai-xld-nginx-ingress-controller external IP to AWS Route 53 console hosted zone to access the Deploy UI by hostname. Please see AWS EKS for details.
Test your set up
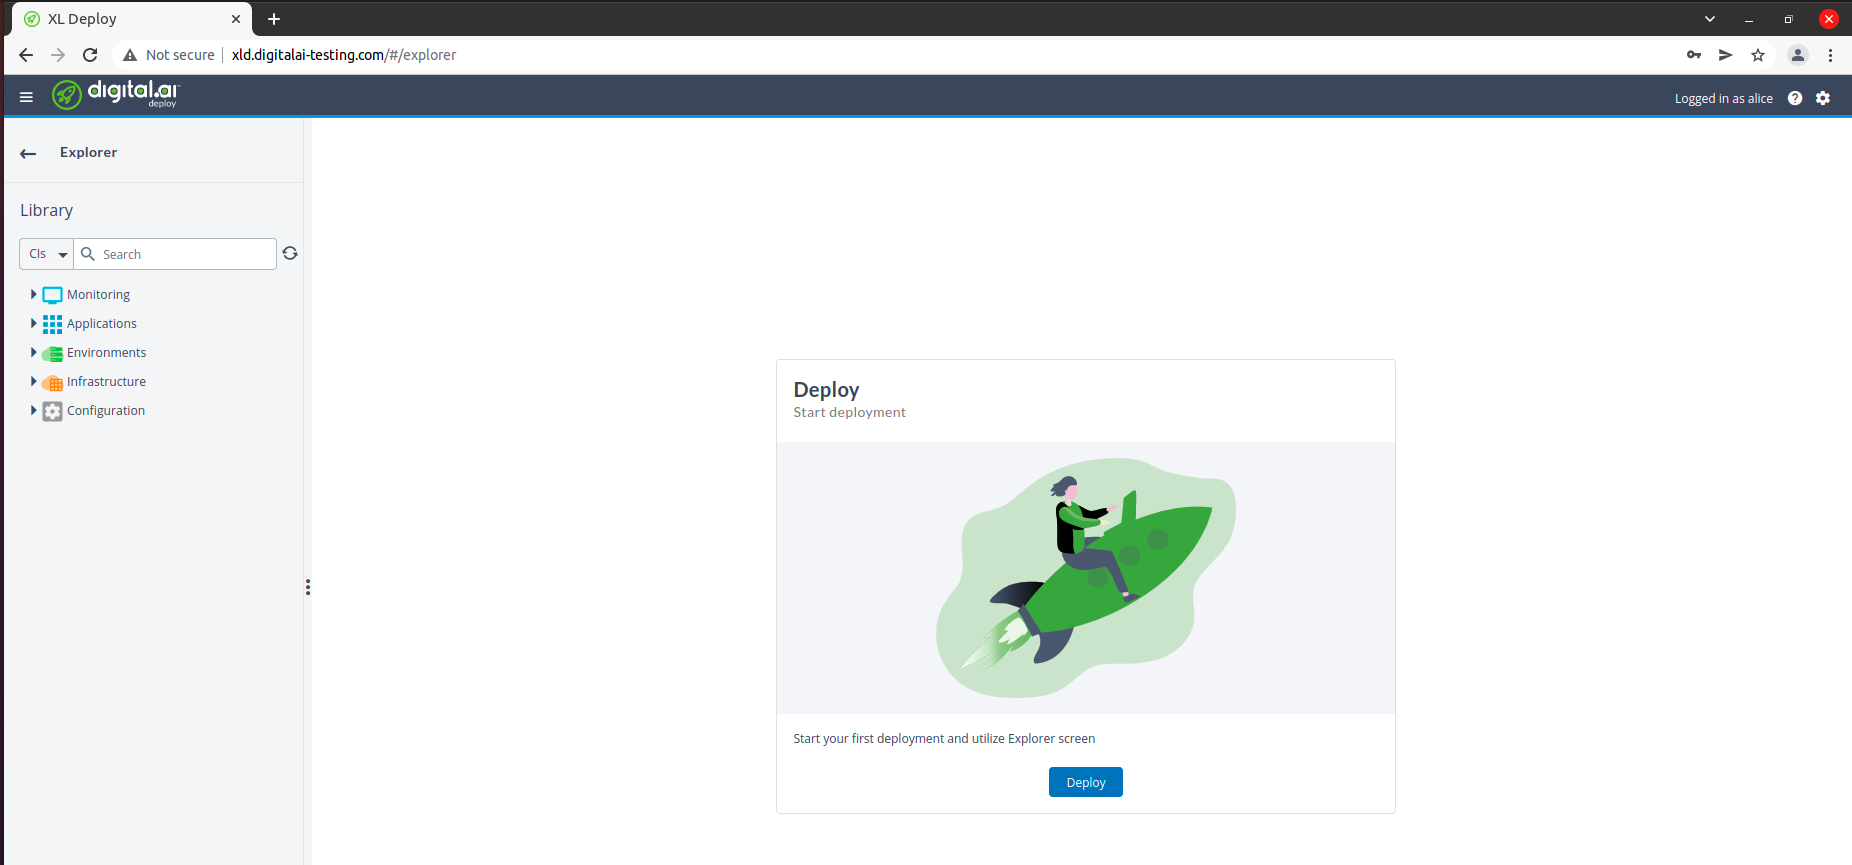
First we need to assign appropriate permissions in Deploy for users present in Keycloak. The OIDC users and roles are used as principals in Deploy that can be mapped to Deploy roles. Login with internal user and map roles with OIDC roles, as shown below.

Assign appropriate global permissions, as shown below.

Open your deploy url in browser and you should be redirected to Keycloak login page.
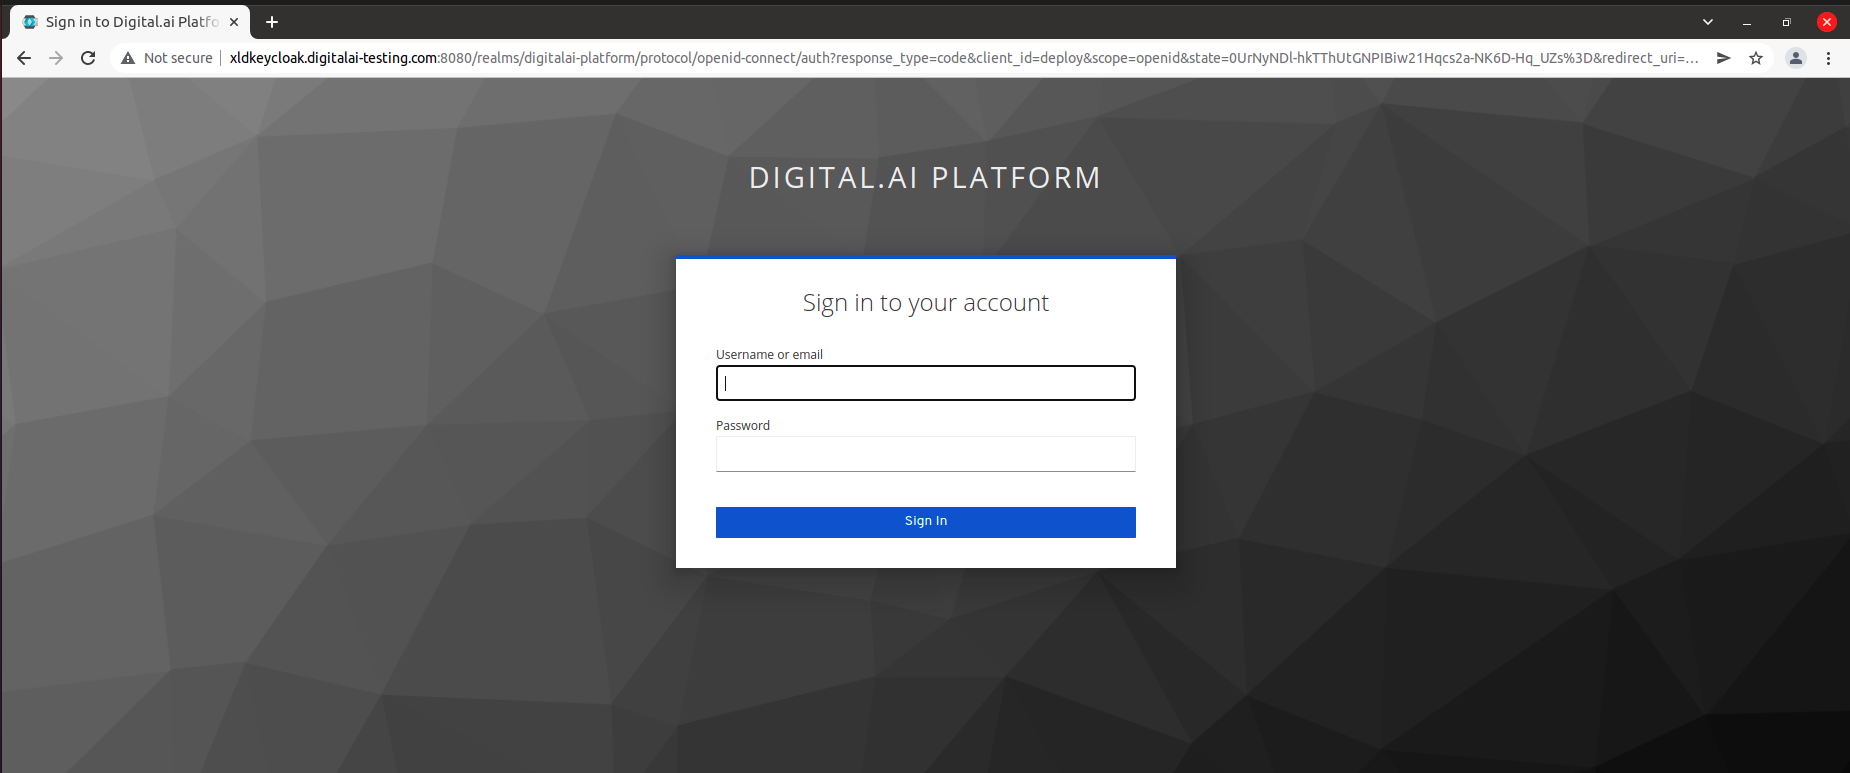
Now, Enter the credentials of any user created on keycloak.
