Create a CSV File to Import Groups
To import multiple groups, you need to upload a CSV (Comma Separated Values) file that lists the necessary information. You can create the CSV file using a spreadsheet program such as Microsoft Excel, or you can export a CSV file from Active Directory (AD) and then edit it as necessary.
When creating or editing the CSV file, refer to the CSV File Requirements below. For instructions on exporting a CSV file from AD, see Export a CSV File from Active Directory.
CSV File Requirements
When creating or editing the CSV file, include the Create a CSV File to Import Groups#Required Columns listed below. Also refer to Create a CSV File to Import Groups#Other Specifications to ensure that all data is entered properly and the file is saved in the appropriate format.
Required Columns
The CSV file must include the following two columns, and there must be a value in both columns for every row. Column headers are not case-sensitive.
Template
Click here to download a CSV template pre-populated with the required columns.
| Require Columns | |
|---|---|
| Name | Group name, up to 128 characters. This name must be unique within the file and across your organization. If a group by the same name already exists for your organization, the row is ignored. |
| Description | Description of the group, up to 500 characters. This description appears in the list of groups on the Groups page. |
Other Specifications
Keep these additional specifications in mind when creating or editing a CSV file for adding groups:
-
The
namecolumn must be unique within a file and across your organization. If a group by that name already exists for your organization, the row is ignored. -
Provide a value in both required columns for every row of the file.
-
You must remove unused columns. The CSV may include extra columns if you export the file from Active Directory, so be sure to delete them.
-
Remove the entire row for any group you do not wish to import.
-
On a Windows computer, save the file as CSV (Comma delimited). On a Mac computer, save the file as Windows Comma Separated (
.csv) or Comma Separated Values (.csv); either format is acceptable.-
If the program asks if you want to "Only save the active sheet," click OK.
-
If the program indicates that saving in CSV format will lose certain features, click Yes or Continue.
-
Export a CSV File from Active Directory
After you export a CSV file from Active Directory, you can edit it to remove rows of data for groups you do not wish to add. You must edit the file to remove any extra columns.
To export a CSV file from Active Directory
-
On your Microsoft Windows computer, open a Command Prompt window.
-
Type the following command to export data for every contact listed as a "person" in AD:
CSVDE -ffilename.csv -r "(objectCategory=Group)"Where
filenameis the name that will be used for the exported CSV file. -
Press enter to export the contacts to a CSV file.
The
filename.csvfile will be created in the root of your User directory. -
Using a spreadsheet program like Microsoft Excel, open the CSV file to review and edit the contents. Ensure that you have included all necessary data and meet the specifications listed in CSV File Requirements. Remove rows of data for any groups you do not wish to add, and remove any extra columns.
Use the "Find" command (Ctrl+F) to quickly navigate to the required columns to change any records with problems.
To delete an entire record, right-click the number of the row on the far-left side of the window and press Delete.
Example CSV
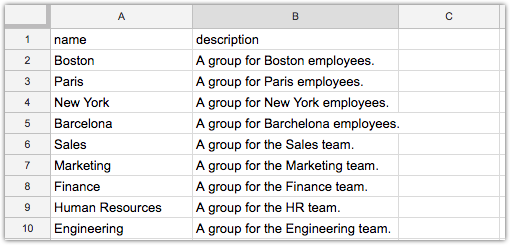
The following example demonstrates a properly-formatted spreadsheet that can be imported as a CSV file.
