Using Delivery Stream
This article explains how to use Delivery Stream with Agility.
Overview
DeliveryStream (formerly known as "DevOps Center") provides teams the ability to trigger pre-configured Continuum actions within Digital.ai Agility work items. Previously, teams developing software would need to manually carry out multiple actions inside Continuum during the development cycle. Tasks such as initiating pipelines, tasks, etc., needed to be kicked off manually in Continuum or automatically via VCS, CI Server, etc. DeliveryStream allows teams to trigger Continuum automation activity with a single click, right inside Digital.ai Agility.
You must have a valid Continuum instance in order to use the DeliveryStream feature.
Once each action is executed, a message is sent to the relevant Delivery Insights endpoint for that particular action. The message payload includes attributes that are unique to the work item from which the action is being executed.
DeliveryStream provides a centralized location for all automation activity and allows teams to configure automation and trigger it within Digital.ai Agility for the following work item types:
- Project
- Portfolio Item
- Story
- Defect
- Test Set
Enabling DeliveryStream
To view the DeliveryStream administration page, your Admin Privileges role must be set to "System Administrator".
- Click the hamburger menu
 > Admin > DevOps > DeliveryStream.
 - Click the button on the top-left part of the page to enable DeliveryStream.
- Enter your Continuum instance URL and Continuum API Access Token.
- Click Save. You will receive a success message once your Continuum instance is validated.
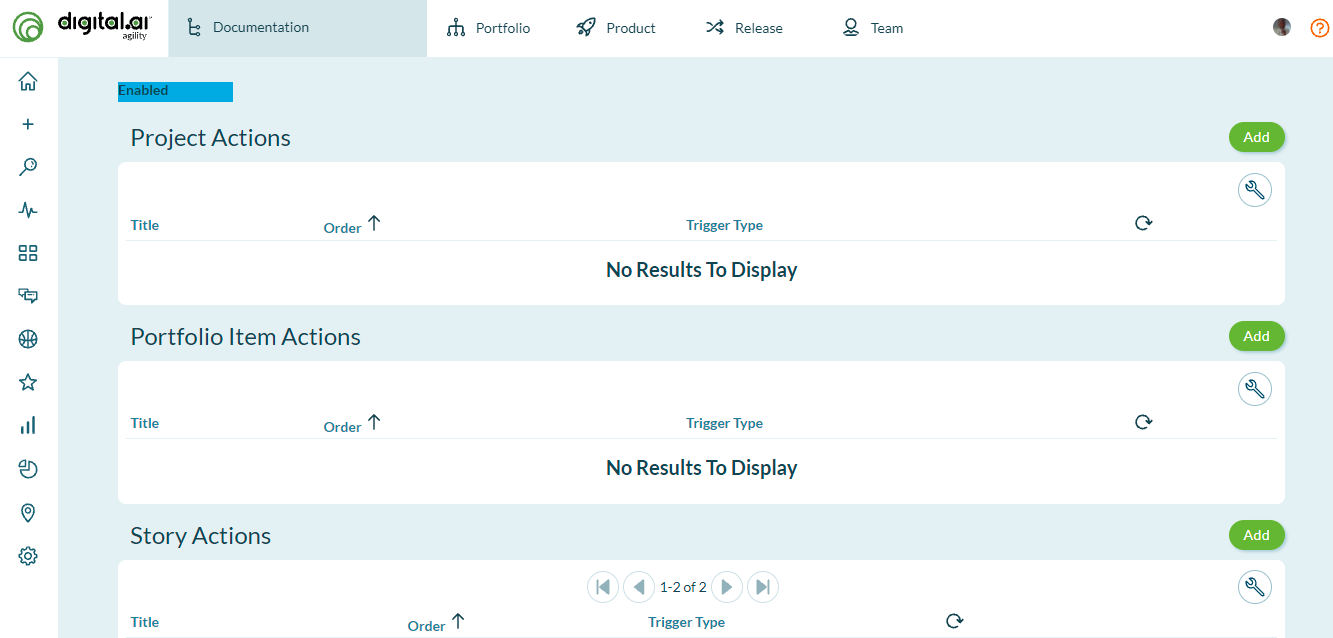
Creating a New Action
DeliveryStream can be used to trigger the following actions in Continuum:
- Pipelines
- Tasks
- Webhooks
- Canvas
DeliveryStream will send Continuum information relevant to the particular work item you're working with; for example, if you're inside story S-12345 and you execute an action within DeliveryStream, the payload for this action will include information that is unique to this work item as well as information about the user that triggered the action.
- Click the hamburger menu
> Admin > DevOps > DeliveryStream.
- Under the desired work item type, click the Add button.
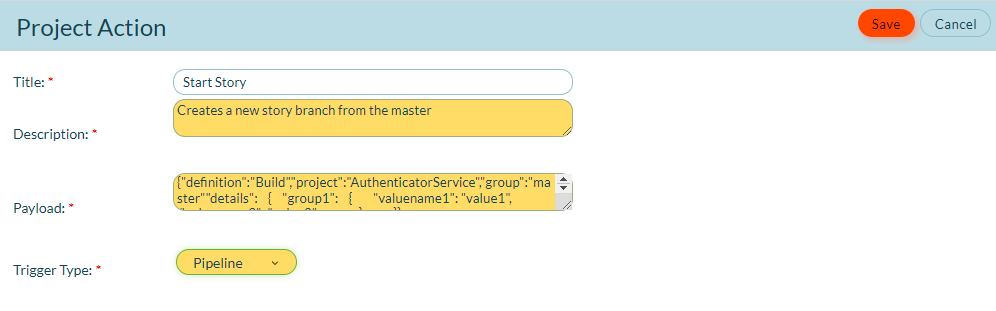
- An Action dialog will display. Fill in the required information as follows:
- Title: The action title displays in the top left of the actions menu under each work item.
- Description: The action description displays directly below the action title. It should describe what the action does in more detail.
- Payload: The payload is used to specify particular information about the automation being called in Continuum.
- Trigger Type: Select the desired trigger type to match the Continuum item this action should trigger.
The following payload format must be used when creating actions in DeliveryStream:
Note: You may pass as many "details" values as your trigger type requires.
| TRIGGER TYPE | PAYLOAD FORMAT | PAYLOAD EXAMPLE |
|---|---|---|
| Pipeline | {"definition":"Build","project":"AuthenticatorService","group":"master""details": { "group1": { "valuename1": "value1", "valuename2": "value2" } }} | {"definition":"Build","project":"AutenticatorService","group":"master","details": { "github": { "ref": "refs/heads/master" } }} |
| Task | {"task":"<Continuum Task Name>","initial_data":{}} | { "task": "CreateNewBranch", "initial_data": { "mydata": true }} |
| Webhook | {"handler":"<Continuum Webhook Handler Name","<content>":"<content>"} | {"handler":"commit_webhook","Story":"Commit"} |
| Canvas | Use the relative path of the canvas you want to trigger; everything after"/canvas/" should be included.<br />{"path": "<Relative canvas path>"} | If your full Canvas path is:<br />http://continuum.mycompany/canvas/tools/support/foundation.layout<br />Then use:<br />{"path": "tools/support/foundation-demo.layout"} |
Editing an Existing Action
- Click the Edit button on the right-most of each action row.
- In the work item type Action dialog box, enter the desired changes and click Save.
Deleting an Action
-
In order to delete an action, click the drop-down menu on the furthermost right part of the action in the Admin area and click Delete.

-
A confirmation dialog will appear. Confirm the action by clicking Delete on the upper right-hand side of the dialog.

Executing an Action
-
Open the work item from which you wish to trigger the action and click on the DeliveryStream icon at the left side of the dialog box.
-
Click the Run button next to the desired action.
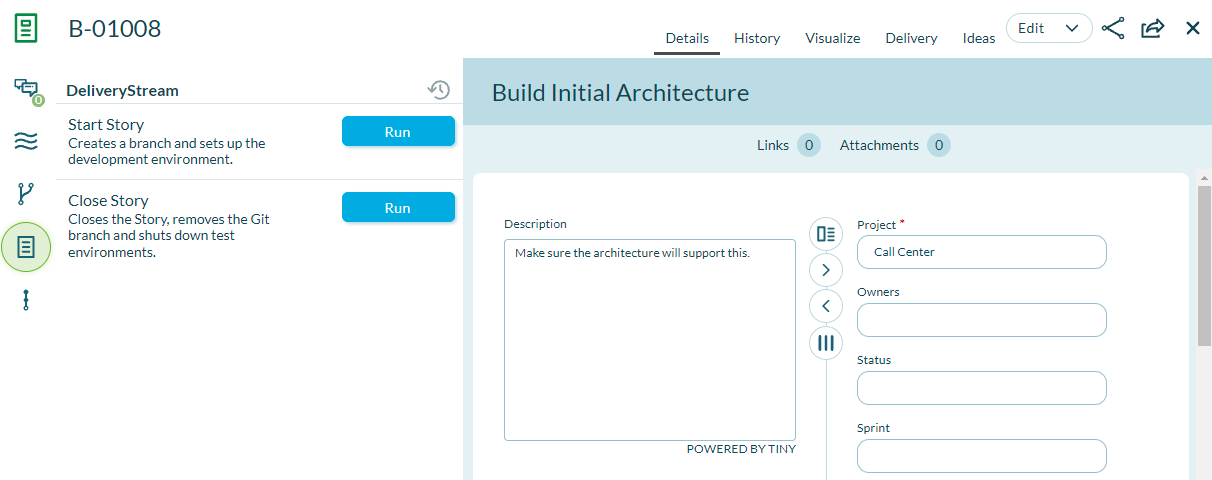
-
The button will display a spinner while the action is executed. The color of the button will change to green if the action was successful, or to red if it was unsuccessful.
Accessing Action History
Each execution of a particular action in DeliveryStream will create an accessible record for the event. Each history record contains the following information:
- Status
- Date/Time
- User
- Response
- Request
To access history for a particular work item:
- Open the desired work item (Project, Portfolio Item, Story, Defect, or Test Set).
- Click on the DeliveryStream icon to open the DeliveryStream side panel.
- Click the History icon
 on the upper right hand side of the side panel
 - The "DeliveryStream History" dialog will open. From the drop-down menu, select the action for which you want to see history
- If the action has been executed, all instances of execution will appear on the left. Simply click on an instance to view its details:
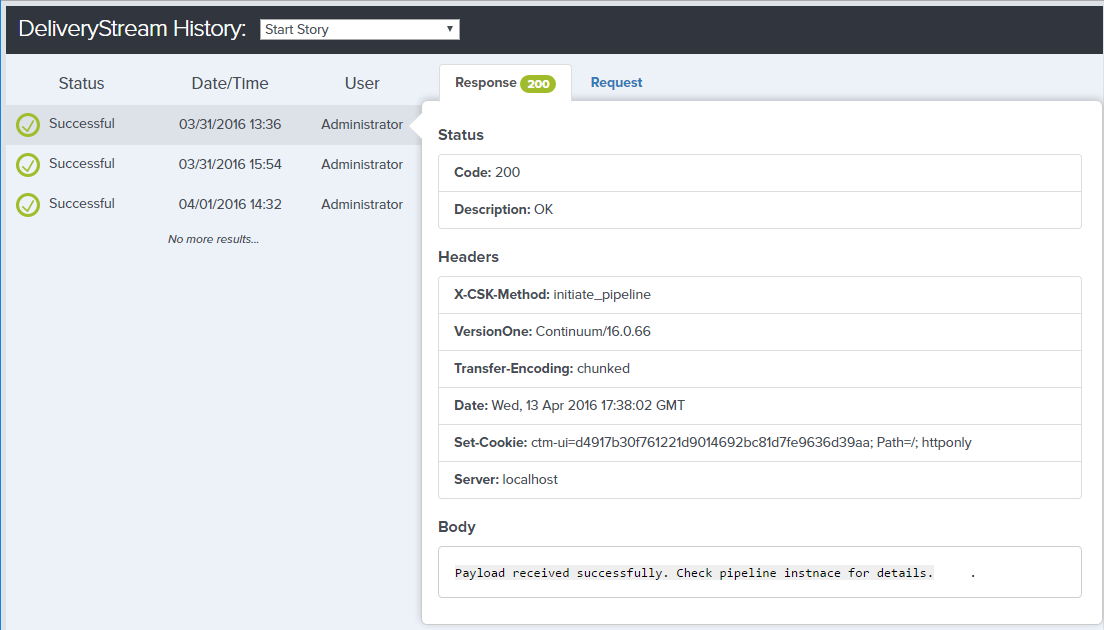
The Request section will show by default on the right hand side. The Request tab will contain the HTTP response received for the execution instance in its title. To view the contents of the request, click on the Request tab.