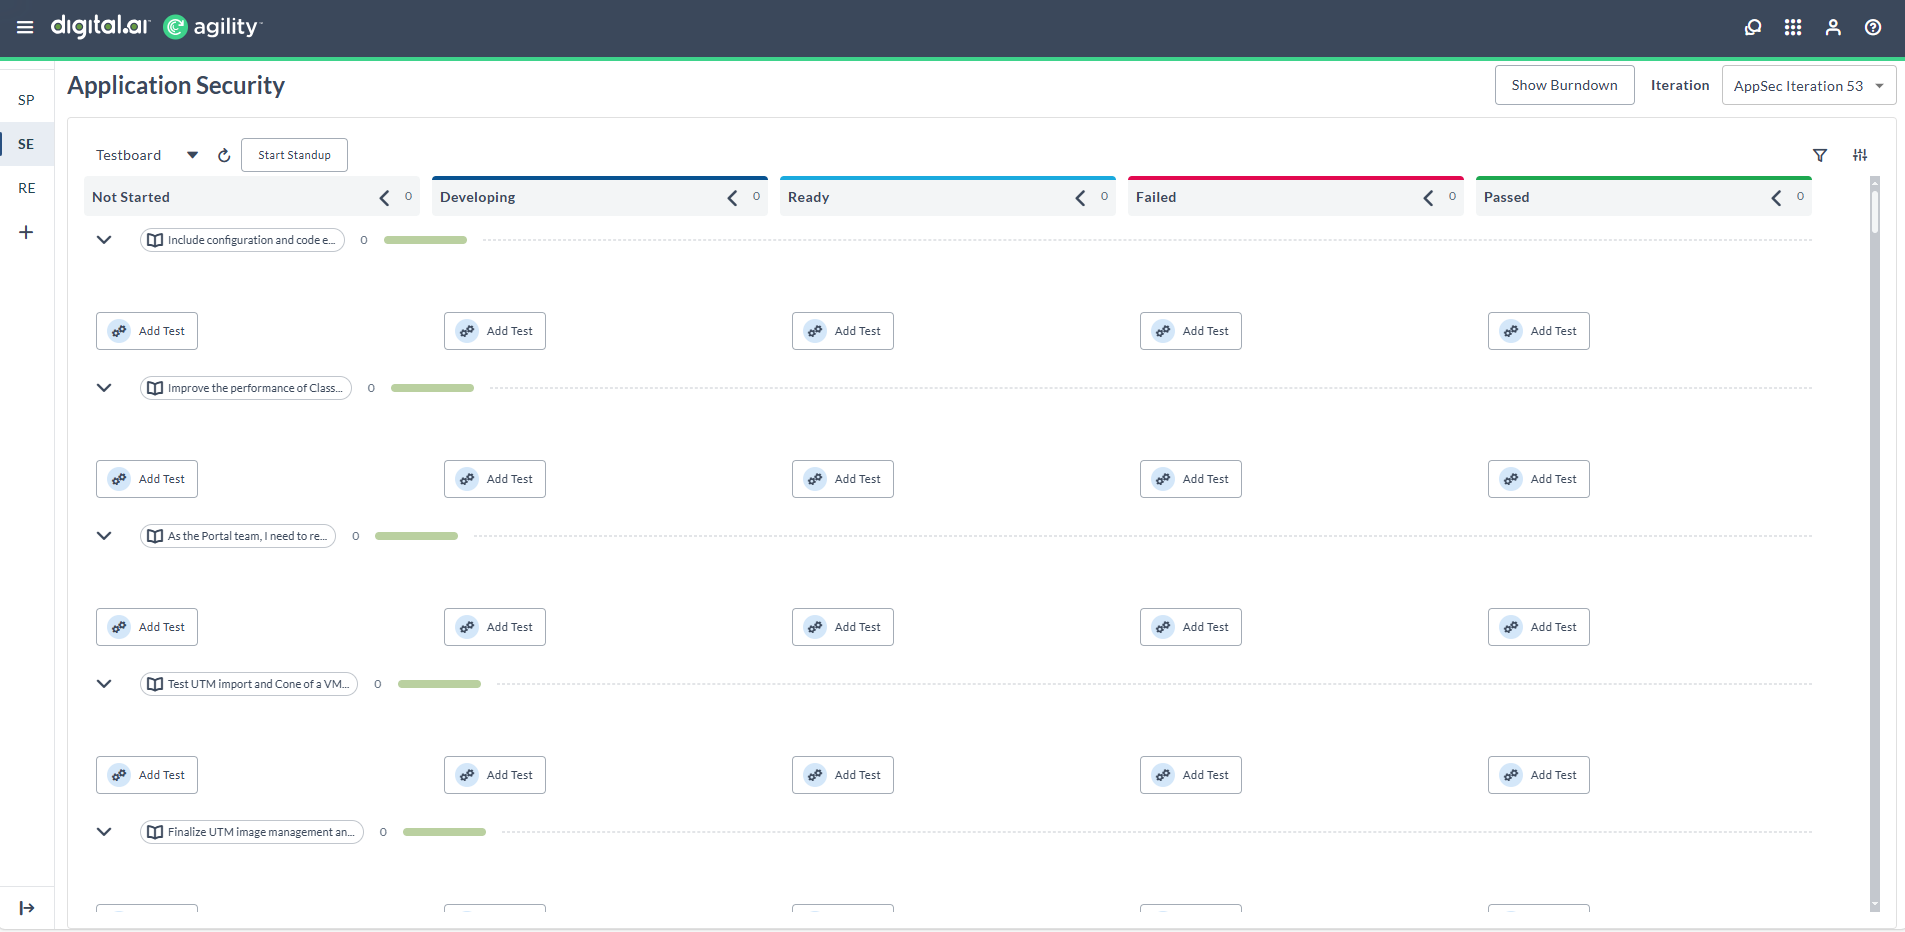
Testboard in Rooms 2
The Testboard in Rooms 2 is a specialized test management interface that helps teams organize, create, and track tests within their sprint execution workflow. This guide covers everything you need to know about using the Testboard effectively.
Overview
The Testboard provides a dedicated interface for test management within sprint execution. Tests are organized into swimlanes based on their parent Stories or Defects, with columns representing different workflow states. This visual organization allows teams to:
- Create and manage tests efficiently during sprint execution
- Track test progress across different workflow states
- Maintain traceability between tests and their parent work items
- Coordinate testing activities within the broader sprint workflow
Prerequisites
- Access to a Team Room in Rooms 2
- Appropriate permissions to create and manage tests
- Existing Stories or Defects to associate tests with
Access the Testboard
To access the Testboard in your Team Room:
-
Navigate to Team Rooms
- Click the hamburger menu

- Select Rooms > All Team Rooms
- Click the hamburger menu
-
Enter Rooms 2
- Select your Team Room name
- Click the Try Rooms 2 button

-
Open Sprint Execution
- In the Sprint Views page, click Sprint Execution (SE)
- From the board dropdown, select Testboard
The Testboard interface will load, showing your current sprint's test organization.
Testboard layout
Board controls
- Testboard dropdown: Switch between Storyboard, Taskboard, and Testboard views.
- Refresh button: Update the board with the latest information.
- Start Standup button: Launch the daily standup assistant.
- Filter options: Filter tests by team members and other criteria.
Swimlanes
- Story/Defect swimlanes: Tests are grouped by their parent work items.
- Swimlane headers: Display the parent Story or Defect ID and title. If the parent work item has blocking issues, a blocked indicator (red triangle and Blocked bubble) appears in the swimlane header. Hover over a swimlane header to view a tooltip with work item icon, ID, title, description, and copy icon. Click a header to open the Asset Detail Drawer for the parent work item.
- Expandable swimlanes: Click the chevron to expand or collapse swimlanes.
- Progress indicators: Show test completion status for each parent work item.
Columns and workflow
- Workflow columns: Represent different test states (Not Started, In Progress, Done, etc.).
- Add Test buttons: Available at the bottom of each column for quick test creation.
- Column totals: Display the number of tests in each workflow state.
Add test from swimlane
- Locate the specific Story or Defect swimlane where you want to add the test.
- Click Add Test within that swimlane section.
- The Parent field is pre-populated with the selected Story or Defect.
- Complete the Title and Status fields as needed.
- Click Save to create the test.
Edit test details
Open test for editing
- Click on a test card to open the Asset detail drawer.
- The drawer displays three tabs on the left side:
- Details: Core test information and fields
- Attachments: Add or manage test-related files
- Comments: View activity history and add notes
Update test information
- In the Details tab, update any of the following fields:
- Parent: Change the associated Story or Defect.
- Status: Update the test status.
- Owners: Assign or reassign team members by typing to search.
- Detail Estimate: Set effort estimates.
- Tags: Add or modify test tags.
- Description: Update test details and acceptance criteria using the rich text editor.
- Use the Show More button to access additional configured fields.
- Click Save or use Ctrl+S to apply your changes.
Review test information
The Information section at the bottom of the Details tab shows audit details including:
- Created by and creation date
- Changed by and last modification date
- Test ID (e.g., AT-159919)
Manage tests
Move tests between workflow states
- Locate the test card on the board.
- Drag the test card to the appropriate workflow column.
- The test status updates automatically based on the column configuration.
Update test assignments
- Click on a test card to open the Asset detail drawer.
- In the Owners field, type to search for team members.
- Select the appropriate team member from the dropdown.
- Save the changes to update the assignment.
Filter and organize tests
- Use the filter options in the top-right corner of the board.
- Apply filters by:
- Team members: Show tests assigned to specific users.
- Status: Focus on tests in particular workflow states.
- Other criteria: Apply additional filters as configured for your project.
- Use member avatars displayed on test cards to quickly identify assignments.
Delete tests
- Open the test in the Asset detail drawer.
- Click the three-dot menu (⋮) in the drawer header.
- Select Delete from the menu.
- In the confirmation dialog, click Delete to confirm the removal.
Deleted tests cannot be recovered. Consider changing the status to "Cancelled" instead of deleting if you need to preserve the record for historical tracking.
Best practices
Test creation
- Use descriptive titles: Create clear test names that indicate what functionality is being tested.
- Proper parent association: Ensure tests are linked to the correct Story or Defect to maintain traceability.
- Realistic estimates: Provide accurate effort estimates to support sprint planning and capacity management.
Test management
- Regular status updates: Keep test statuses current to maintain accurate progress tracking across the team.
- Clear descriptions: Include detailed test steps and acceptance criteria to ensure consistent execution.
- Appropriate assignments: Assign tests based on team member expertise, availability, and capacity.
Board organization
- Consistent workflow: Follow established column meanings and definitions across the team.
- Regular cleanup: Archive or remove obsolete tests to maintain board clarity and focus.
- Effective filtering: Use filters strategically to focus on relevant tests during daily activities and reviews.
Troubleshooting
Common issues and solutions
Test not appearing in expected swimlane
- Verify that the test's parent Story or Defect is assigned correctly.
- Check that the parent work item is included in the current sprint.
- Ensure that you have the necessary permissions to view the test.
Unable to move test between columns
- Confirm that your user role has permission to update test statuses.
- Check whether the workflow transition is allowed for the current test state.
- Verify that the destination column accepts the test's current status.
Add Test button not visible
- Ensure that you have test creation permissions in the current project.
- Verify that the sprint is active and not locked.
- Check whether the column configuration allows new test creation.
What's next
- Getting Started with Rooms 2 - Overview of all Rooms 2 capabilities.
- Adding a Test - Traditional test creation methods for comparison.
Related concepts
- Asset detail drawer - The side panel interface for editing work items.
- Swimlanes - Horizontal groupings that organize tests by parent work items.
- Workflow states - The progression of test statuses from creation to completion.
- Sprint execution - The active phase of sprint delivery where testing occurs.