Getting Started for Release Managers
Release Managers use Digital.ai Release to plan, coordinate, and track software releases. This guide covers the Release features most relevant to this role such as creating and starting releases, monitoring task progress, handling issues, coordinating multi-team delivery, and reviewing reports.
This guide assumes that Digital.ai Release has already been installed and configured by your platform or operations team. If you need to set up Release from scratch, see the Installation Guide.
Who This Guide Is For
This guide is for Release Managers and Release Owners who:
- Are accountable for the delivery of a software release.
- Coordinate work across development, QA, operations, or other teams.
- Track progress, resolve blockers, and ensure releases complete on time.
- Report delivery status to engineering leadership or stakeholders.
If you design the reusable release templates that your teams run from, see Getting Started for Release Engineers.
Getting Around in Release
This section introduces the main interface areas you will use as a Release Manager. To access Release, navigate to your Release URL and log in using your credentials.
Most organizations configure SSO, so you will be redirected to your identity provider to authenticate. If you have trouble accessing Release, contact your Release Administrator or System Administrator.
Home Page Dashboard
After logging in, the Home Page Dashboard shows recent workflows, active releases, templates, and applications. Use it to access work in progress or check the status of ongoing releases. For more information, see Digital.ai Release Home Page.
Left Navigation Sidebar
The left sidebar is organized into labeled sections. Key areas for Release Managers include:
Overview
- Home — The default landing page. Shows active releases, recent templates, and workflows.
- Folders — Access folder-organized views of your releases and templates.
- Tasks — View tasks assigned to you across all active releases.
Releases
- Releases — View, create, and manage all releases.
- Templates — Browse and create release templates.
- Deliveries — Manage release trains and multi-team delivery.
Insights
- Reports — Access reports and dashboards.
Take the Guided Tour
The first time you log in, a Welcome! Click me to get started task is waiting for you under Tasks in the sidebar. Open it to follow a guided tour of the main features of Release.
Organizing Releases and Templates with Folders
Folders organize templates, releases, workflows, and dashboards into a hierarchy that matches your team or project structure. Permissions set on a folder apply to everything inside it. To view releases within a specific folder, go to Overview > Folders in the sidebar and select the folder. For more information, see Organizing Release.
Planning and Launching a Release
A release in Digital.ai Release is created from a template. A template defines the phases (sequential stages such as Development, QA, and Deployment), the tasks within each phase, the teams responsible for each task, and the variables that take different values each time a release runs (such as the application version or target environment). Release Managers select a template, fill in the variable values for the specific run, and start the release.
Step 1 — Browse Available Templates
Go to Releases > Templates in the sidebar. Browse or search for a template that fits your release — templates are created and maintained by whoever manages your release process and vary by organization. If no suitable template exists, see Getting Started for Release Engineers to learn more about how templates are built.
Step 2 — Create a Release from a Template
Open the template, give the release a descriptive name (for example, MyApp v2.4 Production Release), fill in the variable values prompted at this stage (such as the application version or environment name), and set the start and due dates if applicable. For more information, see Start a Release From a Template.
Step 3 — Review and Start the Release
Before starting, review the release configuration. Each release has properties (owner, dates, description), team assignments (who is responsible for each phase), and variables (values that change each run, such as the application version or target environment). Verify these are set correctly for the current run. For more information, see Configure Release Properties.
When you are ready, click Start release. The release moves to In Progress and the flow engine begins executing tasks — automated tasks run immediately, and team members receive notifications for manual tasks.
Automating Release Starts
Releases can be started automatically on a schedule or in response to an external event (such as a completed code merge). For more information, see Understanding Triggers and Schedule Releases.
Managing Access for Your Team
To control who can view and act on a release, Release uses a team-based permission model. Each release defines teams (such as Development, QA, Release Admin), and each team is assigned specific permissions for that release.
For more information, see:
For organization-wide user management, contact your Release Administrator. See the Administration Guide.
Tracking a Release in Progress
Once a release is started, use the following views and tools to monitor progress and identify issues.
The Release Flow View
The Flow view is the main screen for a running release.
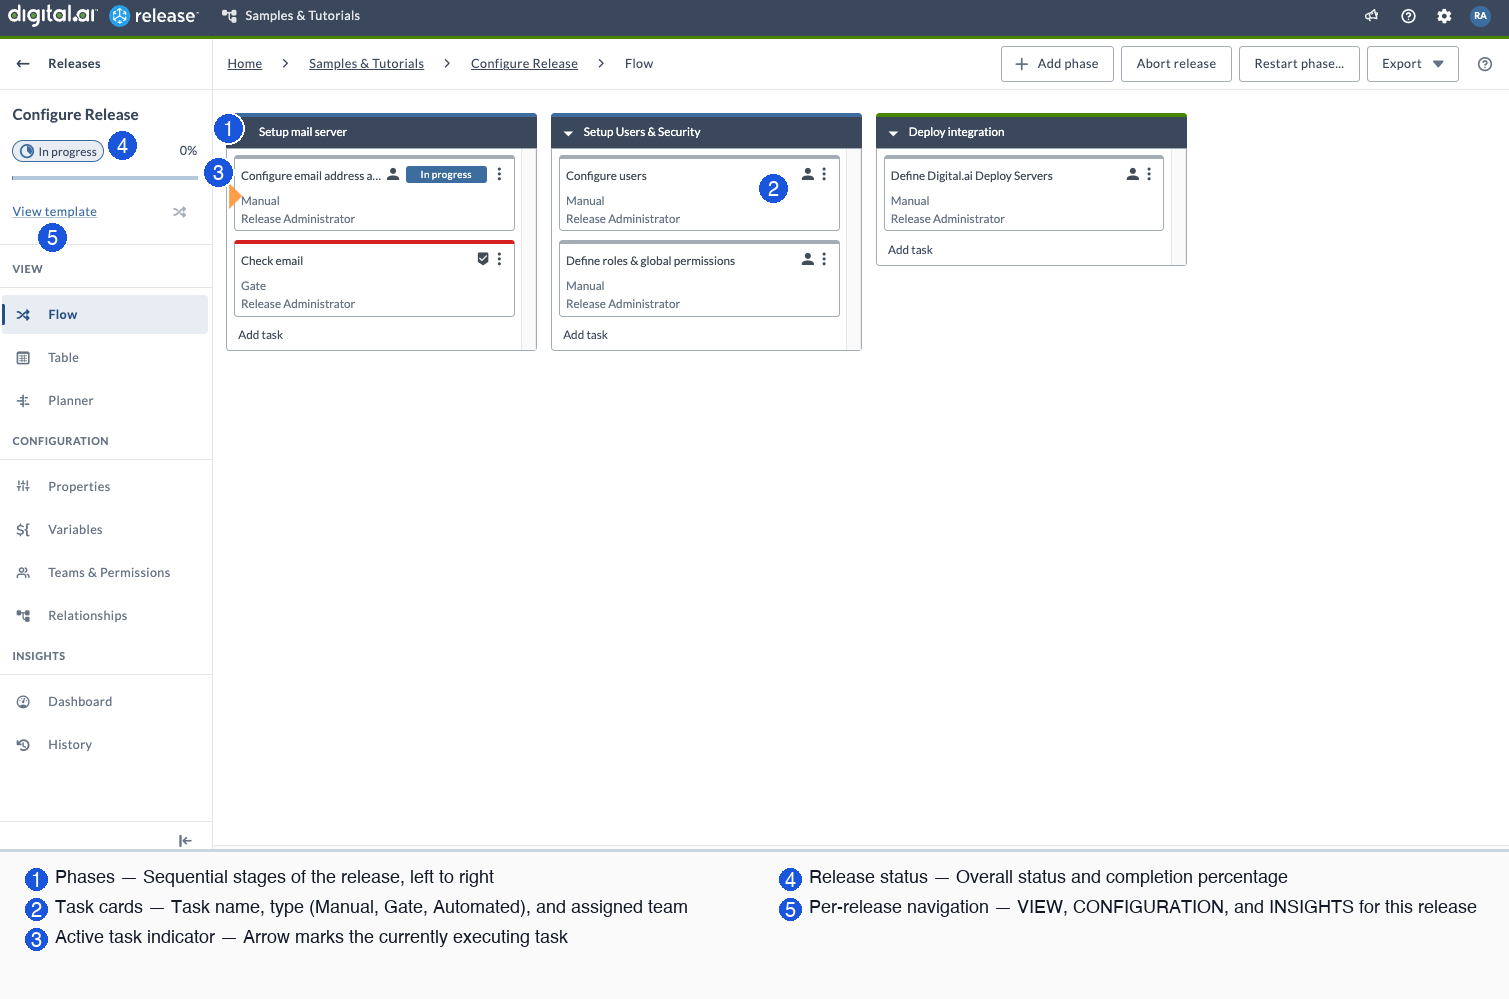
Phases appear as columns from left to right, representing the sequential stages of the release. Tasks appear as cards within each phase. Each card shows the task name, type (Manual, Gate, Automated), and the team or user responsible for it. A small arrow indicator marks the currently active task so you can see exactly where execution stands.
The release header shows the overall status (for example, In Progress) and completion percentage. A View template link takes you back to the template the release was created from.
The left navigation within a release is different from the global sidebar. It gives you access to release-specific views and settings:
- VIEW — Switch between Flow, Table, and Planner views
- CONFIGURATION — Access Properties, Variables, Teams & Permissions, and Relationships for this release
- INSIGHTS — Open the release Dashboard and History
Click any task card to open the Task Drawer — a panel that slides in from the right while keeping the flow view visible.
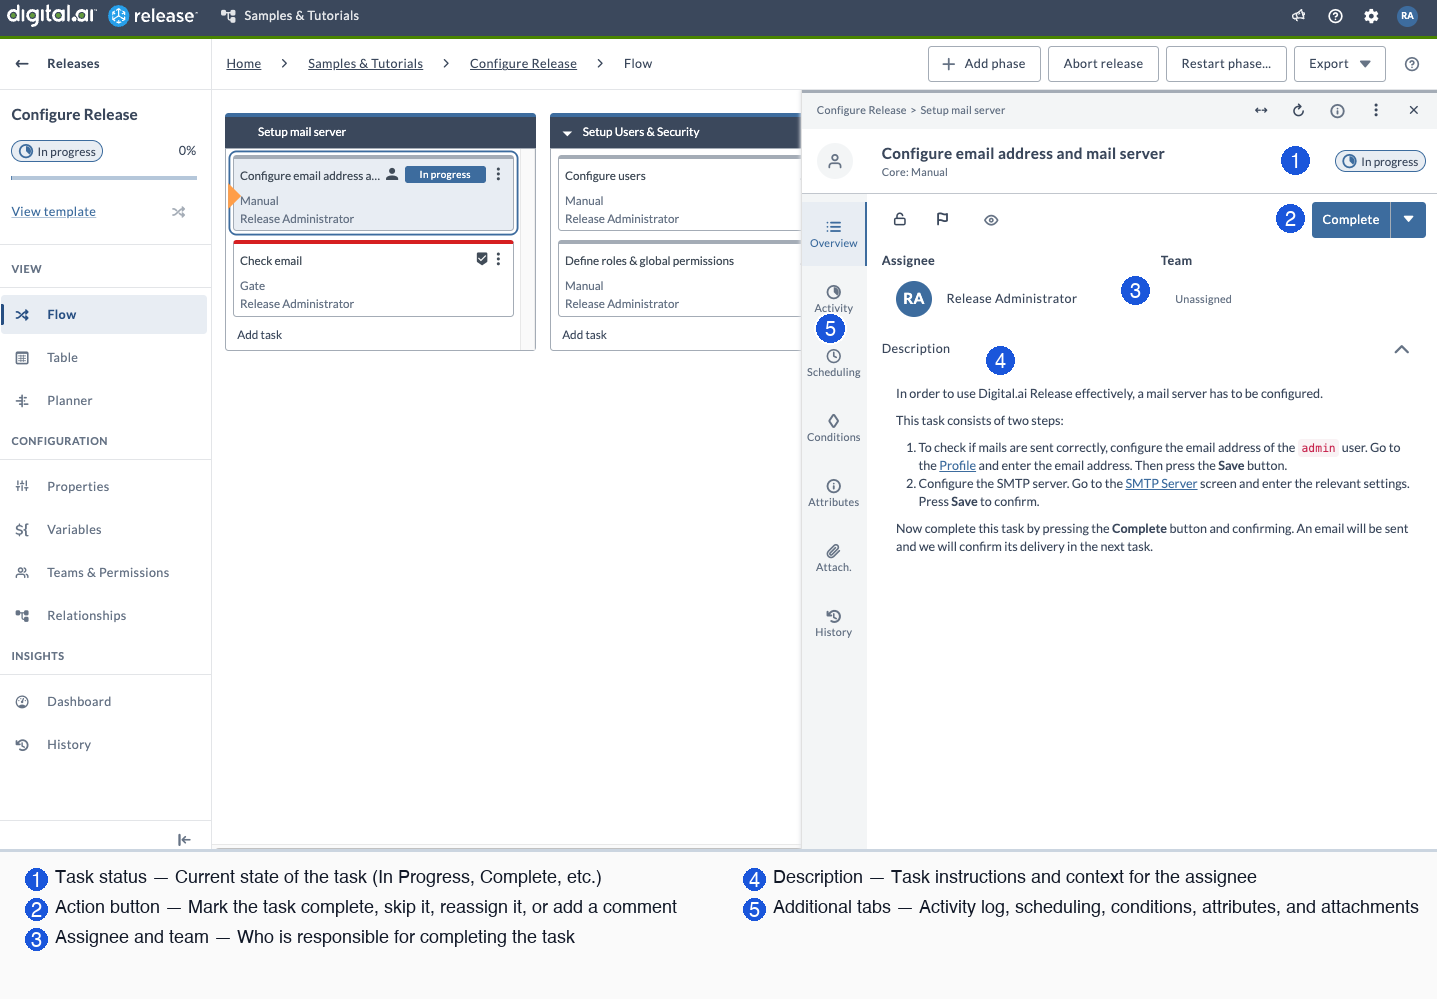
The Task Drawer shows the task description, assignee, team, and status. Use it to mark the task complete, skip it, reassign it, or add a comment. Additional tabs give access to the task's history, scheduling, conditions, attributes, and attachments. For more information, see Task Drawer.
If the release contains tasks that create sub-releases, a Related Releases panel is available in the Flow view. It shows links to any sub-releases and their current status, making it easy to navigate between a parent release and its children. For more information, see Related Releases.
For information on all available views, see Release Views.
Alternative Views
Release provides several views for tracking progress:
| View | Best for |
|---|---|
| Flow View | Seeing the overall release structure and task status in real time |
| Table View | Working with tasks in a list format with bulk editing and filtering |
| Planner View | An interactive Gantt chart for managing timing and schedule |
| Calendar View | Seeing all planned and running releases on a day/week/month timeline |
| Relationships View | Viewing dependencies between releases |
Risk Awareness
Release calculates a risk level for each release based on factors such as failed tasks, flagged tasks, and approaching due dates. Use the Risk Awareness view to identify at-risk releases and take corrective action.
Release History and Audit Trail
Every action on a release is logged. Use the Release History to see a complete audit trail of changes, comments, and completions, useful for compliance reviews or troubleshooting.
Coordinating Multi-Team Delivery
When multiple teams work on releases that must ship together — a quarterly release cycle, a platform upgrade, or a coordinated multi-team feature — use Deliveries to synchronize them.
A Delivery defines a flow of stages that a set of tracked items must move through. Tracked items are the units of work you want to track across releases — features, tickets, or changes linked to tasks in one or more participating releases. As those releases progress, the delivery reflects their combined state. Transitions between stages act as synchronization gates, such as an approval that all teams must clear before moving forward.
Use the Calendar View to see all planned and running releases on a timeline, useful for identifying scheduling conflicts or clusters of simultaneous deployments.
For more information, see Introduction to Delivery Patterns and Configuration & Management.
Managing Your Task Assignments
Tasks is in the main sidebar, available from any page in Release. Click it to see all tasks currently assigned to you across all active releases. For manual tasks, click the task to open it and mark it Complete, or flag it if there is a blocking issue. Note that when you are inside a release or a template, the left navigation switches to context-specific options — navigate back to the main sidebar to reach Tasks. For more information, see Accessing Task Overview.
When Things Go Wrong
The following sections describe how to handle common issues that arise during a release.
A Task Has Failed
When an automated task fails, the release is paused and the release owner receives a notification. Your options are:
- Retry the task — Fix the underlying issue and retry.
- Skip the task — Skip it with a comment if it is safe to proceed without it.
- Reassign the task — Assign it to a different team member.
AI Assistant
AI Assistant can analyze a failed task and suggest a likely cause. See Task Troubleshooting.
A Task Is Flagged
Team members can flag a manual task to signal that they need help or that there is a blocking issue. The release owner receives a notification and should review the flag and take action. For instructions on setting status flags, see Task Drawer.
Restarting a Phase
If a critical phase needs to be re-run (for example, after a failed deployment), you can restart it. Review dates and user assignments after restarting. For more information, see Restart a Phase in an Active Release.
Blackout Periods
To prevent releases from starting during scheduled maintenance windows or deployment freezes, configure a blackout period. See Set Blackout Period.
Notifications
Release sends email notifications to team members when tasks are assigned, fail, or change state. Contact your Release Administrator to confirm that an SMTP server is configured. For more information, see Configure an SMTP Server and Notifications in Release.
Reporting on Delivery Status
Release provides several dashboards and reports for tracking and communicating delivery performance.
Release Dashboard
Each running release has its own dashboard that displays planning information and release status through configurable tiles. For more information, see Release Dashboard.
Custom Dashboards
You can create dashboards with tiles that display specific metrics relevant to your team, such as release counts, task completion rates, and upcoming milestones. For more information, see Custom Dashboards and Dashboard Tiles.
Release Audit Report
For compliance purposes, generate a Release Audit Report that records every action taken during a release. See Release Audit Report and Generate the Release Audit Report.
For portfolio-level dashboards and cross-release visibility, see Getting Started for Engineering Managers.