Production Deployment Using Docker
This guide covers what you need to deploy AI Assistant on-premises with Docker for production use. The Docker Compose files, the full environment variable reference, the network flows, backup and disaster recovery, and private CA trust all live in the AI Assistant Docker Repository.
To try AI Assistant on a single host before a production deployment, see the Lab Deployment Using Docker.
The container images and Docker Compose files referenced in this guide are also available from the Distribution Site.
AI Assistant requires Digital.ai Release 26.1.5 or later, with the built-in MCP server enabled through the bundled Release MCP Tools Plugin. For more information, see the AI Assistant Docker Repository.
For the complete set of AI Assistant features and capabilities, see AI Assistant.
Supported Models
AI Assistant has been validated with specific Anthropic and OpenAI models, and some tested models are known to fail. See Supported Models for the current list before you configure a model provider.
Prerequisites
- Digital.ai Release 26.1.5 or later, installed, licensed, and running on-premises.
- Release is already configured for OIDC with your identity provider. Keycloak and Okta are the validated OIDC providers, and you can also use the Digital.ai Identity Service. AI Assistant reuses your Release OIDC setup and does not add its own login. Other authentication methods, such as LDAP, SAML, and local authentication, are not supported.
- The built-in MCP server is enabled in Release. See AI Settings.
- Docker Engine and the Docker Compose plugin are installed on the host.
- PostgreSQL 14 or later is provisioned and reachable. The Release Assistant and the LLM Service both need PostgreSQL. You can host both databases (
dai_assistantanddai_llm) on one server. - An OIDC issuer with a JWKS endpoint reachable from the Release Assistant and the LLM Service.
- Access to the container registry hosting the AI Assistant images.
- For self-hosted LLM mode, an LLM provider endpoint and credentials.
Deployment Model
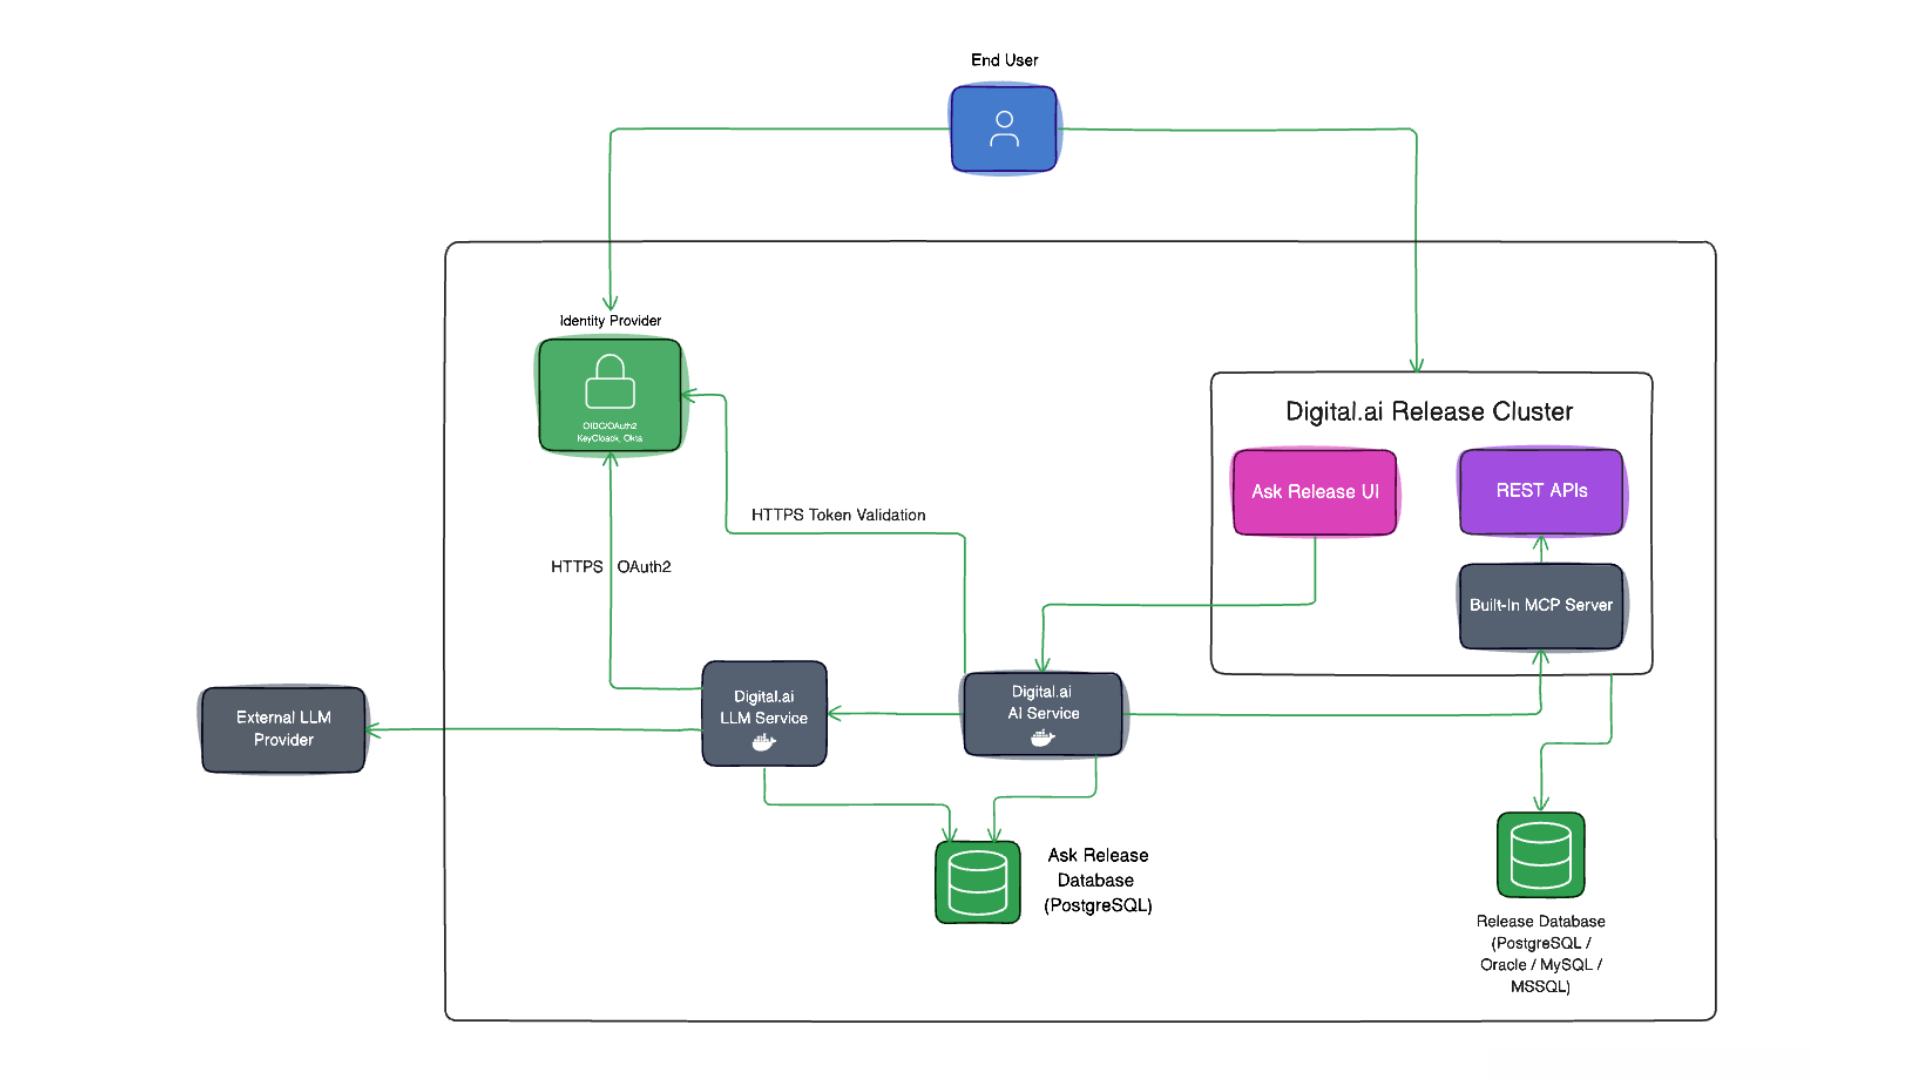
On-premises, you run two services with Docker, plus an optional PostgreSQL container if you do not have an existing PostgreSQL server:
- Release Assistant: Receives questions from the AI Assistant UI, orchestrates the response, and streams it back. Pull the latest Release Assistant image from Docker Hub, and set it in your
.envfile asRELEASE_ASSISTANT_IMAGE. - LLM Service: Processes natural language requests and calls your configured model provider (
llm-service-api, with a one-timellm-service-dbinitcontainer for database schema initialization). Pull the latest LLM Service API and LLM Service DB init images from Docker Hub. - PostgreSQL (optional): Include the PostgreSQL container from the stack only if you do not have an existing PostgreSQL server. See PostgreSQL Databases.
You provide and operate the supporting components yourself:
- Digital.ai Release (your existing instance), which hosts the built-in MCP server the Assistant calls.
- An OIDC identity provider, such as Keycloak, Okta, or the Digital.ai Identity Service.
- PostgreSQL for the Release Assistant and the LLM Service.
- A model provider endpoint like OpenAI, Anthropic, or AWS Bedrock.
There is no separate MCP container. The MCP server is embedded in Release and is exposed at ${RELEASE_PUBLIC_URL}/s/mcp. The Assistant connects to it directly with the signed-in user's token. When you run your own identity provider and model provider, the deployment runs fully self-contained, with no runtime calls to Digital.ai-hosted services. This is a single-host Docker deployment and is not highly available.
The root Docker Compose files ship the production services. In production, you provide and maintain your own Digital.ai Release, identity provider, and PostgreSQL. The repository includes an optional test-lab package that you can use to try out the installation before your production deployment. See Lab Deployment Using Docker. The test-lab setup is for testing and demo purposes only. It is not for production use and is not covered by Digital.ai support.
How It Works
- A user asks a question in the AI Assistant UI in Release.
- The UI sends the question, with the user's token, to the Release Assistant.
- The Assistant validates the token against your OIDC provider.
- The Assistant calls Release's built-in MCP server with the user's token to fetch the Release data needed. Release RBAC applies, so results are scoped to what the user can access.
- The Assistant calls the LLM Service, which invokes your model provider to generate the response.
- The response streams back to the AI Assistant UI.
Security and RBAC
AI Assistant does not replace Release authorization. It delegates to Release APIs. If a user cannot view or modify an object directly in Release, AI Assistant cannot expose or mutate it.
- Authenticated access: Uses your existing Release session through your OIDC provider. No separate credentials.
- Permission-scoped: The embedded MCP endpoint calls the Release API with the authenticated user's token, not elevated service credentials, so Release RBAC decides what is returned.
- Read-only: AI Assistant retrieves and displays information only. It cannot start releases, approve tasks, or change data.
- Scoped to Release data: Queries run against Digital.ai Release only.
- Audit logged: Operations are recorded for compliance and traceability.
Do not include sensitive information such as passwords, API keys, or secrets in your prompts.
Configuration
Before you deploy, configure the supporting components. This section covers the LLM provider, the PostgreSQL databases, and the identity provider clients.
LLM Provider Configuration
The llm-service directory in the AI Assistant Docker Repository contains three provider files: open-ai.json, anthropic.json, and bedrock.json. Edit the file for the provider you use with your credentials, base64-encode it, and set the result as LLM_SERVICE_DEFAULT_PROVIDER_CONFIG. The variable is consumed by llm-service-dbinit, so set it before the database initialization step.
For OpenAI, organization and project take the organization ID and project ID, not the display names shown in the OpenAI dashboard.
open-ai.json:
{
  "type": "openai",
  "config": {
    "api_key": "sk-proj-your-openai-key",
    "organization": "org-your-organization-id",
    "project": "proj_your-project-id",
    "webhook_secret": null,
    "websocket_base_url": null
  }
}
anthropic.json:
{
  "type": "anthropic",
  "config": {
    "api_key": "sk-ant-your-api-key",
    "base_url": "https://api.anthropic.com",
    "max_retries": 2,
    "default_headers": null,
    "anthropic_proxy": null,
    "timeout": null
  }
}
bedrock.json:
{
  "type": "bedrock",
  "config": {
    "region_name": "us-west-2",
    "api_version": null,
    "config": {
      "connect_timeout": 60,
      "read_timeout": 180
    },
    "use_ssl": true,
    "verify": null,
    "endpoint_url": null,
    "aws_access_key_id": "your_aws_access_key",
    "aws_secret_access_key": "your_aws_secret_key",
    "aws_session_token": null,
    "aws_account_id": null,
    "batch_role_arn": null,
    "batch_s3_bucket": null
  }
}
Encode the edited file, then set the output as the value of LLM_SERVICE_DEFAULT_PROVIDER_CONFIG in .env:
base64 -w0 anthropic.json
Set AI_LLM_CHAT_MODEL to the model the Assistant should use. See Supported Models for the current list of validated models. For optional model alias mappings and their behavior, see the LLM provider config examples in the AI Assistant Docker Repository.
IAM Permissions for Bedrock
The IAM user or role behind aws_access_key_id and aws_secret_access_key needs permissions to discover, invoke, and validate the models and guardrails the Assistant uses. Attach the following policy directly to the IAM user or role in AWS. It is separate from bedrock.json and is not part of LLM_SERVICE_DEFAULT_PROVIDER_CONFIG.
{
    "Version": "2012-10-17",
    "Statement": [
        {
            "Sid": "BedrockModelDiscovery",
            "Effect": "Allow",
            "Action": [
                "bedrock:GetFoundationModel",
                "bedrock:GetFoundationModelAvailability",
                "bedrock:ListFoundationModels"
            ],
            "Resource": "*"
        },
        {
            "Sid": "BedrockInferenceProfileDiscovery",
            "Effect": "Allow",
            "Action": [
                "bedrock:GetInferenceProfile",
                "bedrock:ListInferenceProfiles"
            ],
            "Resource": "*"
        },
        {
            "Sid": "BedrockModelInvocation",
            "Effect": "Allow",
            "Action": [
                "bedrock:InvokeModel",
                "bedrock:InvokeModelWithResponseStream"
            ],
            "Resource": [
                "arn:aws:bedrock:*::foundation-model/*",
                "arn:aws:bedrock:*:*:inference-profile/*",
                "arn:aws:bedrock:*:*:application-inference-profile/*"
            ]
        },
        {
            "Sid": "BedrockGuardrails",
            "Effect": "Allow",
            "Action": [
                "bedrock:ApplyGuardrail",
                "bedrock:GetGuardrail",
                "bedrock:ListGuardrails"
            ],
            "Resource": "*"
        },
        {
            "Sid": "IAMPolicySimulation",
            "Effect": "Allow",
            "Action": "iam:SimulatePrincipalPolicy",
            "Resource": "arn:aws:iam::<account-id>:user/<iam-user-name>"
        }
    ]
}
Replace <account-id> and <iam-user-name> in the IAMPolicySimulation statement resource with the account ID and user name of the IAM user you configure.
IAM permissions alone are not enough. AWS requires you to complete the model agreement, also called first-time use (FTU), for each Bedrock model before the model can be invoked.
PostgreSQL Databases
The Release Assistant and the LLM Service each need their own PostgreSQL database with its own user: dai_assistant and dai_llm. Both databases can live on the same PostgreSQL server, provided it runs PostgreSQL 14 or later.
Use Your Existing PostgreSQL Server
If you already operate PostgreSQL 14 or later (on-premises or managed, such as RDS, Aurora, or Azure Database for PostgreSQL), host the two AI Assistant databases on it. Create the databases and users with the init SQL from the repository, then point the stack at your server by setting POSTGRES_HOSTNAME, POSTGRES_PORT, and the RELEASE_ASSISTANT_DB_* and LLM_DB_* credentials in .env. To encrypt the connection, append sslmode to the database URLs. For the init SQL, TLS verification levels, and backup guidance, see the external PostgreSQL scenario in the AI Assistant Docker Repository.
Provision a New PostgreSQL Server
If your Release repository runs on a database other than PostgreSQL, such as Oracle or SQL Server, deploy the PostgreSQL container included in the stack, or provision a dedicated PostgreSQL 14 or later server and follow the same steps as above. Your Release repository database is not affected. AI Assistant reads Release data through the MCP server, not through the Release database.
The in-stack PostgreSQL service is defined in the test-lab compose file, so include both compose files and the with-postgres profile. With LLM_SERVICE_DEFAULT_PROVIDER_CONFIG already set in .env, start PostgreSQL first, then run the database initialization:
docker compose --project-directory . \
  -f docker-compose.yaml -f test-lab/docker-compose.yaml \
  --profile with-postgres up -d postgres

docker compose --project-directory . \
  -f docker-compose.yaml -f test-lab/docker-compose.yaml \
  --profile with-postgres --profile with-llm-service up llm-service-dbinit
Start llm-service-api and release-assistant later, as described in Step 4: Start the Services.
Authentication
AI Assistant authenticates users through your OIDC provider. The Assistant validates the user token against OIDC_ISSUER_URI, reads Release data through the embedded MCP server using that token, and the LLM Service validates the token audience.
Your identity provider needs two OIDC client registrations: one for Release and one for the Assistant. The Assistant client (registered as OAUTH2_TOKEN_CLIENT_ID) must have Standard token exchange enabled and an Audience mapper that adds the Release client ID to the aud claim. Without both of these settings, the exchanged token is rejected. These requirements are the same for every OIDC provider. The following sections cover the provider-specific setup.
Configure the Clients in Keycloak
On the Assistant client (the one registered as OAUTH2_TOKEN_CLIENT_ID):
- On the Settings tab, add
https://<assistant-public-fqdn>/login/oauth2/code/*to Valid redirect URIs. - On the Capabilities tab, enable Standard flow and Standard token exchange.
- Set Access token lifespan to 30 minutes (the AI Assistant default) and align it with your security policy.
- On the Mappers tab, add an Audience mapper named
Client Audiencewith Included Client Audience set to the Release client ID (the value ofRELEASE_OIDC_CLIENT_ID).
On the Release client, add https://<release-public-fqdn>/oidc-login to Valid redirect URIs and enable Standard flow. Standard token exchange is not required on the Release client. For the token verification commands, see the Keycloak client setup in the AI Assistant Docker Repository.
Use Digital.ai Platform Identity Service
If Release is integrated with the Digital.ai Platform identity service as its OIDC provider, register a second client for the Assistant with the same settings: Standard token exchange enabled and an Audience mapper that adds the Release client ID to the aud claim. For registering Release itself with the identity service, see Integrate Digital.ai Release.
Use Another Enterprise OIDC Provider
Keycloak and Okta are the validated OIDC providers. Any other compliant OIDC provider with a JWKS endpoint, such as Microsoft Entra ID, Ping Identity, or Auth0, uses the same conceptual settings. Only the navigation differs by vendor. Set OIDC_ISSUER_URI, OAUTH2_TOKEN_CLIENT_ID, OAUTH2_TOKEN_CLIENT_SECRET, and OAUTH2_SCOPES in .env, and override OIDC_JWK_SET_URI only if your provider uses a non-standard layout. For the full client settings, see the enterprise OIDC scenario in the AI Assistant Docker Repository.
Deploy
Get the Docker Compose files and helper scripts from the AI Assistant Docker Repository, then follow these steps.
Step 1: Verify Hostname Resolution
Release, the Assistant, and the identity provider must resolve to the same fully qualified hostnames across the browser and the services, so TLS certificate names and the OIDC issuer stay consistent. In production, these hostnames already resolve through your DNS. Confirm that the same FQDNs are used in RELEASE_PUBLIC_URL, RELEASE_ASSISTANT_PUBLIC_URL, and OIDC_ISSUER_URI.
Step 2: Enable AI Assistant in Release
In your xl-release.conf or xl-release-local.conf, set the Release Assistant URL and enable the AI feature:
features {
  ai {
    assistant-url = "https://release-assistant.example.com:8090"
    enabled = true
  }
}
Restart Release after this change.
Step 3: Configure the Environment
Create a .env file in the project root (copy the repository's .env.base template). At minimum set the OIDC issuer (OIDC_ISSUER_URI), the Assistant OAuth client (OAUTH2_TOKEN_CLIENT_ID, OAUTH2_TOKEN_CLIENT_SECRET), the Release URL (RELEASE_PUBLIC_URL), the Release Assistant database connection, and the image references. For local LLM mode, also set the LLM database, model provider, and tenancy values. For the full variable list, defaults, and LLM provider examples, see the AI Assistant Docker Repository.
Store secrets such as the OAuth client secret, database passwords, and the LLM provider config in a secret manager and inject them at runtime. Do not commit .env.
Change the Model or Provider Later
After the deployment is running, change the model or provider by updating .env and recreating the affected services:
- Change the model within the same provider: Set
AI_LLM_CHAT_MODELin.envto the new model name and recreate the Assistant withdocker compose up -d release-assistant. See Supported Models for the current list of validated models. - Change the provider: Update
LLM_SERVICE_DEFAULT_PROVIDER_CONFIGin.envwith the new provider JSON, re-runllm-service-dbinit, and recreate the services withdocker compose up -d llm-service-api release-assistant.
Step 4: Start the Services
Run the one-shot llm-service-dbinit from PostgreSQL Databases first and wait for it to exit, then start the long-running services:
docker compose --project-directory . \
  --profile with-llm-service up -d llm-service-api release-assistant
If you deploy the in-stack PostgreSQL instead of using an existing server, use the combined compose files and profiles shown in Provision a New PostgreSQL Server. For a deployment that uses an external LLM endpoint instead of the local LLM Service, start only release-assistant. For the full set of profiles and command variants, see the AI Assistant Docker Repository.
Step 5: Verify
Check the health endpoints:
curl http://release-assistant.example.com:8090/actuator/health/liveness
curl http://llm-service.example.com:9000/llm/utility/ping
A healthy Release Assistant returns HTTP 200 with liveness UP. The LLM /llm/utility/ping endpoint returns HTTP 200 with an empty body when healthy, so judge it by the status code. Then run an end-to-end chat test in the Release UI and one RBAC negative test to confirm a user cannot retrieve data they are not authorized to view.
Upgrade and Rollback
Upgrade the Release Assistant and the LLM Service as a coordinated set, and always back up the two databases before running llm-service-dbinit.
Upgrade
-
Record the currently running image tags and back up the
dai_assistantanddai_llmdatabases. -
Pull the target images:
docker compose pull llm-service-api release-assistant llm-service-dbinit. -
Plan a maintenance window unless online migration compatibility is confirmed for the target version pair.
-
Run the one-shot schema migration:
docker compose --profile with-llm-service up llm-service-dbinit. -
Restart the services in order:
llm-service-api, thenrelease-assistant.docker compose restart llm-service-api release-assistant -
Verify the health endpoints and run an end-to-end chat test in the Release UI.
Roll Back
- Stop the affected services.
- Revert the image tags in
.envto the previous known-good versions. - If a schema or data incompatibility is detected, restore the
dai_assistantanddai_llmdatabases from the backup taken before the upgrade. - Start the services and verify the health endpoints and the end-to-end chat path.
For the upgrade coordination model, downtime guidance, and llm-service-dbinit rerun behavior, see the upgrade and operations notes in the AI Assistant Docker Repository.
TLS Note
If the Release Assistant uses a self-signed certificate, open the Release Assistant health URL in the browser once and accept the certificate warning before using AI Assistant in the Release UI.