Deploy to podman Using Digital.ai Deploy
Before you Begin
This how-to demonstrates how you can leverage the Digital.ai Deploy application's DevOps as code capabilities (deployment manifest files) and deploy applications, files, and folders to a podman container. It also illustrates how you can create pods, volumes, networks, and secrets using Digital.ai Deploy manifest files. You can also map a podman host's port to a podman container's port using a manifest file.
This tutorial involves working with a variety of tools and technologies such as podman, Digital.ai Deploy, XL CLI, Digital.ai Deploy's DevOps as code repositories (YAML manifest files), and so on. You can perform this task by simply following the instructions. However, being familiar with these tools and technologies can help you considerably when you try this out in your test environment.
What's the objective?
Deploy an application, file or folder to a podman container using Digital.ai Deploy. Also, learn how to create the following podman resources using the Digital.ai Deploy YAML manifest files:
- pod
- volume
- network
- secret
What do you need?
- A GitHub account
- A Linux or Windows server (with root and Internet access) to install and work with
- Digital.ai Deploy 22.3 (or later) with xld-podman-integration.xldp plugin installed
- XL CLI 22.3 (or later)
- A Linux server (with root and Internet access) to install and work with podman
- A public IP to access the podman host
What do you have?
We have created a xebialabs-community/how-to GitHub repository that hosts the following.
- An application DAR file to create a deployment package of the web application in Digital.ai Deploy for use with this example deployment
- The environment.yaml and infrastructure.yaml manifest files to create the podman infrastructure and environment in Digital.ai Deploy
How does it work?
Here's a high-level overview of how this works. A more elaborate step-by-step is available later in this topic.
- Install podman.
- Install Digital.ai Deploy.
- Install the XL CLI.
- Install the xld-podman-integration.xldp plugin for Digital.ai Deploy.
- Fork the xebialabs-community/how-to GitHub repository.
- Update the deployment manifest files (infrastructure.yaml and environment.yaml) to connect to your podman host.
- Use the XL CLI to create the Deploy configuration items (infrastructure and environment) using the DevOps As Code YAML manifest files (infrastructure.yaml and environment.yaml).
- Import the application DAR file.
- Deploy the application to podman.
Set up Your Deploy and podman Hosts
-
Install podman on the podman host.
-
In a cloud setup, configure a public IP to access the podman host via internet.
-
Start the podman API service with the following command.
podman system service tcp:localhost:8081 --log-level=debug --time=0 -
Prepare your Digital.ai Deploy Linux host.
-
Install Digital.ai Deploy.
-
Install and configure the XL CLI.
-
Contact the Digital.ai Support and get the xld-podman-integration.xldp plugin.
-
Make sure you keep the xld-podman-integration plugin xld-podman-integration.xldp file at
<xl-deploy-server-home>/plugins/xld-officialdirectory. -
Run the following command to start your Deploy server.
run.sh -plugin-source=filesystem
-
-
Fork the xebialabs-community/how-to GitHub repository. Suppose you fork the repository to the user's home directory (for example,
/home/john). -
Update the
environment.yamlandinfrastructure.yamlmanifest files in the forked repository. Here's an example.infrastructure.yaml
apiVersion: xl-deploy/v1kind: Infrastructurespec:- name: Infrastructure/localhosttype: podman.EnginepodmanHost: http://127.0.0.1:8081 # the url of your podman hostImportant: Make sure you update the
nameandpodmanHostkeys with values that suit your environment.environment.yaml
apiVersion: xl-deploy/v1kind: Environmentsspec:- name: Environments/localEnvtype: udm.Environmentmembers:- Infrastructure/localhostImportant: Make sure you update the
nameandmemberskeys with values that suit your environment. -
Use XL CLI and create the Deploy configuration items.
-
Run the following XL CLI commands to create the deployment environment and infrastructure.
xl apply -f environment.yamlxl apply -f infrastructure.yaml
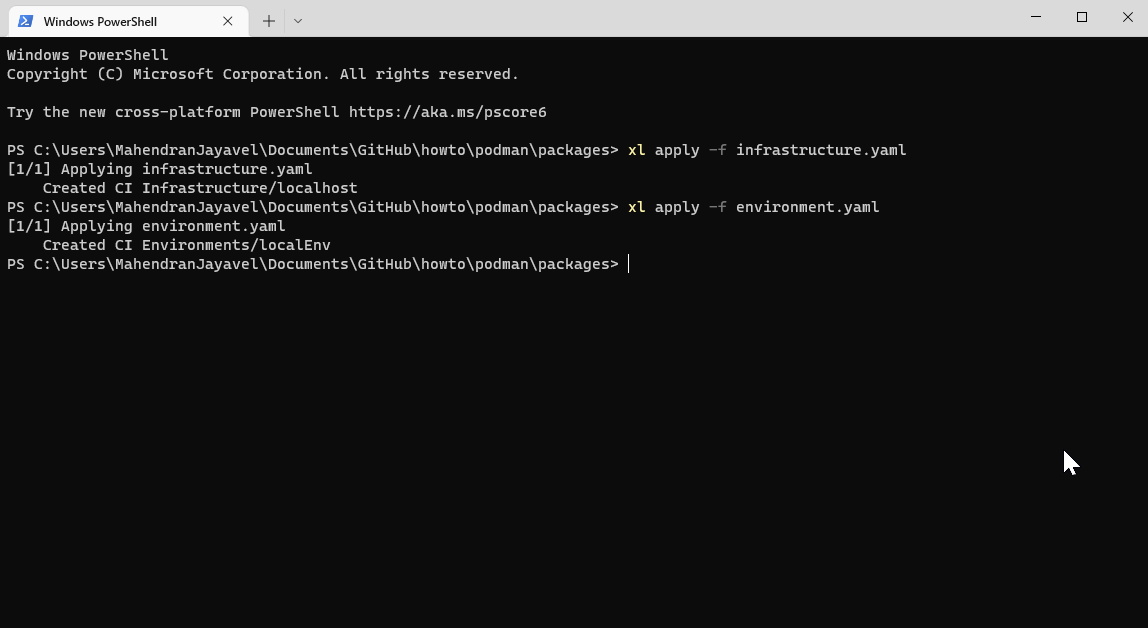
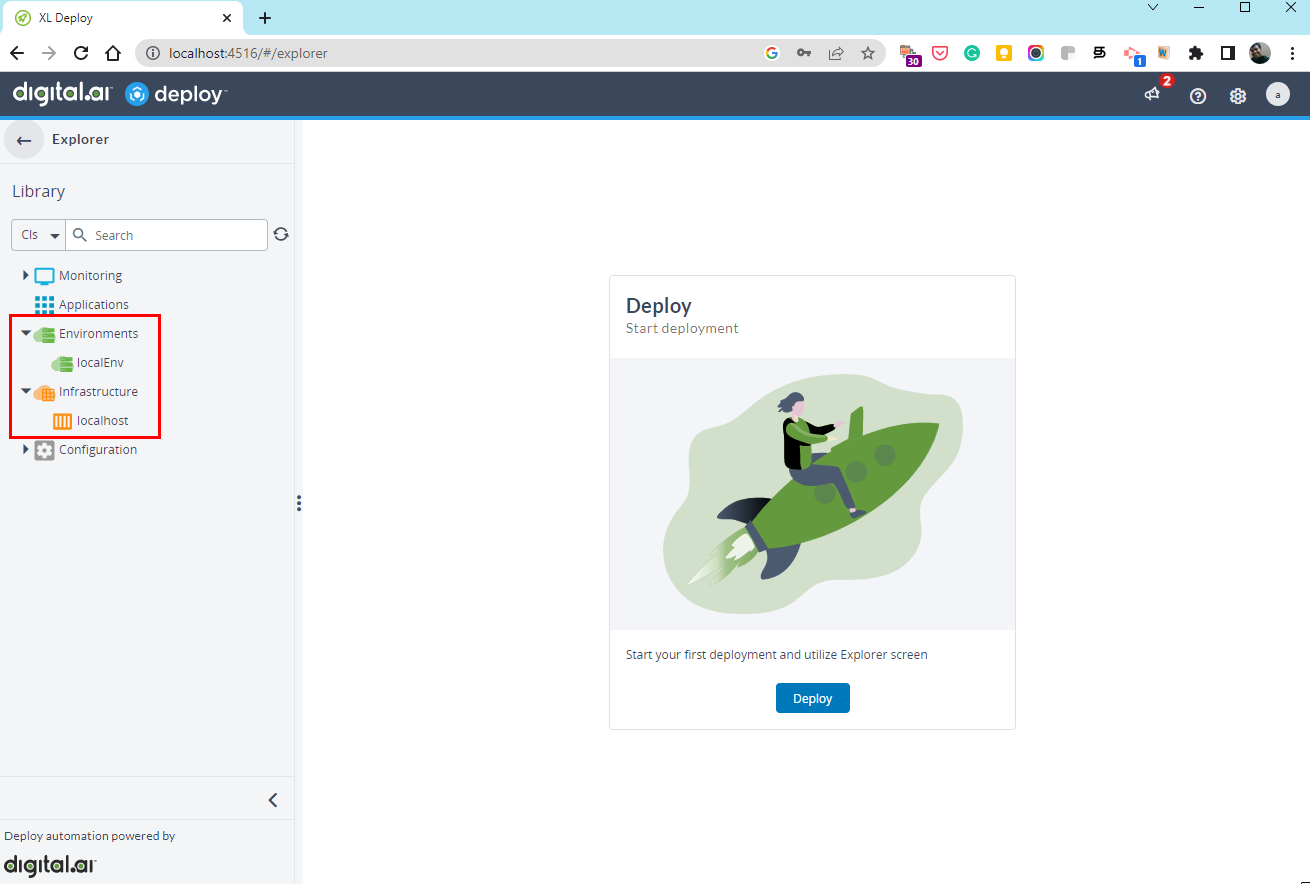
The Environment and Infrastructure configuration items are now created.
-
-
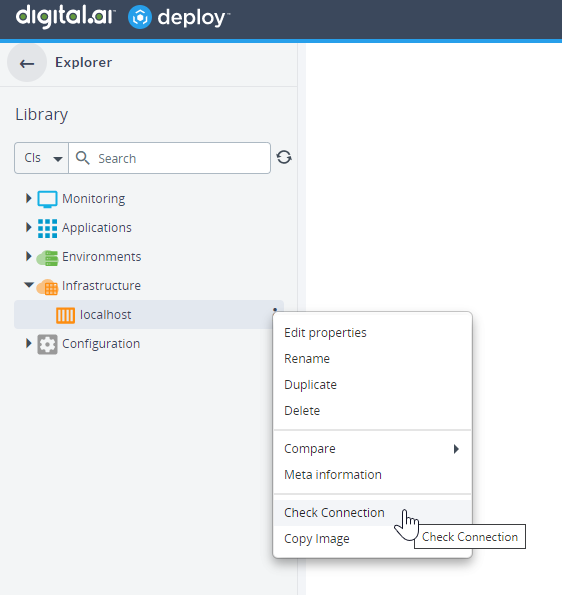
Once the infrastructure is created, check connection with the podman host.
-
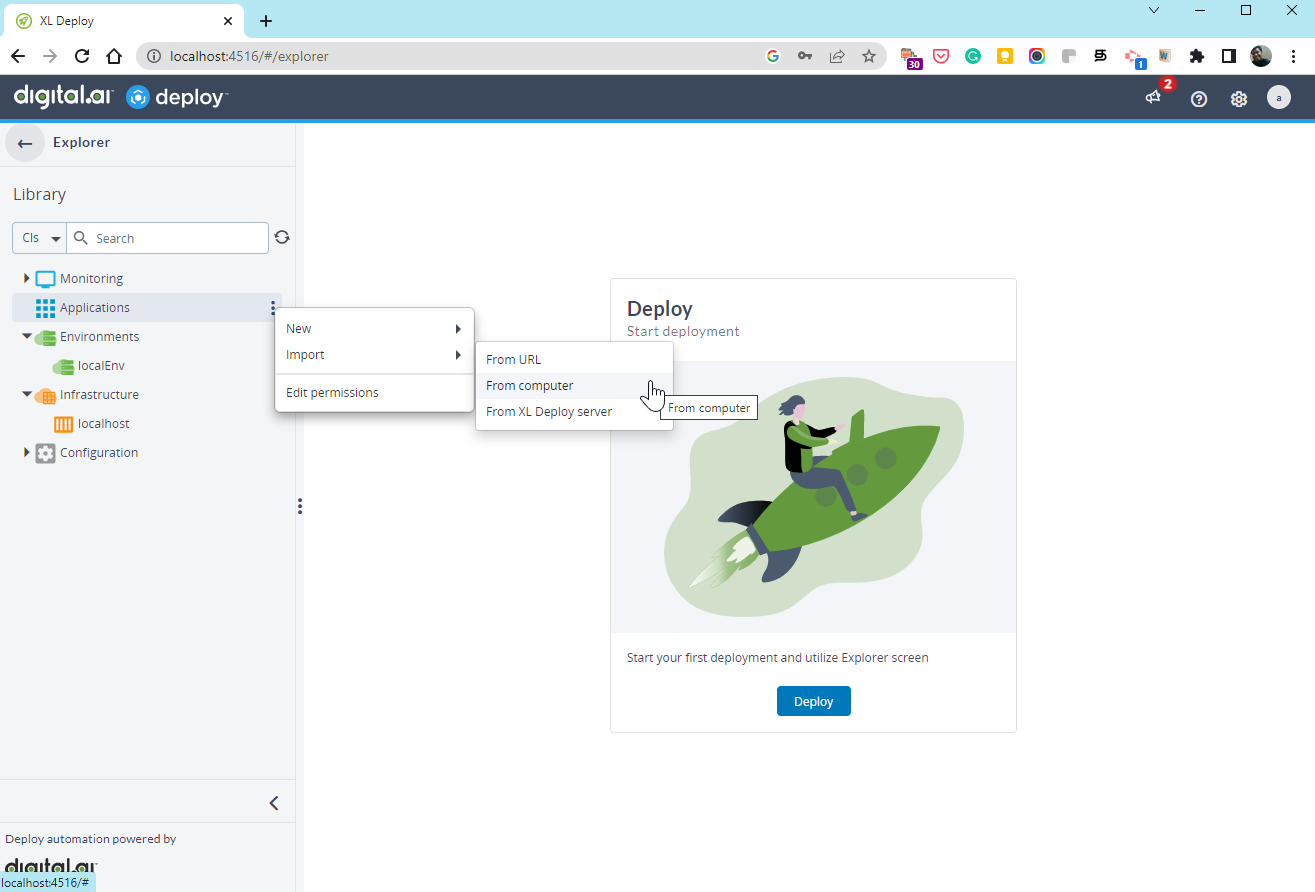
Import the application DAR file.
-
Select Applications > Import > From Computer.
-
Click Browse and select the
newpodapp-1.0.darfrom the forked repo.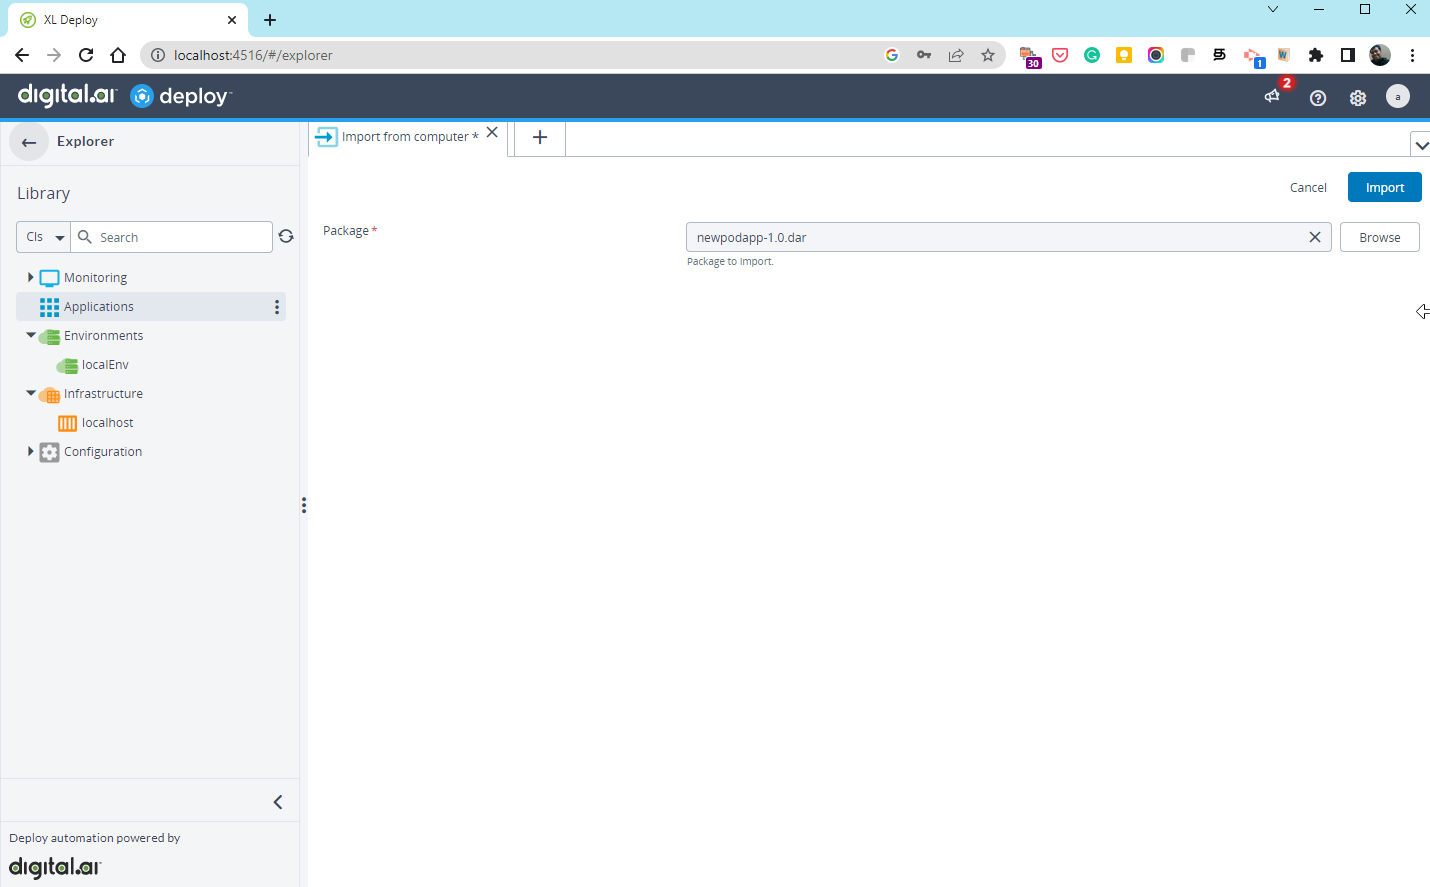
-
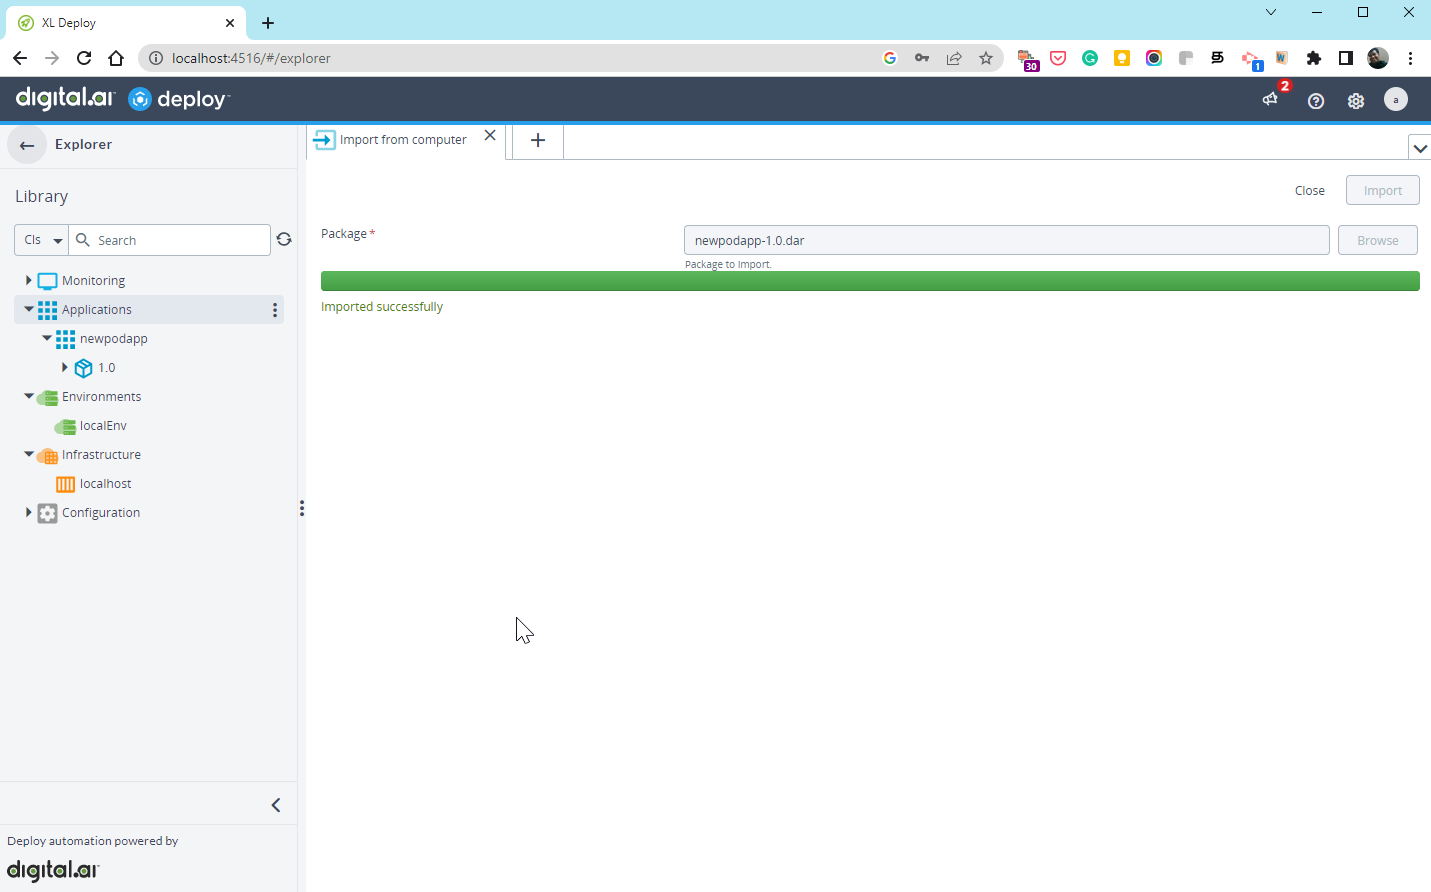
Click Import and make sure the DAR package is imported successfully.
-
Deploy Application to a podman Container
-
Hover over the deployment package, click the ellipses icon
 select New > podman and click ContainerSpec.
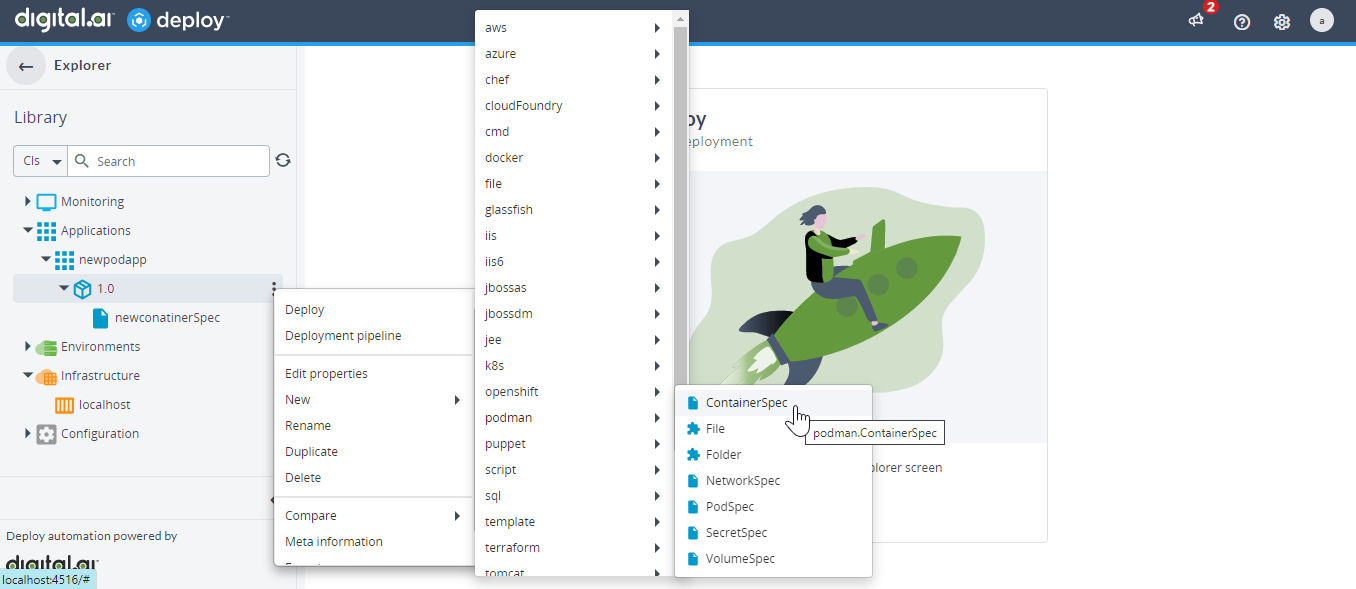
-
Type the details of the container such as the container name, image name, and so on and click Save.
Here's an example specification for the
podman.ContainerSpec.<?xml version="1.0" encoding="UTF-8"?><udm.DeploymentPackage version="1.0" application="Test-Container-Spec"><application /><orchestrator /><deployables><podman.ContainerSpec name="/newcont"><tags /><containerName>sample-newcontainer2505</containerName><image>docker.io/library/tomcat:latest</image><labels /><environment /><showLogsAfter>1</showLogsAfter><networks /><dnsOptions /><links /><portBindings /><volumeBindings /></podman.ContainerSpec></deployables><applicationDependencies /><dependencyResolution>LATEST</dependencyResolution><undeployDependencies>false</undeployDependencies><templates /><boundTemplates /></udm.DeploymentPackage> -
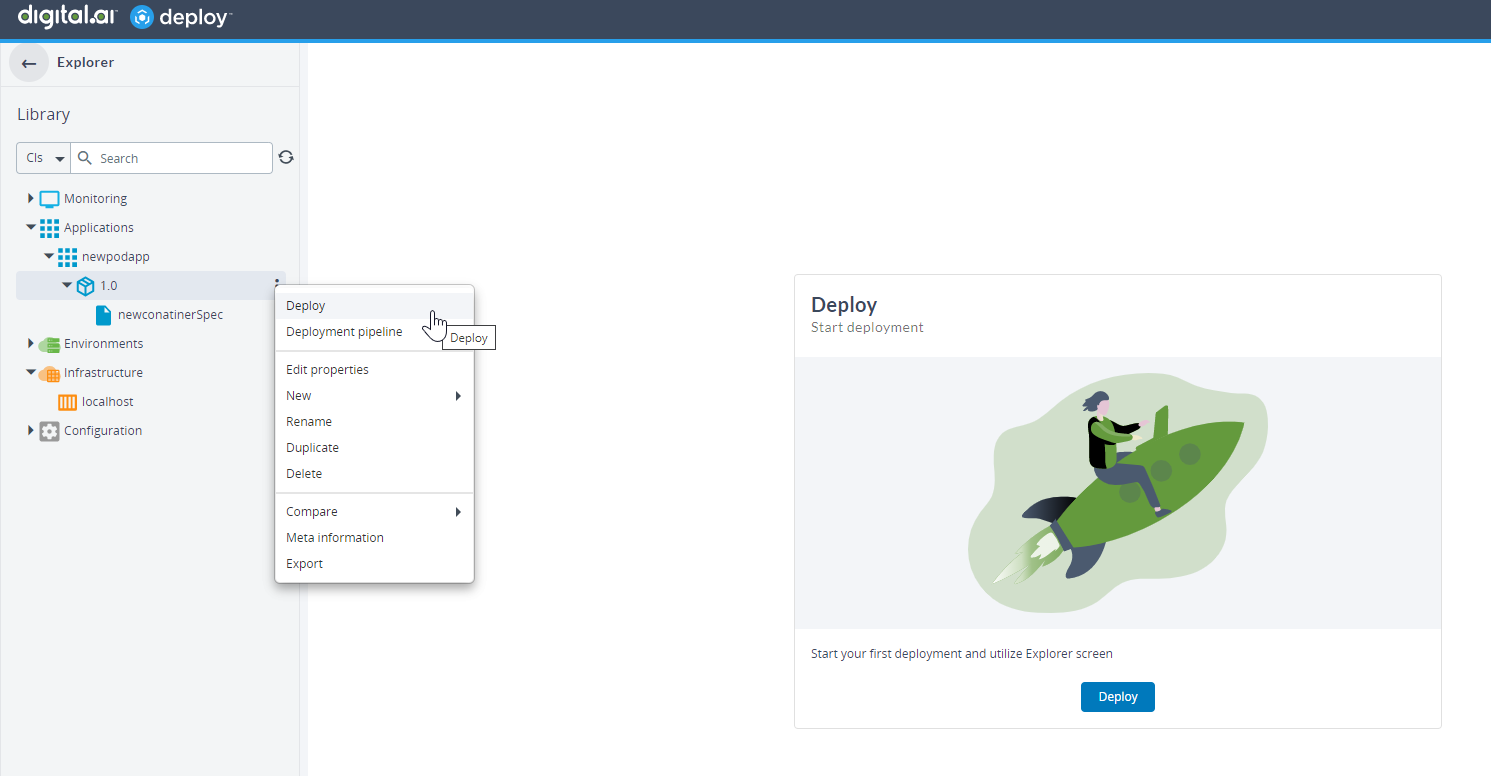
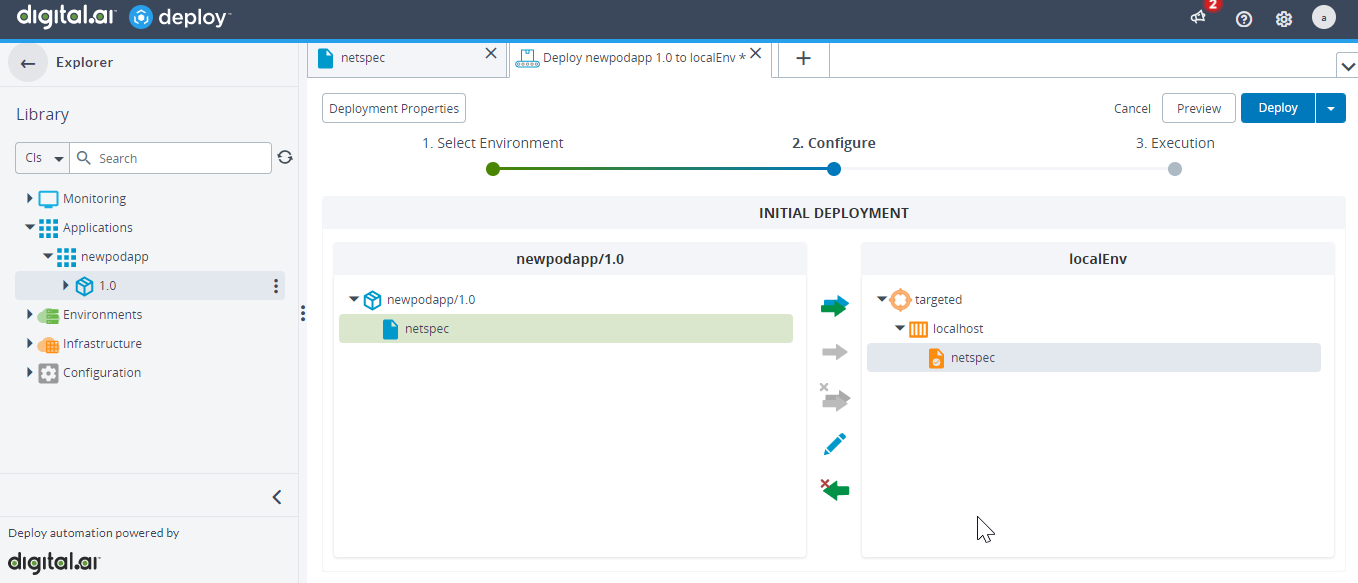
Hover over the deployment package, click the ellipses icon and select Deploy.
-
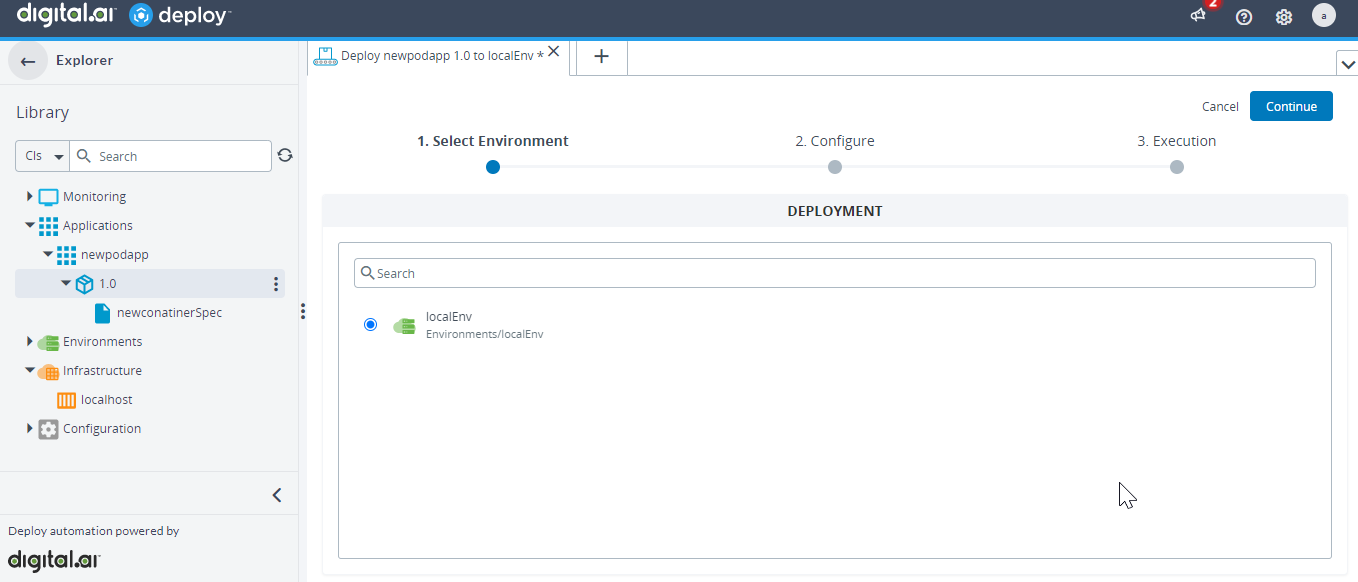
Select the target environment.
-
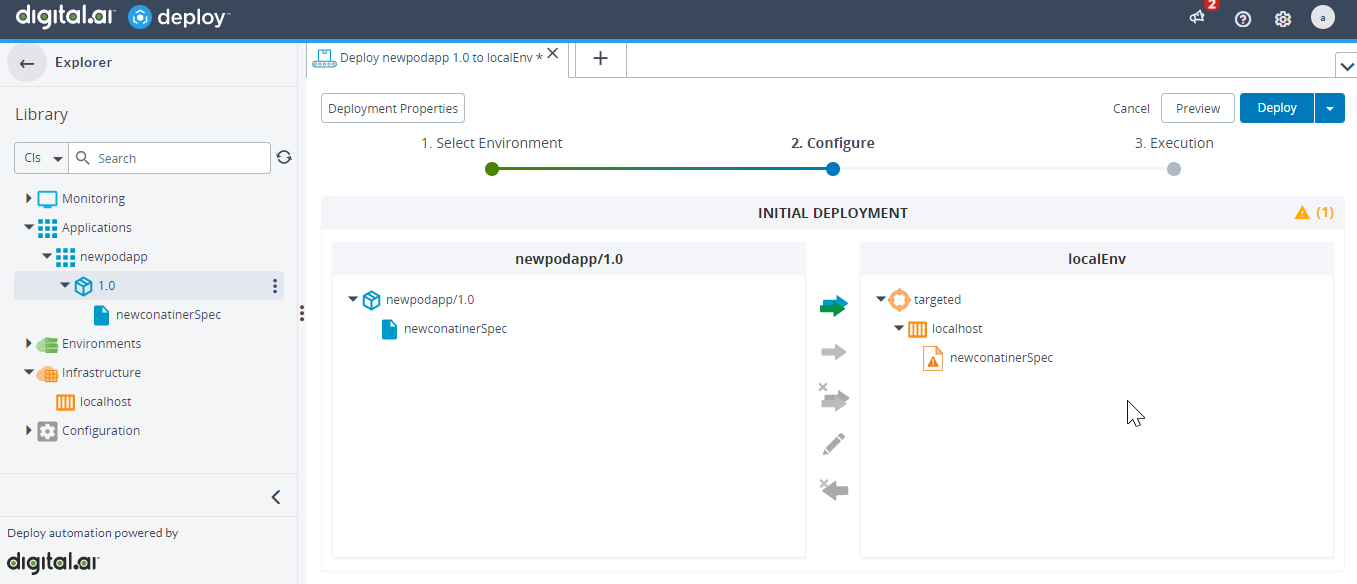
Click Continue.
-
Click Deploy.
Deploy Application to a Pod
-
Hover over the deployment package, click the ellipses icon
select New > podman and click PodSpec. -
Type the details of the pod such as the pod name, cpu_period, cpu_quota, and so on and click Save.
Here's an example specification for the
podman.PodSpec.<?xml version="1.0" encoding="UTF-8"?><udm.DeploymentPackage version="1.0" application="Test-Pod-Spec"><application /><orchestrator /><deployables><podman.PodSpec name="/newpod"><tags /><PodName>sample-newpod2505</PodName><labels /><cpu_period>1</cpu_period><cpu_quota>1</cpu_quota><infra_command /><no_infra>true</no_infra><no_manage_hosts>true</no_manage_hosts><start_pod>false</start_pod><pod_create_command /><pod_devices /><portmappings /></podman.PodSpec></deployables><applicationDependencies /><dependencyResolution>LATEST</dependencyResolution><undeployDependencies>false</undeployDependencies><templates /><boundTemplates /></udm.DeploymentPackage> -
Hover over the deployment package, click the ellipses icon and select Deploy.
-
Select the target environment.
-
Click Continue.
-
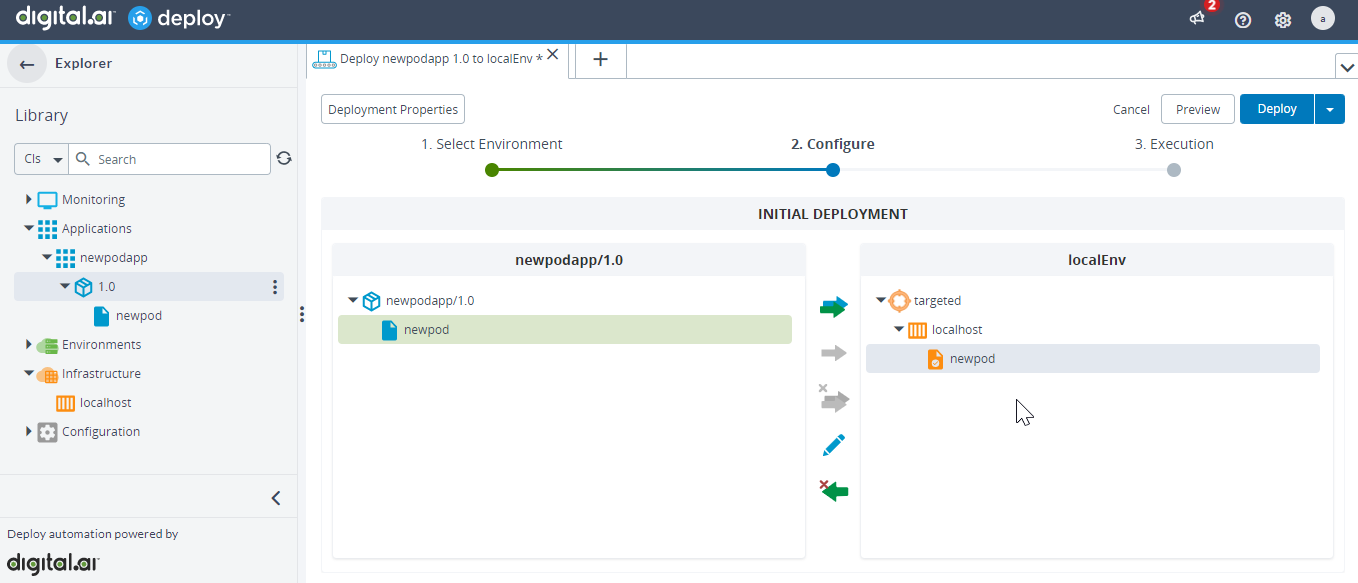
Click Deploy.
Deploy to a podman Volume
-
Hover over the deployment package, click the ellipses icon
select New > podman and click VolumeSpec. -
Type the details of the volume such as the volume name, driver, and so on and click Save.
Here's an example specification for the
podman.VolumeSpec.<?xml version="1.0" encoding="UTF-8"?><udm.DeploymentPackage version="1.0" application="Test-Volume-Spec"><application /><orchestrator /><deployables><podman.VolumeSpec name="/newvol"><tags /><volumeName>sample-newvol2505</volumeName><driver>local</driver><driverOptions /><labels /></podman.VolumeSpec></deployables><applicationDependencies /><dependencyResolution>LATEST</dependencyResolution><undeployDependencies>false</undeployDependencies><templates /><boundTemplates /></udm.DeploymentPackage> -
Hover over the deployment package, click the ellipses icon and select Deploy.
-
Select the target environment.
-
Click Continue.
-
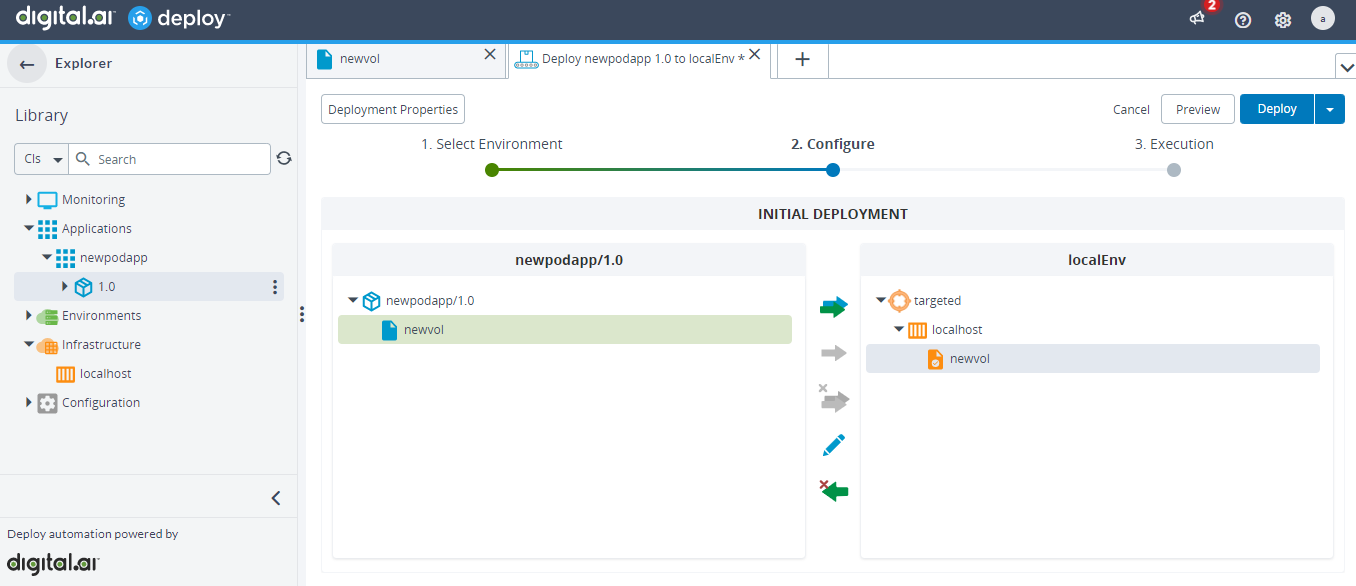
Click Deploy.
-
Run the following command to verify if the volume is created.
podman volume ls
Attach a Volume to a podman Container
-
Hover over the created container, click the ellipses icon > New, and then select MountedVolumeSpec.
-
Type a name for the application version, specify a name for the volume, type the path to the podman container where the volume will be attached in the Mountpoint field, and set the default value to
falsein the Read Only field. -
Deploy the created package to the target environment.
The podman container is created with the mounted volume attached at the mount point.
Create a podman Network
-
Hover over the deployment package, click the ellipses icon
select New > podman and click NetworkSpec. -
Type the details of the network such as the network name, driver, and so on and click Save.
Here's an example specification for the
podman.NetworkSpec.<?xml version="1.0" encoding="UTF-8"?><udm.DeploymentPackage version="1.0" application="Test-Network-Spec"><application /><orchestrator /><deployables><podman.NetworkSpec name="/netspec"><tags /><networkName>sample-newnet2505</networkName><driver>bridge</driver><networkOptions /></podman.NetworkSpec></deployables><applicationDependencies /><dependencyResolution>LATEST</dependencyResolution><undeployDependencies>false</undeployDependencies><templates /><boundTemplates /></udm.DeploymentPackage> -
Hover over the deployment package, click the ellipses icon and select Deploy.
-
Select the target environment.
-
Click Continue.
-
Click Deploy.
-
Log on to your podman host and run the following command.
podman network inspect <network_name> -
Run the following command to verify if the network is created.
podman network ls
Map a podman Container Port to a podman Host
Port mapping is used to map the host port with the container port.
-
Create a container inside an application with a deployment package.
-
Hover over the created container, click the ellipses icon
select New > podman and click PortSpec.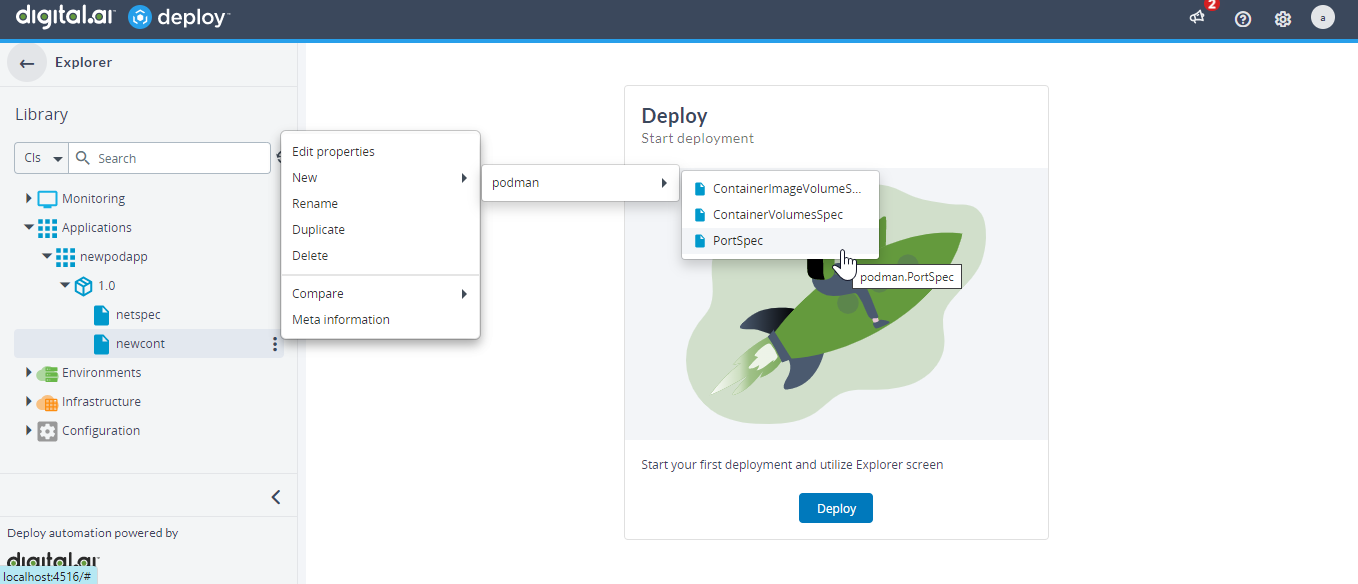
-
Type a name for the PortSpec.
-
Type the port of the podman host that will be mapped to the container in the Host Port field.
-
Type the port of the container thatw ill be mapped to the podman host in the Container Port field.
-
Type the name of the protocol, for example tcp, over which the connection will be established in the Protocol field.
-
Click Save to save the PortSpec.
-
Hover over the deployment package, click the ellipses icon and select Deploy.
-
Select the target environment.
-
Click Continue.
-
Click Deploy and verify the network port mapping.
Create a podman Secret
-
Hover over the deployment package, click the ellipses icon
select New > podman and click SecretSpec. -
Type the details of the secret such as the Secret Name, Driver (optional), Secret (a value for the secret), and click Save.
Here's an example specification for the
podman.SecretSpec.<?xml version="1.0" encoding="UTF-8"?><udm.DeploymentPackage version="1.0" application="podapp"><application /><orchestrator /><deployables><podman.SecretSpec name="/secretspec"><tags /><secretName>secretname</secretName><driver>file</driver><secret>secretvalue</secret></podman.SecretSpec></deployables><applicationDependencies /><dependencyResolution>LATEST</dependencyResolution><undeployDependencies>false</undeployDependencies><templates /><boundTemplates /></udm.DeploymentPackage> -
Hover over the deployment package, click the ellipses icon and select Deploy.
-
Select the target environment.
-
Click Continue.

-
Click Deploy.
-
Run the following command to verify if the secret is created.
podman secret ls
Deploy a File to a podman Container
-
Create an application and a deployment package. For more information, see Add a package to Deploy.
-
Hover over the deployment package, click the ellipses icon
select New > podman and click File. -
Type a FileSpec name.
-
Type the File URI (or click Browse from the Choose File field and select the file), Target Container (specify the container ID), Target Path (specify the path to the directory inside the container), and click Save.
Here's an example specification for the
podman.File.<?xml version="1.0" encoding="UTF-8"?><udm.DeploymentPackage version="1.0" application="podapp"><application /><orchestrator /><deployables><podman.File name="/filetype" file="/filetype/wls-issue.docx"><tags /><scanPlaceholders>true</scanPlaceholders><preScannedPlaceholders>false</preScannedPlaceholders><placeholders /><checksum>225ced63f77e38e436c7c595fbdbc882be239580f892a3cbdf29f1d12b11b0ef</checksum><fileEncodings><entry key=".+\.properties">ISO-8859-1</entry></fileEncodings><isRescanned>false</isRescanned><targetContainer>conatinerId</targetContainer><targetPath>/tmp</targetPath></podman.File></deployables><applicationDependencies /><dependencyResolution>LATEST</dependencyResolution><undeployDependencies>false</undeployDependencies><templates /><boundTemplates /></udm.DeploymentPackage> -
Hover over the deployment package, click the ellipses icon and select Deploy.
-
Select the target environment.
-
Click Continue.
-
Click Deploy.
-
To verify if the file is deployed to the podman container, log on to the container with bash and verify the deployment.
Deploy a Folder to a podman Container
You must have the folder zipped before you deploy the folder to the container.
-
Create an application and a deployment package. For more information, see Add a package to Deploy.
-
Hover over the deployment package, click the ellipses icon
select New > podman and click Folder. -
Type a FolderSpec name.
-
Type the Folder URI (or click Browse from the Choose File field and select the zip file of the folder), Target Container (specify the container ID), Target Path (specify the path to the directory inside the container), and click Save.
Here's an example specification for the
podman.Folder.<?xml version="1.0" encoding="UTF-8"?><udm.DeploymentPackage version="1.0" application="podapp"><application /><orchestrator /><deployables><podman.Folder name="/folderfile" file="/folderfile/podapp-1.0.zip"><tags /><scanPlaceholders>true</scanPlaceholders><preScannedPlaceholders>false</preScannedPlaceholders><placeholders /><checksum>5e7cc41f1f5068f967f70a41ba19d1b9618eecaf778a46fb948a0b4e197bc7f9</checksum><fileEncodings><entry key=".+\.properties">ISO-8859-1</entry></fileEncodings><isRescanned>false</isRescanned><targetContainer>containerID</targetContainer><targetPath>/tmp</targetPath></podman.Folder></deployables><applicationDependencies /><dependencyResolution>LATEST</dependencyResolution><undeployDependencies>false</undeployDependencies><templates /><boundTemplates /></udm.DeploymentPackage> -
Hover over the deployment package, click the ellipses icon and select Deploy.
-
Select the target environment.
-
Click Continue.
-
Click Deploy.
-
To verify if the folder is deployed to the podman container, log on to the container with bash and verify the deployment.