Manage Custom Reports
Organize, modify, share, and run your custom reports effectively in Digital.ai Agility Analytics.
Overview
Report management includes:
- Creating folders to organize reports
- Renaming and modifying report properties
- Moving reports between folders
- Copying reports to shared areas
- Running reports with parameters
- Deleting obsolete reports
Organize Reports with Folders
Create folders to organize reports logically and keep your workspace manageable.
Create Report Folders
To create a new folder:
-
Navigate to the report area where you want to create the folder:
- Personal Reports - Private to your account
- Shared Reports - Available to all users
-
Hover over the Add button and select Folder from the list

- Enter a Folder name
- (Optional) Add a Description for the folder
- Click Save to create the folder
The new folder appears in the report list.
Modify Folder Properties
To modify a report folder:
- Click the
 icon next to the folder name
 - Update the folder name or description as needed
- Click Save to commit changes
The Name column reflects the changes and the Last Modified column updates to the current timestamp.
Delete Report Folders
To delete one or more folders:
- Select folders by enabling their checkboxes
- Click the Delete button
- Click OK to confirm removal
Deleting a folder also deletes all reports contained within it. Move important reports to other folders before deleting.
Move Reports Between Folders
Organize reports by moving them into appropriate folders.
To move a report:
-
Use one of these methods:
- Single report: Hover over the
 icon and select Move from the actions list
 - Multiple reports: Select reports using checkboxes and click the Move button
- Single report: Hover over the
-
From the Destination Folder Type dropdown, select a folder type:
- Personal Reports
- Shared Reports
-
(Optional) From the Folder tree, select a specific folder within that area
-
Click Save to move the report(s)
Reports disappear from the original location and appear in the destination folder.
Modify Reports and Dashboards
Update report definitions, properties, and settings as your reporting needs evolve.
Modify Report Definitions
To modify a report's content:
-
Hover over the
icon for the report -
Select Modify from the dropdown list
-
The Report Builder opens with the existing report definition
-
Make changes to:
- Data sources
- Display elements
- Filters and parameters
- Formatting and styles
-
Save the modified report
Use the Report Builder to modify reports and the Dashboard Builder to modify dashboards.
Rename Reports
To rename a report or dashboard:
- Hover over the icon for the report
- Select Rename from the dropdown list
- The Report Details dialog appears
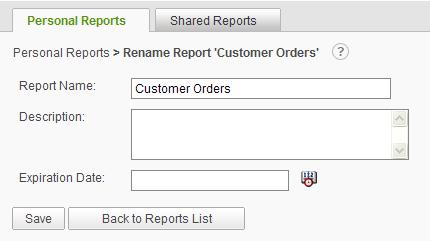
- Modify the Report Name
- (Optional) Update the Description
- (Optional) Set an Expiration Date for time-sensitive reports
- Click Save to commit changes
Use descriptive report names that clearly indicate the report's purpose and content. Include the date range or data scope in the name when appropriate.
Set Report Expiration Dates
Expiration dates designate when time-sensitive reports become obsolete.
To set an expiration date:
- Follow the steps to rename a report above
- In the Expiration Date field, select a date in the future
- Click Save
Expired reports are marked visually and can be filtered or deleted.
The expiration date must be greater than the current date.
Delete Reports
Remove reports that are no longer needed to keep your workspace organized.
To delete one or more reports:
- Select the reports by enabling their checkboxes
- Click the Delete button
- Click OK to confirm removal
Deleted reports are permanently removed and cannot be recovered.
Share Reports
Copy reports to the Shared Reports area to make them available to all users.
Copy Reports to Shared Area
To share a report:
-
Use one of these methods:
- Single report: Hover over the icon and select Copy from the dropdown list
- Multiple reports: Select reports using checkboxes and click the Copy button
- Single report: Hover over the
-
The Copy Report dialog appears
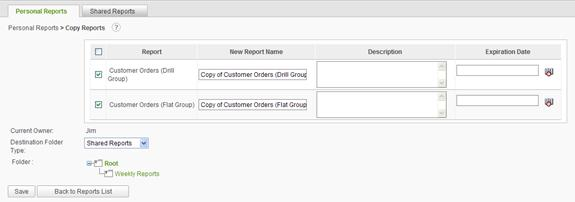
- Enter a New Report Name for the shared copy
- From the Destination Folder Type dropdown, select Shared Reports
- (Optional) Select a specific folder within Shared Reports
- (Optional) Set an Expiration Date for the report
- Click Save to create the shared copy
The report appears in the Shared Reports area with the new name.
When a report is copied, the name is prefixed with "Copy of" to distinguish it from the original. If copied multiple times, a number appears: "Copy (2) of Report Name".
Understanding Shared Reports Security
Access Levels:
- All users: Can view any report in Shared Reports
- All users: Can copy shared reports, edit the copy, and save under a new name
- All users: Can create and save new reports in the Shared Reports folder
- Admin users: Can edit ALL reports in the Shared Reports section
- Non-admin users: Can only edit their own reports (but can copy and modify others' reports)
Shared Folder Permissions:
- All folders created under Shared Reports have the same access rights as the top-level shared folder
- There is no way to create a shared folder with restricted rights for specific users or groups
- All shared content is visible to all logged-in users
To share reports with specific people only, instruct them to copy your report from Personal Reports to their Personal Reports area instead of using Shared Reports.
Run Reports
Execute reports to view current data from the Data Mart database.
Run Basic Reports
To run a report:
- Navigate to Personal Reports or Shared Reports
- Click the report name to launch it in a new browser window
The report renders with data from the Data Mart.
Run Reports with Parameters
If the report includes ask parameters (runtime filters), you can modify values before running.

To run a report with parameters:
-
Click the report name to open it
-
The parameter input box appears with default values
-
Modify parameter values as needed:
- Enter text values
- Select from dropdownslists
- Choose dates from date pickers
- Check or uncheck boolean options
-
Choose how to run the report:
- Run and Hide Parameters running the report and hides the parameter input box (provides more screen space)
- Run - Runs the report and leaves the parameter input box visible (allows quick parameter changes)
-
The report renders with the selected parameter values
Date values less than 01/01/1753 cannot be specified.
For reports with numerous parameters, click Run and Hide Parameters to maximize screen space for viewing results. Run the report again if you need to change parameters.
Use Cascading Filter Parameters
Cascading filters create dependent dropdown menus where each selection filters the next menu's options.

To use cascading filters:
- Select a value from the first dropdown menu
- The second dropdown menu updates to show only relevant values based on the first selection
- Continue selecting from each subsequent dropdown
- The last parameter is selected from the filtered list
- Click Run to execute the report with the cascading filter values
Cascading filters help narrow down data progressively, ensuring meaningful parameter combinations.
Best Practices
Folder Organization:
- Create a logical folder structure that matches your team's workflow
- Use folders for different time periods (Q1 2026, Q2 2026)
- Organize by report type (Sprint Reports, Portfolio Reports, Velocity Reports)
- Keep the root folder clean by moving active reports into appropriate folders
Naming Conventions:
- Use descriptive names that indicate report content and scope
- Include date ranges or sprint numbers when applicable
- Prefix shared reports with team or area names (e.g., "Platform Team - Velocity Report")
- Be consistent with naming patterns across similar reports
Sharing Strategy:
- Keep experimental or draft reports in Personal Reports
- Only promote polished, validated reports to Shared Reports
- Set expiration dates on time-sensitive reports to prevent confusion
- Document report purpose in the description field
Report Maintenance:
- Review and delete obsolete reports regularly
- Update report parameters when project structure changes
- Test shared reports after modifying to ensure they still work correctly
- Archive historical reports to separate folders rather than deleting
Parameter Usage:
- Design ask parameters for the most common filter scenarios
- Provide sensible default values to reduce user effort
- Use cascading filters for complex, multi-level selections
- Document parameter meanings in report descriptions or labels
Related Topics
- Build Custom Reports - Create new custom reports
- Export Custom Reports - Save reports in multiple formats
- Dashboards - Add reports to dashboards
- Custom Reporting and Data Mart - Overview of reporting capabilities