Import Data from Excel
Bulk import data into Digital.ai Agility from a Microsoft Excel spreadsheet.
Who Imports Data from Excel
- Product Owners: Bulk import backlog items and portfolio items when migrating from other systems or creating initial project backlogs.
- Scrum Masters: Import stories and defects for multiple teams during project setup or data migration.
- System Administrators: Perform bulk imports across multiple projects and configure import templates for organization-wide use.
- Team Members: Import tasks and test cases when transitioning from spreadsheet-based tracking.
Permission Requirement
To import data, you must have Edit access to the Product Planning area for the target project(s). To import portfolio items, you must have Edit access at the portfolio level. System Administrators can perform imports across all project levels. Microsoft Excel installation is required on your local machine to use the import feature.
Before You Begin
- Ensure that you don't include blank spaces for any of the multi-select list fields in the downloaded template. If you include blank space for any of these fields, Digital.ai Agility might prompt you with an incorrect warning message.
- Microsoft Excel installation is required to use the Microsoft Excel import process.
- To maintain data integrity, each import file is processed in a single transaction. We recommend limiting your import to 500 items per import file.
Download the Import Template
To ensure that your data is properly formatted, start with one of our import templates. These templates are pre-configured with the correct column names for the most commonly used attributes.
- Click the hamburger icon
 > Product > Import.
 - Click on the Download Basic Microsoft Excel Template or Download Advanced Microsoft Excel Template button, and select one of the following templates:
- Basic Microsoft Excel Template
- Advanced Microsoft Excel Template
- Save the file to your computer.
- The import file must be saved in a Microsoft Excel 97-2003 (or higher) workbook with the .xls file extension.
Populate the Import Template
Although the import templates include the default column structure and system names for many common assets and attributes, you can add data beyond what's available in the templates by following these specifications.
The import templates contain helpful comments in the column header fields. To see them, hover your mouse over any cell with a red comment indicator in the corner. The required fields are highlighted in red text.
Worksheets (or Tabs)
- Each worksheet in the workbook should correspond to a separate asset.
- Worksheets are processed in alphabetical order by worksheet name.
- You can reference assets in other worksheets in the same file. For example, to create a project and backlog items within the project, add the project in the first worksheet, and then add the backlog items in the project in the second worksheet.
Add Multiple Values for an Attribute
To enter multiple values (e.g., multiple owners) in a cell, insert a duplicate column with the same title. To add two owners to a task, for example, add a second column called "Owners" to the "Task" worksheet in the template.
Add Owners
Use any of these attributes to specify an owner or owners for work items. Enter one value per column. Values are matched according to the hierarchy below:
- Name
- Short Name
- Username
Add Fields Not in the Template
You can add fields that aren't in the template by adding a new column for each field you want to add. The column title should be the same as the system name for the field. You can run a meta query to discover the system name for a field or ask your system administrator to do so.
Add Custom Fields
You can also add custom fields to the template by adding a new column for each field you want to add. Ask your system administrator to look up the corresponding Digital.ai Agility system name for each custom field you'd like to add. The column name should be the same as the system name for the custom field. You can also run a meta query to discover the system name for a custom field.
Add Checkbox Values
Enter "TRUE" for checked or "FALSE" for not checked as the value.
Delete Columns
To remove the columns you don't want to import, simply delete them from the worksheet. You can also leave empty columns in the worksheet with no adverse effects.
Import Your Data
- Click the hamburger icon > Product > Import.
- Click the Upload A Completed Microsoft Excel Template File button.
- Click Choose File to select your import file.
- Click the Import button.
- The data is validated to ensure that the import file doesn't contain errors. If so, you'll be prompted to fix the errors and retry the import.
- If the import was successful, navigate to your backlog to review and fill in any missing information.
Import Status When Team Process is in Place
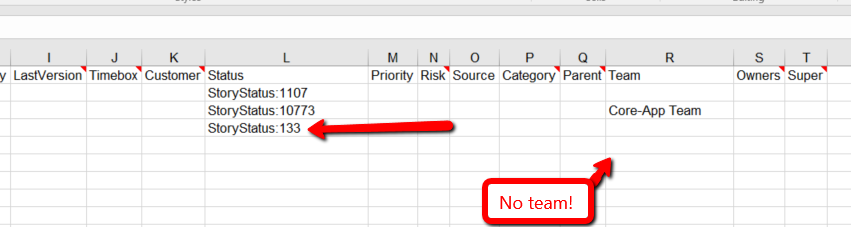
When you have the Team Process set up for certain teams, importing status values can be tricky. If you don't assign a team during the import, you may receive an error stating "Multiple StoryStatus assets matching provided name." The easiest way around this issue is to use the status' OID (object ID) to import the status.
Find Status OIDs
First, you need to see all of your statuses for stories or defects. This query shows you all the statuses in the system for these asset types. It also shows what team they belong to if they're part of the Team Process.
https://<digital.aiagilitydomain>/<instance name>/rest-1.v1/Data/StoryStatus
Example output:
<Asset href="/Demo_DonnieNix/rest-1.v1/Data/StoryStatus/2303" id="StoryStatus:2303">
  <Attribute name="AssetType">StoryStatus</Attribute>
  <Relation name="Team"/>
  <Attribute name="Name">Reporting</Attribute>
  <Attribute name="Team.Name"/>
</Asset>

<Asset href="/Demo_DonnieNix/rest-1.v1/Data/StoryStatus/10767" id="StoryStatus:10767">
  <Attribute name="AssetType">StoryStatus</Attribute>
  <Relation name="Team">
    <Asset href="/Demo_DonnieNix/rest-1.v1/Data/Team/1116" idref="Team:1116"/>
  </Relation>
  <Attribute name="Name">Future</Attribute>
  <Attribute name="Team.Name">Core-App Team</Attribute>
</Asset>
The first status is ID 2303, which is the Reporting status for the base status value set. You can tell this because it doesn't belong to a team (Team.Name is blank).
The second status is 10767, which is the Future status for the Team "Core-App Team".
Use Status OIDs in Import
What you need is the ID that shows in the Asset href line:
<Asset href="/<instancename>/rest-1.v1/Data/StoryStatus/10767" id="StoryStatus:10767">
So, you now have "StoryStatus:10767" which is the Future status in the Core-App team. If you plug that into the Status column in the import sheet, and add "Core-App Team" to the Team column, you can then import stories with that status.
If you're not adding a team to the imported story but still need the Future status, you can run this query:
https://<digital.aiagilitydomain>/<instance name>/rest-1.v1/Data/StoryStatus?where=Name="Future";Team.Name=""
This gives you the ID for the base Future status (not team-specific). You can then use that value in the Status column.
Quick Reference Query
You can run this query before each import to make sure you're adding the correct status for the team names assigned to your imported stories:
https://<digital.aiagilitydomain>/<instance name>/rest-1.v1/Data/StoryStatus?sel=Name,Team.Name
This shows only the ID, status value name, and team name for easy reference.
Troubleshooting
Why does my import fail with "Multiple StoryStatus assets matching provided name" error?
This occurs when you have Team Process configured with team-specific status values. Use the status OID (object ID) instead of the status name in your import file. Run the query https://<domain>/<instance>/rest-1.v1/Data/StoryStatus?sel=Name,Team.Name to find the correct status OID for each team.
Why does my import show errors about missing required fields?
Verify that all required fields (highlighted in red in the template) are populated: AssetType, Name (Title), and Scope (Project). Check the import template column headers for red text indicating required fields. Ensure no required fields are blank in your data.
Why are some fields not importing even though I filled them in the template?
Column titles must exactly match the Digital.ai Agility system names. Run a meta query (meta.v1 API endpoint) to verify correct system names for fields. Check for typos or extra spaces in column headers. Custom fields require the exact system name provided by your administrator.
Why did my import fail with an error about multi-select list fields?
Ensure you don't include blank spaces for multi-select list fields. If you need to add multiple values (e.g., multiple owners), create duplicate columns with the same title instead of separating values with spaces or commas. Each column should contain a single value.